Modifying Plastic Loco Bodies?

RobertInOntario

Active Member
Mar 22, 2006
1,384
0
36
Toronto, Ontario, Canada
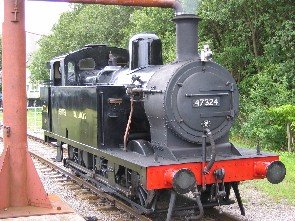
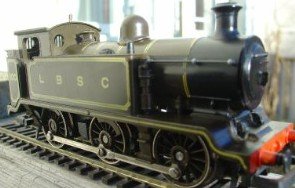
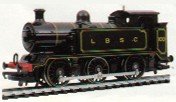
I have a small British 0-6-0 whose paint scheme I'm thinking of changing. It's actually a London Brighton & South Coast Railway loco and I want to make it a Somerset & Dorset Joint Railway engine. So I need to do more than change its livery -- I also need to revise a few small details of its features.

It's an old Hornby loco so I'm not too worried if this conversion goes badly. I need to reshape a few of the loco's details. Is there a way to do this, i.e. is there something that an LHS or a hardware store would sell? I'm wondering if there is some kind of putty or plastic that could be placed onto the loco and reshaped. Once it's dry, then hopefully I could repaint it along with the rest of the loco.

I need to change the shape of the coal bunker, for example, and also a few details around the wheels.

Thanks in advance for any suggestions or advice!

Rob
 

doctorwayne

Active Member
Sep 6, 2005
3,516
0
36
Canada, eh?
It would help if you could post a couple of pictures, Rob, maybe one of the model you have and another of the prototype that you want to have. I've never had much luck with putty or other fillers, so, depending on what needs to be done, I'd use styrene sheet or strips, as appropriate, then file to shape. You can buy domes and other steam loco accessories, but most are for North American prototypes, and may not be suitable for your loco.

Wayne
 

60103

Pooh Bah
Mar 25, 2002
4,754
0
36
Brampton, Ontario, Canada
Visit site
Rob: Model Railway Imports is coming back on line. The new owner was at the meeting yesterday; he says that he has inventoried the RTR but not all the fiddly bits yet.
I don't usually modify anything that drastically. Which loco do you want? It might be better to start with an LMS Jinty.
 

RobertInOntario

Active Member
Mar 22, 2006
1,384
0
36
Toronto, Ontario, Canada
doctorwayne said:
It would help if you could post a couple of pictures, Rob, maybe one of the model you have and another of the prototype that you want to have. I've never had much luck with putty or other fillers, so, depending on what needs to be done, I'd use styrene sheet or strips, as appropriate, then file to shape. You can buy domes and other steam loco accessories, but most are for North American prototypes, and may not be suitable for your loco.
Wayne

Thanks, Wayne. I'll try to post some pics in due course. I may try using styrene sheets or strips then. Some of the N. American domes, etc., might work OK. Take care, Rob
 

RobertInOntario

Active Member
Mar 22, 2006
1,384
0
36
Toronto, Ontario, Canada
60103 said:
Rob: Model Railway Imports is coming back on line. The new owner was at the meeting yesterday; he says that he has inventoried the RTR but not all the fiddly bits yet.
I don't usually modify anything that drastically. Which loco do you want? It might be better to start with an LMS Jinty.

Thanks again, David! Keep me posted about Model Railway Imports then, as that shop/retailer may be quite helpful for these projects.

I won't modify this loco too much. It's currently a LBSCR jinty, an E2 (that Thomas is based on!). I was comparing it to pics of the S&DJR jinties and overall the two jinty types are quite similar. But I noticed that the S&DJR jinties' coal bunkers have a curve at the top of their coal bunkers (whereas the LBSCR ones are straight). Also, the two front wheels of S&D jinties have a curved area over them -- like fenders on cars -- whereas the the LBSCR jinties don't. There are a few other small differences as well.

Anyway, I thought that this would be a "fun" project -- to convert a loco of a different livery to make it fit in with my main S&D project. FYI, I recently found or rediscovered several locos that belonged to my Dad (who passed away in 1999), and this loco was one of them. Otherwise, I could simply spray paint this loco black and apply British Railway decals to it -- then it would pretty much pass for an S&D jinty.

You're probably right in that I simply need an LMS jinty. I think I'm essentially trying to convert a LBSCR jinty into an LMS one.

Rob
 

nkp174

Active Member
Oct 10, 2006
1,455
0
36
41
Cincinnati, O.
If you're looking for a filler, try JB Weld. I used it to replace the nasty hole left in the smokebox of my athearn 2-8-2 when I updated it with a Pyle headlight.
 

RobertInOntario

Active Member
Mar 22, 2006
1,384
0
36
Toronto, Ontario, Canada
"Before & After" Photos now uploaded

doctorwayne said:
It would help if you could post a couple of pictures, Rob, maybe one of the model you have and another of the prototype that you want to have. I've never had much luck with putty or other fillers, so, depending on what needs to be done, I'd use styrene sheet or strips, as appropriate, then file to shape. You can buy domes and other steam loco accessories, but most are for North American prototypes, and may not be suitable for your loco.
Wayne

Wayne:

Here are two pics showing (#1) the LBSC brown loco model that I currently have and (#2) the British Railways loco that I'd like to "convert" it into.

Pic 1 shows the model of the LBSC loco, whereas #2 shows the loco type & livery into which I'd like to convert it. This is a photo of the real thing in England that my family & I rode on in 2005.

These pics should give you an idea of the detail differences that I would need to change. They're not the greatest pics but hopefully will help.

Thanks again! Rob

View attachment 34258
 

Attachments

  • LMS_Jinty.jpg
    LMS_Jinty.jpg
    34.5 KB · Views: 331
  • LBSC_Jinty.JPG
    LBSC_Jinty.JPG
    18.6 KB · Views: 331
  • LBSC#1.jpg
    LBSC#1.jpg
    7.7 KB · Views: 330

doctorwayne

Active Member
Sep 6, 2005
3,516
0
36
Canada, eh?
Hmm. I'm familiar with neither the model nor the prototype, but the obvious changes are:
-you need to lengthen the stack (chimney)
-you need a taller dome
-it looks like the front of the water tank needs to be extended towards the front, encompassing the area where the air pump is on your model
-the window arrangement on the front of the cab needs to be changed
-the frame of the model needs to be lowered, and of course, the bottom of the water tank will need to be extended down. This will put the upper part of the drivers above the frame, allowing you to build the splash plates over top of them.

You might be able to find a replacement stack, although you might have to build the flange around the top.
I don't recall seeing a dome like that, but if you can find some large-diameter styrene rod, you could chuck it in an electric drill, and with it running at low speed, turn the proper shape, using files.
Lowering the frame will depend on how the model is assembled, so I can't offer much in the way of suggestions. A new one could be built up from strip and sheet styrene, which would also work for extending the water tanks both forward and downward.
The easiest way to change the cab window arrangement is to draw it on a sheet of .020" styrene, cut out the windows, then lay it over the front of the original cab. Use a pencil to trace the new openings onto the face of the old cab, then cut out these areas with an X-Acto knife, making them a bit bigger all around than the openings in the new cab front. When that's done, simply cement the new front over the old one. I used this technique to build an all-weather cab on this former Santa Fe Northern, from Bachmann.
100_5554.jpg


If you get the frame lowered, you will be able to make those splash guards for the front drivers. Scribe a circle, a bit larger in diameter than the overall dimension of the driver, onto a piece of .030" sheet styrene, and cut out two suitably-sized segments, one for each driver. Cut the curved top piece from .010" styrene (this will probably be a cut-and-fit effort), then roll it around the handle of your X-Acto knife, to pre-curve it. The thickness of the side pieces will give you lots of area to make a good bond, using a suitable styrene cement, and when it has fully cured, you can smooth the corners with files and sandpaper.
If lowering the frame is not possible due to the method of construction or assembly, you could get away with just doing the chimney and dome, and maybe the cab-front. Paint and lettering should make it look convincing enough.

Wayne
 

RobertInOntario

Active Member
Mar 22, 2006
1,384
0
36
Toronto, Ontario, Canada
Thanks for your note, Wayne! I'll study this as I contemplate my project.

Based on your notes, do you think this is a realistic project or is it too complicated? In other words, would you consider this to be a straight-forward or advanced job?

Thanks again, Rob
 

doctorwayne

Active Member
Sep 6, 2005
3,516
0
36
Canada, eh?
I think that the difficulty will be determined by how the loco is constructed, and whether or not it will be feasible to alter the frame. The other changes should pose few problems.
I never notice before, but where the heck are the cylinders? :confused: Between the frames, perhaps, with a cranked axle?

Wayne
 

60103

Pooh Bah
Mar 25, 2002
4,754
0
36
Brampton, Ontario, Canada
Visit site
Robert: considering that the LMS 3F tabk was a very common model (from Tri-Ang and then Hornby), I hope you really enjoy plastic surgery and sculpture.
A quick check showed that a model of 47281/47294 in BR black can be had for GBP32/34.
 

RobertInOntario

Active Member
Mar 22, 2006
1,384
0
36
Toronto, Ontario, Canada
doctorwayne said:
I think that the difficulty will be determined by how the loco is constructed, and whether or not it will be feasible to alter the frame. The other changes should pose few problems.
I never notice before, but where the heck are the cylinders? :confused: Between the frames, perhaps, with a cranked axle?

Wayne

Thanks, Wayne. I'll think further about this since I probably won't be able to get to it for a few days anyway. As 60103 says, it might be simpler just to buy a new loco! I'm trying expand my locos that would have run on the Somerset & Dorset line by "recycling" some of my eclectic collection. Cheers, Rob
 

RobertInOntario

Active Member
Mar 22, 2006
1,384
0
36
Toronto, Ontario, Canada
60103 said:
Robert: considering that the LMS 3F tabk was a very common model (from Tri-Ang and then Hornby), I hope you really enjoy plastic surgery and sculpture.
A quick check showed that a model of 47281/47294 in BR black can be had for GBP32/34.

Yeah, you might be right. My Dad sure had eclectic tastes! and I guess I'm trying hard to make everything fit into the S&D. It still might be a creative project ... and the loco is so old and not valuable so I could take the risk of something going wrong.

BTW, Do you know where the cylinders would be for such a loco, as per Wayne's request?

Rob
 

RobertInOntario

Active Member
Mar 22, 2006
1,384
0
36
Toronto, Ontario, Canada
doctorwayne said:
I think that the difficulty will be determined by how the loco is constructed, and whether or not it will be feasible to alter the frame. The other changes should pose few problems.
I never notice before, but where the heck are the cylinders? :confused: Between the frames, perhaps, with a cranked axle?
Wayne

Wayne: I don't know where the cylinders are but I'm sue 60103 does! I just asked him. Thanks again for your feedback. Rob
 

60103

Pooh Bah
Mar 25, 2002
4,754
0
36
Brampton, Ontario, Canada
Visit site
Yes. Due to tight clearances at platforms and things, most of the cylinders were inside. On some locos you can see the cylinder ends below the boiler front. They drove on crank axles and the valve gear operated off the same axles (but 2 different cranks as they had to be at right angles...) I will admit I'm not sure, but I suspect it was always the front axle.
It wasn't just the small locos -- as large as 4-6-0 can bee seen with just the side rods.
even closer to universal (until the 1920s) was inside valve gear. You can spot this by the (visible) presence of only main and side rods.
 

RobertInOntario

Active Member
Mar 22, 2006
1,384
0
36
Toronto, Ontario, Canada
60103 said:
Yes. Due to tight clearances at platforms and things, most of the cylinders were inside. On some locos you can see the cylinder ends below the boiler front. They drove on crank axles and the valve gear operated off the same axles (but 2 different cranks as they had to be at right angles...) I will admit I'm not sure, but I suspect it was always the front axle.
It wasn't just the small locos -- as large as 4-6-0 can bee seen with just the side rods.
even closer to universal (until the 1920s) was inside valve gear. You can spot this by the (visible) presence of only main and side rods.

Thanks, David! Rob
 

doctorwayne

Active Member
Sep 6, 2005
3,516
0
36
Canada, eh?
60103 said:
Yes. Due to tight clearances at platforms and things, most of the cylinders were inside. On some locos you can see the cylinder ends below the boiler front. They drove on crank axles and the valve gear operated off the same axles (but 2 different cranks as they had to be at right angles...) I will admit I'm not sure, but I suspect it was always the front axle.
It wasn't just the small locos -- as large as 4-6-0 can bee seen with just the side rods.
even closer to universal (until the 1920s) was inside valve gear. You can spot this by the (visible) presence of only main and side rods.

Thanks for the info, David. I too would suspect that the front axle would be the cranked one, as I believe was the case with three cylinder locomotives in North America.

Wayne
 

RobertInOntario

Active Member
Mar 22, 2006
1,384
0
36
Toronto, Ontario, Canada
Well, after much contemplation, I think I'm going to give this project a shot. If it goes badly, I've only ruined a 27-year-old loco. But if it goes well, I will have learned some modelling/sculpting skills as well as painting skills. I'll keep you posted or upload new pics. Rob