Model Of The Week: Kit Build Goodyear F2G-1 Super Corsair

Willja67

Member
Feb 12, 2005
154
6
16
44
Grantsville,Utah
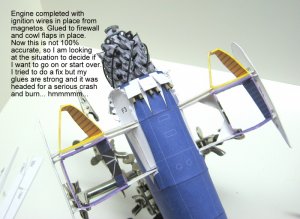
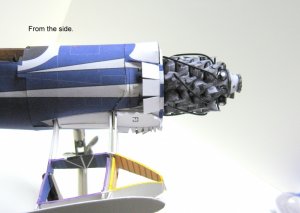
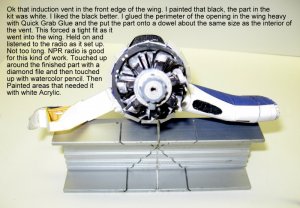
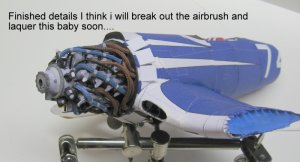
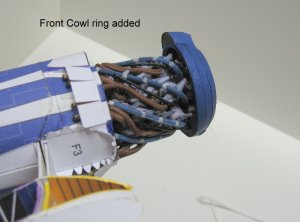
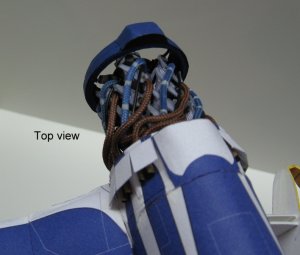
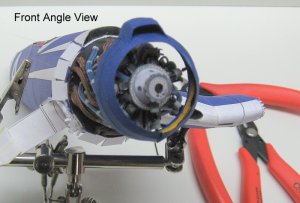
Looking good so far except for one thing that's going to be a bit of a problem. Part F9 is glued to the inside of the cowl at the forward edge of the cowl flaps(see attached).

With your plans to display the engine at least partially uncovered you may want to consider total removal of F9. It's main purpose was to ensure the exhaust stacks stuck out the cowl flaps the appropriate distance. A secondary purpose was as a former for the aft end of the cowl but I think it could be removed without too much problem.

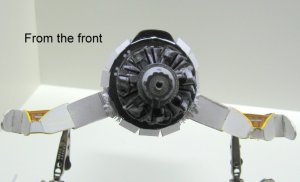
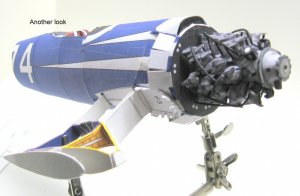
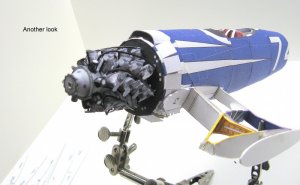
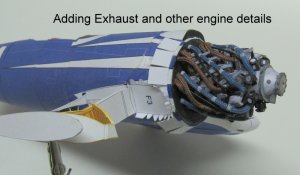
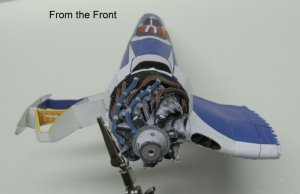
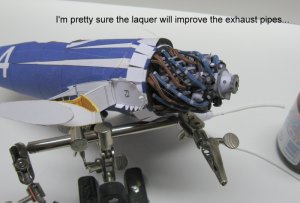
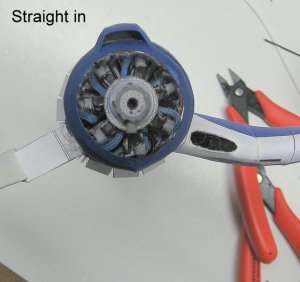
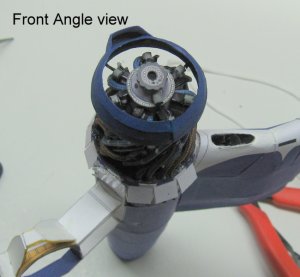
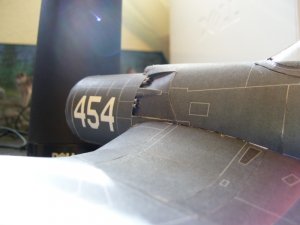
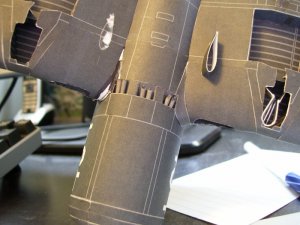
Lately during my rework of the kit I have come to the conclusion that the bottom 6 stacks are about 1/8" too long. The last 2 attached pictures show how much the stacks stick out of the cowl. The pic showing the bottom shows how much I have trimmed the stacks the left 2 stacks being original length.
 

Attachments

  • F9 location.jpg
    F9 location.jpg
    34.4 KB · Views: 13
  • 100_0231.jpg
    100_0231.jpg
    102.2 KB · Views: 14
  • 100_0232.jpg
    100_0232.jpg
    160.9 KB · Views: 17

Willja67

Member
Feb 12, 2005
154
6
16
44
Grantsville,Utah
Heads Up

I would have just edited the previous post but that might get missed. I remembered that F9 is where the engine mounts, so you will either have to remove part of it that would be exposed with a cowl panel removed or extend the engine block the length of the cowl flaps so it can mount on the front of the former F9 is currently glued to. Sorry for not catching that sooner.
 

mldixon

Member
May 30, 2006
66
0
16
Problem

Thanks Will, I see your point and have already come up with a solution stay tuned to the rest of build and I will show as I go.
 

mldixon

Member
May 30, 2006
66
0
16
Engine or Corncob

They refered to this as the corncob. Obvious why...
I did this in less than 3 hours total time so buy the kit and get yourself a
great looking detailed model for your collection. If anyone is interested I will do a detailed thread on this so you can see how it can happen in quick time.
I am going to pipe in the exhaust to the firewall so that should be fun.

Will the designer pointed out a problem to me in the previous post. So I am going to address that. All the parts for what you see are included in this kit but with that being said...

I am modifying the build at this point. So this will be a major enhancement. I am doing this because I want to see the engine and all the intersting stuff that goes on in there. Models are a personal statement of your likes and dislikes, no two will ever be the same. Each kit comes ready for you to build but it also provides a starting point for tons of details. So enjoy and build this baby anyway that suits your skill levels or likes.

One more comment, the details on a engine like this will overwhelm you if you spend too much time on each part. Don't kill yourself by looking too hard at each piece you put in, just keep going forward. As you go forward it will all come together. Sure some parts look better than others. Just put your best side out for view. I hate building more than once. So I spend small efforts on the fix and by the time all the detail is added the area that was bugging you is gone.

Go for the bigger picture. But do your very best at all times.
 

Attachments

  • IMG_0125.jpg
    IMG_0125.jpg
    140 KB · Views: 16
  • IMG_0122.jpg
    IMG_0122.jpg
    81 KB · Views: 12
  • IMG_0127.jpg
    IMG_0127.jpg
    84.1 KB · Views: 20
  • IMG_0126.jpg
    IMG_0126.jpg
    101.1 KB · Views: 10
  • IMG_0128.jpg
    IMG_0128.jpg
    99.4 KB · Views: 10
  • IMG_0130.jpg
    IMG_0130.jpg
    102.4 KB · Views: 15

Willja67

Member
Feb 12, 2005
154
6
16
44
Grantsville,Utah
3 hours of work? You are one Speedy Gonzalez while at the same time making it look good. You are also the first individual I am aware of who built all 28 cylinders.
 

mldixon

Member
May 30, 2006
66
0
16
Gluing wire

The wire is 18 gauge bell wire so it has a plastic jacket. Red, yellow, black, green. Any other color you have to paint with acyrlic after it is formed. I just take the wire and form it to the shape by eye and trial and error fit. When it is in the right shape I grab it with tweezers and put on a spot of gel super glue. If I have one that does not want to go into place and stay, I zap the super glue with Zip, which sets it instantly. The real problem is handling it as all the details are being added. You just gotta be real careful. That is why I use that mulitarm stand to hold onto things. Keeps damage to a miniumum.
 

mldixon

Member
May 30, 2006
66
0
16
Engine mounted

Well the engine assembly is complete and mounted onto the firewall. I have detailed the ignition wires. They are not 100% accurate. I am working on a solution for the offset of the engine from the firewall. In the meantime I am moving forward.
 

Attachments

  • IMG_0001-1.jpg
    IMG_0001-1.jpg
    164 KB · Views: 17
  • IMG_0003-1.jpg
    IMG_0003-1.jpg
    90.1 KB · Views: 13
  • IMG_0005-1.jpg
    IMG_0005-1.jpg
    115.5 KB · Views: 12
  • IMG_0004-1.jpg
    IMG_0004-1.jpg
    131.9 KB · Views: 16
  • IMG_0006-3.jpg
    IMG_0006-3.jpg
    114.5 KB · Views: 14

mldixon

Member
May 30, 2006
66
0
16
First wing skin

Well I got on the first wing skin. Pics below tell story...
 

Attachments

  • IMG_0007-1.jpg
    IMG_0007-1.jpg
    173.3 KB · Views: 18
  • IMG_0008.jpg
    IMG_0008.jpg
    88.3 KB · Views: 12
  • IMG_0009-1.jpg
    IMG_0009-1.jpg
    112.4 KB · Views: 12
  • IMG_0010.jpg
    IMG_0010.jpg
    109.2 KB · Views: 11
  • IMG_0011-1.jpg
    IMG_0011-1.jpg
    168 KB · Views: 20

mldixon

Member
May 30, 2006
66
0
16
Adding engine exhaust

Thanks Chris.

I am adding exhaust from the jugs to the firewall and other details that I am gleeing from photos, not sure what all this does. Not sure if it is 100% accurate. Sure that it pleases me when I look at it though. At this point you can see why I did not kill myself on too good a job on jug details, they get covered up.
Exhaust = mini blind cords, colored with paint, super glued at ends applied to model. Very flexible. Could have done this in copper wire, but that might have sent me over the edge. Hope you enjoy,
 

Attachments

  • IMG_0013-1.jpg
    IMG_0013-1.jpg
    108 KB · Views: 25
  • IMG_0014-1.jpg
    IMG_0014-1.jpg
    89 KB · Views: 14
  • IMG_0015-1.jpg
    IMG_0015-1.jpg
    129.6 KB · Views: 16

mldixon

Member
May 30, 2006
66
0
16
Engine Details

Well I finished the details, some small trivial things to add soon. I think I am going to break out the airbrush and put some type of sealer on this soon. I love the way the engine is starting to take on a life of it's own. Can you tell I love engines...
 

Attachments

  • IMG_0016-1.jpg
    IMG_0016-1.jpg
    105.4 KB · Views: 14
  • IMG_0017-1.jpg
    IMG_0017-1.jpg
    123 KB · Views: 11
  • IMG_0018-1.jpg
    IMG_0018-1.jpg
    110.2 KB · Views: 14
  • IMG_0019-1.jpg
    IMG_0019-1.jpg
    85.7 KB · Views: 11

mldixon

Member
May 30, 2006
66
0
16
Front Cowl ring added

I added the front cowl ring, this is not permanent yet. Too delicate so I will attach it at the end of the build.
 

Attachments

  • IMG_0023-1.jpg
    IMG_0023-1.jpg
    108.2 KB · Views: 19
  • IMG_0024-1.jpg
    IMG_0024-1.jpg
    98.9 KB · Views: 12
  • IMG_0027-1.jpg
    IMG_0027-1.jpg
    131.2 KB · Views: 12
  • IMG_0028-1.jpg
    IMG_0028-1.jpg
    96 KB · Views: 11
  • IMG_0032-1.jpg
    IMG_0032-1.jpg
    164.2 KB · Views: 14

mldixon

Member
May 30, 2006
66
0
16
Hoses

Thank God these aren't real ones they would be tough to install at this scale.
:mrgreen:
I am hoping the laquer coat will flatten this out a bit. I have examined the pictures and I am going for the flexiblity of this cord at the present. The wasp has lots of twists and turns. :thumb:
 

Bomarc

Member
Feb 11, 2004
152
0
16
oh yeah - I know that, I have just never seen a close up of a radiator hose on a corsair.

No one has Chris, because (just as a clarification) engines used on Corsairs are AIR cooled, no radiators required. Oil coolers, but no radiators. ;)

Mike
 

Bomarc

Member
Feb 11, 2004
152
0
16
I forgot to add the intercooler for the supercharger, a kind of radiator, but I'm really not sure of all the mods that post war racer Corsair ran with. Will would know more..... (OK, I'll stop being a so-in-so know-it-all now).

The engine does look pretty cool with all those "pipes" mldixon. I think it captures the "corn cob" look of a Wasp Major really well. Great use for a non traditional model building material (blind cords).

Mike