Layout progress

JKountz

New Member
Dec 31, 2005
32
0
6
56
Wild Wonderful WV
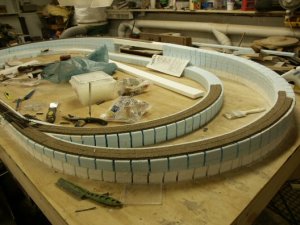
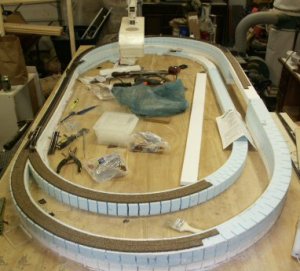
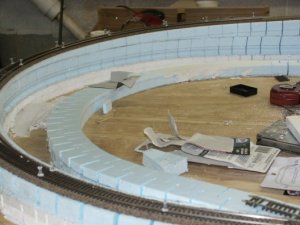
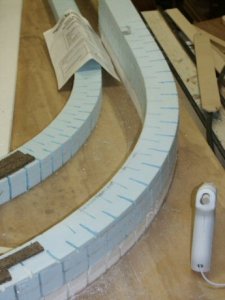
Hey everyone, here are some pics of my progress so far on the new layout. All risers and inclines I made myself gluing up layers of the blue foam then "resawing" them on the bandsaw, tapering them to the desired grade. The outer loop is all 4 percent while the inner loop is at 2. I rigged a hot wire cutter using a soldering iron I had and kerf cut the risers and inclines to form the curves. So far the whole thing is flat and true to radius and I saved boo koos of bucks making these things instead of purchasing them. I read alot of posts here about making risers with foam but let me tell you, if you have a bandsaw, this is the tool for the job. I made all the risers and inclines in one evening for the whole layout. Im laying in all my switches and cork bed today and hopefully I'll be ready for a short test run this evening. Seeing as how Im just getting back into this hobby after many years I would welcome suggestions for improvements or things I should be looking out for from the ones in the know here. I appreciate all the help Ive recieved so far and hope maybe someday I can in turn help someone else.

Thanks so much!

Jim
 

Attachments

  • SubTerrainWeb4.jpg
    SubTerrainWeb4.jpg
    61.6 KB · Views: 67
  • SubTerrainWeb3.jpg
    SubTerrainWeb3.jpg
    46.5 KB · Views: 77
  • SubTerrainWeb1.jpg
    SubTerrainWeb1.jpg
    49.3 KB · Views: 68
  • SubTerrainWeb2.jpg
    SubTerrainWeb2.jpg
    36.4 KB · Views: 78
L

lester perry

Looks good to me. But the 4% grade is a little steep. Hope you don't plan on long trains. How did you make the foam cutter?
Les
 

JKountz

New Member
Dec 31, 2005
32
0
6
56
Wild Wonderful WV
Thanks Les, I used 4 percent in order to get a higher area for the trestle thats going in. My layout is Civil War era and so no, long trains wont be an issue for me. In fact Ive only seen one or two pics in my research where the trains are longer than 4-5 cars altogether. Not saying they didnt pull more than that of course but it seems most of the time they were short. I guess! Anyway thanks again for the compliment!

Jim
 
N

nachoman

wow. Civil war era. I congratulate you. I don't have much experience with HO
4-4-0s, but the prototype would probably only be able to pull 4-5 cars up a grade that steep. Trains werent very long back then, and freight cars werent very big, either.

kevin
 

JKountz

New Member
Dec 31, 2005
32
0
6
56
Wild Wonderful WV
Kevin, you're right they wouldnt have pulled more than 4-5 cars. At least thats what my research shows. This has been a real challenge so far. Limited resources for HO 1860's rolling stock and the locos that are available look pretty much the same except paint. I havent even bought any structures or anything yet so thats probably challenge there too. But all in all its a lot of fun and gives me something to do in the shop other than build furniture and cabinets!

Jim
 
L

lester perry

You might want to check out MDC/Roundhouse for 1860 stuff. They were bought out by Horizon hobbies and their stuff is a little hard to find right now. Might try LHS

Les.
 

JKountz

New Member
Dec 31, 2005
32
0
6
56
Wild Wonderful WV
Les, sorry for not answering the part about the foam cutter, guess I looked over that part of your post. I made it much the same way as some others here I read about. I used a soldering gun fitted with a length of #14 solid wire. I made a loop out of the wire and used that to make all the kerf cuts for bending the risers around the turns. Worked great and was fast and easy. My gun is trigger operated and the bare copper wire cools down quickly after letting the trigger go so its a little safer than one that doesnt have the trigger.

Jim
 

Doc Holliday

Member
Oct 27, 2002
613
0
16
Big Valley, California
Looking real good Jim! :thumb: My hats off to you for making the inclines yourself. I tried and failed, but was using white beaded foam (the only kind I could find in my neck of the woods). I'm modeling the Old West, circa 1880 , am also using 4% grades and short trains due to a high trestle. I'll also bet your hot wire cutter looks something like this.
adc.jpg

Doc
 

JKountz

New Member
Dec 31, 2005
32
0
6
56
Wild Wonderful WV
Hey how did you get my wire cutter!!?? You're right mine look EXACTLY like that. LOL Same gun and all. Works great doesnt it? Id love to see pics of your progress especially the trestle, I started mine last night but not sure about the scale of wood I used. Might work out though.

Thanks Doc,

Jim
 

Doc Holliday

Member
Oct 27, 2002
613
0
16
Big Valley, California
Jim,
Click on my username in the post above. You'll get a drop down menu that has a link to my home page on Railimages.com. It has some pics of my layout. If you want more let me know and I'll see what I can do.
Doc
 

Dingo69

New Member
Jan 3, 2006
30
0
6
54
Question, why do you guys use foam and all the work to cut it to the right size, a lot of sample here (in switzerland) use light weight wood, with support and a small cork or a thin foam bed under the track.

Seems an easier solution as you then can adjust the height easier with a nail change.
 

Drew1125

Active Member
Jan 28, 2001
2,975
0
36
Great looking layout, Jim!

I didn't see whether you said what the dimensions were...Is it a 4x8?

Also, Are you going for some type of logging theme? I notice you have some pretty hefty grades...

Looks great though! Keep those pics coming!

:thumb: :cool: :cool: :thumb:
 

unclemole

New Member
Jan 16, 2006
5
0
1
39
looks really solid... never though of using a soldering gun to cut throught styrofoam... does it work well?
 

Doc Holliday

Member
Oct 27, 2002
613
0
16
Big Valley, California
unclemole said:
looks really solid... never though of using a soldering gun to cut throught styrofoam... does it work well?
Like a hot knife through, well, foam, err, butter.

Actually I think it works great. I can bend the wire to almost any shape, as long as it doesn't touch itself anywhere. I suppose that the larger diameter wire (as opposed to a store bought one) creates a little more fumes.
Doc
 

Doc Holliday

Member
Oct 27, 2002
613
0
16
Big Valley, California
UM,
I used a piece of regular #14 (maybe it was #12) regular copper wire used for residential construction. I unscrewed the fittings and took out the old soldering tip and replaced it with the piece of wire, having first inserted it through the fittings and bending over little tabs on the ends to keep it from falling out. Very simple.
Doc
 
L

lester perry

Dingo 69 I don't understand what you are describing. Can you help me out.

Les