

Kit Painting
- Thread starter OwenCPR
- Start date
You are using an out of date browser. It may not display this or other websites correctly.
You should upgrade or use an alternative browser.
You should upgrade or use an alternative browser.
OK. Ignore my lst posting. Figured out I should paint first. I would appreciate anyone who has assembled these kits (and I know there are lots of them out there) to recommend suitable colours?
Thanks
Thanks
Hi,
Im not familiar with that particular kit but if its a coal mine then
this is what I done....
I sprayed all of the walls "Polly Scale Roof Brown" and the roof
was sprayed "Tamiya Olive Green Acrylic"
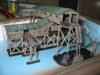
After it dried, I mixed 1:1 "Polly Scale Earth + Reefer White" and watered it down quite a bit. I then gave all of the walls a heavy coating of the watered down paint and set it aside to dry. While that was drying, I made up a 1:1 mix of "Tamiya Olive Green and White" and drybrushed the roof. I then made an even lighter mix of those two colours and done some more drybrushing on the roof. I have attached some photo's of my Coal Mine by "Model Power"... I havent quite finished it yet but its getting there....
Troy.
Im not familiar with that particular kit but if its a coal mine then
this is what I done....
I sprayed all of the walls "Polly Scale Roof Brown" and the roof
was sprayed "Tamiya Olive Green Acrylic"
After it dried, I mixed 1:1 "Polly Scale Earth + Reefer White" and watered it down quite a bit. I then gave all of the walls a heavy coating of the watered down paint and set it aside to dry. While that was drying, I made up a 1:1 mix of "Tamiya Olive Green and White" and drybrushed the roof. I then made an even lighter mix of those two colours and done some more drybrushing on the roof. I have attached some photo's of my Coal Mine by "Model Power"... I havent quite finished it yet but its getting there....
Troy.
Attachments
Hi Owen!
I've never really built that kit "out-of-the-box", but I have used pieces of it in other kitbashes...
http://www.the-gauge.com/forums/showthread.php?s=&threadid=2511&highlight=EVM+Maupin+Mfg
http://www.the-gauge.com/forums/showthread.php?s=&threadid=1581&highlight=Leigh+Foods
I just left the color as it was, but sprayed it with some Dullcote, & then dry-brushed with rust colored acrylics...
As far as when you paint it, it doesn't really matter, but I would want to paint it befire I put the windows in...
Owen: I usually end up painting before and after assembly.
If the colour separation matches the part separation e.g. windows, doors, I do it before assembly. Kepp paint of the glue points.
Large flat surfaces are done first e.g. walls, roofs. Also any fiddly bits that get mounted close to other things. Any surfaces that will be hard to do later -- end walls, interiors,
After assembly, touch up the joints and places where the glue took off the paint. Then add weathering and colours that have to be continuous over joints or around corners.
Troy.... I know that kit you posted pics of...
Here's my version of the same...
I used a combination of browns, tans and whites... brushed on... The roof is just indian ink drybrushed on ... The "coal" on the bottom was sprayed with chalkboard paint (my usual black)... I may have done an overspray of the same black, I can't remember now.

Here's my version of the same...
I used a combination of browns, tans and whites... brushed on... The roof is just indian ink drybrushed on ... The "coal" on the bottom was sprayed with chalkboard paint (my usual black)... I may have done an overspray of the same black, I can't remember now.
fifer
Active Member
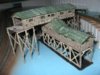
Hey Owen , This is n scale Glacier Gravel but the wall sections are the same .
I left it the colors it was and assembled unpainted , then used a thick wash of rust on the tin , followed by a thin wash of black , followed by a overall white brybursh. Then hand painted the concrete with polly S concrete and black washed.
Then I put in the weather steaking and sprayed polly S dust over whole thing from the top.
Hope this gives you some ideas.
Mike
Attachments
oh, that coal mine !!
The first time I saw that coal mine, was in a three part scratch building article by Jack Work, that started in October 1959, in Model Railroader. I built it in HO scale, out of Balsa, and about two years later,blew it up with a small fire cracker.
This was a kit in HO some years ago, and I'm happy to see it again in kit form.
The article ran october, November, and I believe either Dec.'59, or Jan '60. If you have access to MRs that old you might be interested in how it was built.
Pete

Charlie,
Hole in one!
I've also seen the previous one (I have a small version of it in kit from Faller awaiting construction).
I have two of the Walthers Kits but I want to have two separate mines located a short distance from each other (belong to the same company) instead of combining the two kits together and scratch building a "super mine"!
Thanks for all the tips guys. I've spraypainted the inside balck as I want to install lights in most of the buildings on the layout, and I've been told that even the small grain of rice bulbs can sometimes give the plastic "walls" a see-through effect if they are not painted black. I like the idea of leaving the colour and then giving it rust and black washes. But I also like the colour (albiet a bit more weathered) that Charlie posted from Walthers! All suggestions (and pics of similar projects to give me some more colour ideas) welcome!
Thanks