Keystone Shay NWSL upgrade

neilmunck

Member
Feb 18, 2004
180
0
16
41
Glasgow, UK
www.gmts.org.uk
Gear honing

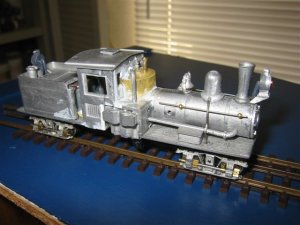
I have just used some Brasso to hone a brass-brass worm-gear set. I worked a treat (and the gears are all shiney!:D )

I assembled the gears, motor and etched gearbox. There was a bit of a sticky bit on the gear so I put some Brasso on with a piece of tissue. I turned the motor by hand to make sure it rotated without too much resistance. The I hooked it up to my power supply and ran it at the lowest speed that it ran smoothly at (about 2.5volts, it is a Mashima 1020).

After running it for about an hour (changing direction frequently) I put a rag under it and sloshed 3 in 1 oil over it to wash the brasso off.

I runs nicely now and hopefully will for a long time as the design of the kit is such that getting it all out when the chassis is finished will be a real pain.
 

camelot

Member
Jan 12, 2003
188
0
16
Perth Western Australia
Visit site
Some updated pictures of my Shay , i have added handrails , injector,exhaust,intake and sand pipes.Bell, roof vent, toolbox and headlights have also been added as well as the rear kadee coupler.

Handrails have been added to the cab and tender each side of the cab opening.

I have still to add the air pump on the other side ,steps,front coupler and the wistle on top of the steam dome

Here are 2 pictures one from the front...

9.jpg


the other from behind...

10.jpg


i have also been making up the U joints which involves drilling and glueing 4 pins to hold the U-joint castings to the universal rings , to give an idea of size , from end to end this piece is 5/8 " or 16mm long.

Four of these will connect the lineshafts from the wheels to the crankshaft in the motor mount...

8.jpg


Cheers

Ian
 

Jeff Law

New Member
Oops, you're best to cut off the square shafts from the u/joints before assembling them, as you need to drill holes in them for the line shafts.

BTW, I had nearly finished my second Shay, when I knocked it off the bench and broke the frame in half (where it was cut to take the transfer case). Oh!!!!!!!!!!!!!!

I'll rebuild it with a brass frame.
 

camelot

Member
Jan 12, 2003
188
0
16
Perth Western Australia
Visit site
ahhh , the penny has dropped , now i know how to connect the u-joints to the line and crank shafts !!!!

It may sound a little simple but i don't remember anything mentioned about it in the instructions.

Thankfully i only made two of the u-joints pieces so at least 2 of them will be easy , i might make the made-up ones for the lineshafts as those holes would be smaller.

Sorry to hear about your second shay , lucky you have the ability to remake one , i would be forced to expoxy it togeather, not sure how that would go ...

Can you solder it togeather ?

Ian
 

Jeff Law

New Member
I doubt that soldering would be any better than epoxy, so I'll use the remains of the frame to use as a master for a milled brass frame.

I have a Clisby Vertical Milling Machine (see http://www.clisby.com) so making it shouldn't be too difficult. I've already made a similar one for the Class B Climax I'm building (see http://www.datamasta.co.nz/hon30/b_and_o.htm and take the Climax B link).

I will also fit it with captive, sliding drive-shafts like the ones I've put on the Climax as shown in the above link.

Jeff
 

camelot

Member
Jan 12, 2003
188
0
16
Perth Western Australia
Visit site
Here is a finished picture of the shay with the driveshafts installed , all running well now but it took a lot of trial and error to get it that way...

000_2759.jpg


heres another picture from the underside , below the model you can see the replacement cardan shafts i made from a bit of brass tube and wire...


000_2763.jpg


cheers

Ian
 

kettlestack

Member
Jan 18, 2002
859
0
16
84
Scotland UK
Visit site
I salute you guys

As I'm not into conversion kits (without knowing exactly what's in the kit) I have only today read this thread right through.
My Keystone Shay was bought about 20 yrs ago and I remember at the time what a gem of a loco it is. At that time there were no insulated spoked wheels with gearteeth on the rims available so it was destined to be a static model for use in dioramas.
Seeing your working conversion and those of you who have taken up the challenge of motorising it has left me in awe! :cool: :cool:
To drill out and pin universal joints is something I doubt I would be able to do even on a G Scale shay! You deserve the highest admiration for your tenacity, innovativeness and overall skill in acheiving a working model from what was originally inteded to be a "display" model.

I salute you all.

The thread reads like a conversation over a cuppa coffee making me feel I was part of the conversation and has been very informative for me. Thanks for sharing :thumb: :thumb: :thumb:

Errol
 

camelot

Member
Jan 12, 2003
188
0
16
Perth Western Australia
Visit site
Thanks for your kind words Errol , i thank all those who that have given me help and ideas during the construction of the Shay Kit.This would be the most difficult kit i have made but is well worth the time.

Now my favourite part is here , the painting :D

here is a picture of the first airbrushing session...

000_2845.jpg


Cheers

Ian
 

camelot

Member
Jan 12, 2003
188
0
16
Perth Western Australia
Visit site
The Shay is 108mm end to end , not including buffer plates or couplers , mine has Kadee N°5 couplers and is 125mm overall.The Width is 25mm being the deck but the crankshaft universal joints stick out another 4mm on the driver side.

Hope this helps.

Update on my Shay progress , while running the shay with another loco the other day i noticed that it was the reverse polarity , so having heated up the soldering iron i swapped the pickup wires , forgot about swapping the globe pickups and blew my last 1.5v microbulb. :cry:

I have bought another globe and i am in the process on installing it , while i have been waiting i have been making and collecting some junk to go on the running boards , including a grease bucket , oil cans , spanners , wrenches etc and loads of chain.

Heres a picture of it as it stand with a tape measure for an idea of scale...
and awaiting decaling.

The bottom marks on the tape are in mm the top inches.

Cheers

Ian

000_2872.JPG
 

Jeff Law

New Member
Shay T-Boiler

Here is a picture of my second, partly-built Keystone/NWSL Shay. This one is being modified into a T-Bolier, to offer a bit of variety on my railroad.
It's nearly ready to be painted since I photographed it - the shaft drive is installed now.
 

Attachments

  • climax_1.jpg
    climax_1.jpg
    53.3 KB · Views: 168

camelot

Member
Jan 12, 2003
188
0
16
Perth Western Australia
Visit site
Hey Jeff , that looks great , is this the one that feel off the table and broke in 2 ?
If so how did you mend it , last time you said you might make a new one from Brass .

Would love to see some more pictures and how does it run ?

Cheers

Ian
 

Jeff Law

New Member
Yes, this is the 'broken' one, but before it broke! I've made the new frame from brass and re-assembled it to about the same stage as the photo.
I need to get it run-in before proceeding.
For your interest, here is a photo of my first Keystone/NWSL Shay (#1).
 

Attachments

  • Climax_2.jpg
    Climax_2.jpg
    25.2 KB · Views: 260