

Publisher: GPM
Subject: Junkers Ju 87D-3
Model Number: 213 (2/2004)
Author: Unknown
Year Issued: 2004
Format: A4 booklet
Source: GPM
My Cost: 5.50 USD
Scale: 1:33
Parts: 336 (confirmed)
Construction Style: Connecting strip
Upgrades: AeroGlass canopy and Gomix wheels
Prototype: Aircraft from 9/StG 77 (Stukageschwader 77), 1943-1944
Card models continue to improve by leaps and bounds as designers master ever better CAD and painting software. Looking through a stack of card models, one can discern clear boundaries where designers leveraged skill and technology to evolve the art form to the next level. GPM's most recent Stuka, now over two years old and chronologically close to such a boundary, unquestionably belongs to the latest generation of superbly engineered and painted kits.
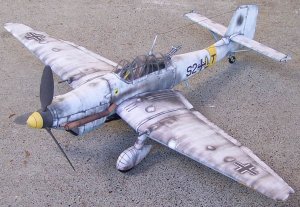
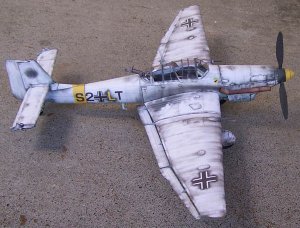
When compared to other models, GPM's Stuka immediately stands out because of the beautifully rendered and weathered winter whitewash camouflage. The light blue underside of the plane receives equal treatment with drop shadows highlighting panels and subtle weathering adding character.
The joy continues once construction begins. Every major component fits perfectly. In fact, the wings and fuselage join so well that the designer left out wing fairings. The wheel boots look excellent, a trait unique to this Stuka card model.
I only encountered 5 issues during construction, 3 of which relate to the AeroGlass canopy I used. First, when assembling the aft machine gun, I could not fit the gun to the ammo belts, themselves fitted to the ammo cans. Second, a gap developed under the rear most portion of the canopy. Third, the entire canopy fit poorly and I ultimately discarded most of it. Despite these issues, the completed canopy still looks good. A more accurately shaped canopy would eliminate these problems.
The fourth issue involves the bomb cradle. For some reason the designer includes schematics for the cradle arms, but not the arms themselves. You must form these two parts out of card, plastic, wire, or some other media. On my model I used card and painted them black.
Finally, In order to sell this model in Germany, the designer left off the swastikas that should appear on the tail. You need to make your own. As you can see from my model, I have yet to find acceptable substitutes.
One more note: when fitting the wheels inside the wheel boots, I rolled four narrow cylinders as axels. Though not strictly necessary, this added strength to the wheels and boots.
I highly recommend this model to everyone with moderate skill or better. Though excellently painted, it lacks the complication of many recent models. Hopefully GPM uses this model as the basis for a G-1 or G-2 variant.
Parts Breakdown
Cover: General information
Page 1: Construction diagrams (paper)
Page 2: 44 (card; fuselage, spinner)
Page 3: 56 (card; wing, tail, boot)
Page 4: 56 (card; wing, tail, boot)
Page 5: 114 (card; cockpit, prop, bomb) + 1 (wire)
Page 6: 56 (paper for cardboard; formers) + 3 (wire) + 6 (film)
Cover: Construction diagrams
Total Parts: 336
See this thread for tail insignia for this aircraft: http://www.cardmodels.net/forum/showthread.php?p=45919#post45919
You can find more pictures of this model at http://www.damraska.com/card_review.lasso?id=8SH17JA49SCF.
Subject: Junkers Ju 87D-3
Model Number: 213 (2/2004)
Author: Unknown
Year Issued: 2004
Format: A4 booklet
Source: GPM
My Cost: 5.50 USD
Scale: 1:33
Parts: 336 (confirmed)
Construction Style: Connecting strip
Upgrades: AeroGlass canopy and Gomix wheels
Prototype: Aircraft from 9/StG 77 (Stukageschwader 77), 1943-1944
Card models continue to improve by leaps and bounds as designers master ever better CAD and painting software. Looking through a stack of card models, one can discern clear boundaries where designers leveraged skill and technology to evolve the art form to the next level. GPM's most recent Stuka, now over two years old and chronologically close to such a boundary, unquestionably belongs to the latest generation of superbly engineered and painted kits.
When compared to other models, GPM's Stuka immediately stands out because of the beautifully rendered and weathered winter whitewash camouflage. The light blue underside of the plane receives equal treatment with drop shadows highlighting panels and subtle weathering adding character.
The joy continues once construction begins. Every major component fits perfectly. In fact, the wings and fuselage join so well that the designer left out wing fairings. The wheel boots look excellent, a trait unique to this Stuka card model.
I only encountered 5 issues during construction, 3 of which relate to the AeroGlass canopy I used. First, when assembling the aft machine gun, I could not fit the gun to the ammo belts, themselves fitted to the ammo cans. Second, a gap developed under the rear most portion of the canopy. Third, the entire canopy fit poorly and I ultimately discarded most of it. Despite these issues, the completed canopy still looks good. A more accurately shaped canopy would eliminate these problems.
The fourth issue involves the bomb cradle. For some reason the designer includes schematics for the cradle arms, but not the arms themselves. You must form these two parts out of card, plastic, wire, or some other media. On my model I used card and painted them black.
Finally, In order to sell this model in Germany, the designer left off the swastikas that should appear on the tail. You need to make your own. As you can see from my model, I have yet to find acceptable substitutes.
One more note: when fitting the wheels inside the wheel boots, I rolled four narrow cylinders as axels. Though not strictly necessary, this added strength to the wheels and boots.
I highly recommend this model to everyone with moderate skill or better. Though excellently painted, it lacks the complication of many recent models. Hopefully GPM uses this model as the basis for a G-1 or G-2 variant.
Parts Breakdown
Cover: General information
Page 1: Construction diagrams (paper)
Page 2: 44 (card; fuselage, spinner)
Page 3: 56 (card; wing, tail, boot)
Page 4: 56 (card; wing, tail, boot)
Page 5: 114 (card; cockpit, prop, bomb) + 1 (wire)
Page 6: 56 (paper for cardboard; formers) + 3 (wire) + 6 (film)
Cover: Construction diagrams
Total Parts: 336
See this thread for tail insignia for this aircraft: http://www.cardmodels.net/forum/showthread.php?p=45919#post45919
You can find more pictures of this model at http://www.damraska.com/card_review.lasso?id=8SH17JA49SCF.
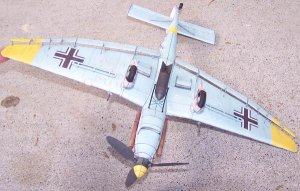
 What is used to connect the aelerons and such to the wings? hard to tell but it doesnt look like card Thin wire perhaps to allow adjusting as desired? Could be card though just cant tell.