

Hi everyone. I recently joined the forum and wanted to share my first project which is Jan Rükr's Terran Marine Cannon I got from his website. I only started building paper models a few months ago and I'm hooked. I've completed the gun muzzle and have started on the cooler. I'll post some pics of my progress shortly. Based on the quality of work I’ve seen here I have a lot to learn.
Jan Rükr Startcraft II Terran Marine Cannon
- Thread starter juntopi
- Start date
You are using an out of date browser. It may not display this or other websites correctly.
You should upgrade or use an alternative browser.
You should upgrade or use an alternative browser.
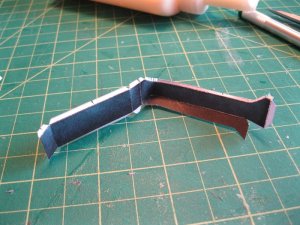
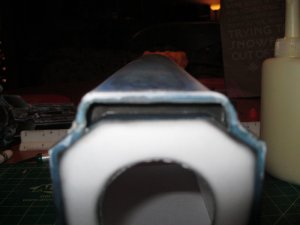
Gun Muzzle
Here's a picture of the completed gun muzzle. It's a little gimpy, however I'll cut myself a little slack since it's my first model. I got tripped up on some of the pieces as they need to be folded inside out. Oh well, onward and forward.
Here's a picture of the completed gun muzzle. It's a little gimpy, however I'll cut myself a little slack since it's my first model. I got tripped up on some of the pieces as they need to be folded inside out. Oh well, onward and forward.
Attachments

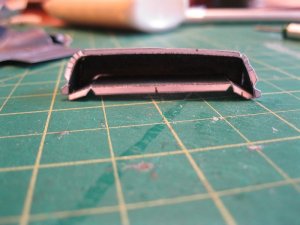
Cooler
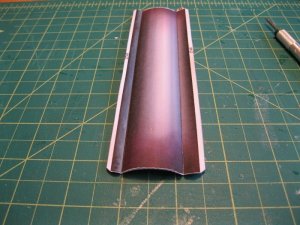
Here's some pictures of the cooler assembly. To get the curve on the piece in the first picture I rolled it over the handle of my knife.
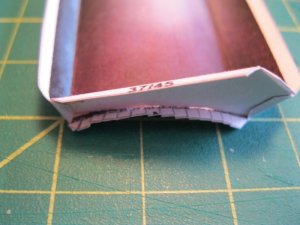
The piece in the third picture is supposed to be glued to the inside of the larger piece with its color side facing in according to the diagrams for the model.
Here's some pictures of the cooler assembly. To get the curve on the piece in the first picture I rolled it over the handle of my knife.
The piece in the third picture is supposed to be glued to the inside of the larger piece with its color side facing in according to the diagrams for the model.
Attachments

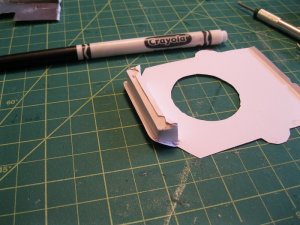
Forward Gun Body
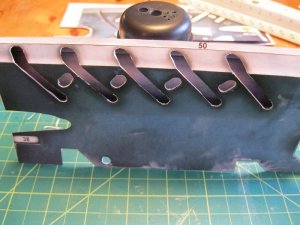
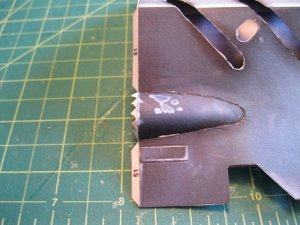
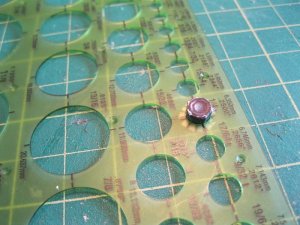
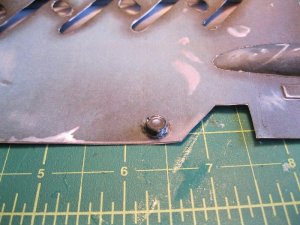
These are some pics of the forward gun body detail. In the second picture I used a circle stencil to try and get a better circular shape for some of the pieces. In the third picture you can see the pieces installed. I think tripped up again though and this piece should be folded inside out and internal to the larger part.
Lastly I'm using a Crayola black marker of my daughters to touch up the folded areas. It has a bit of a blue tint that makes it perfect for this model.
Attachments
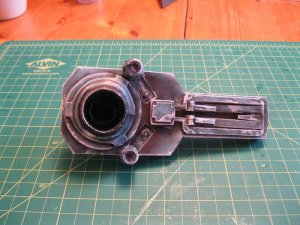
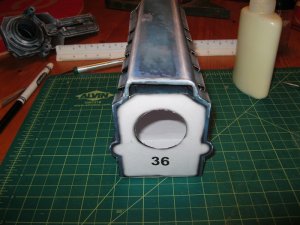
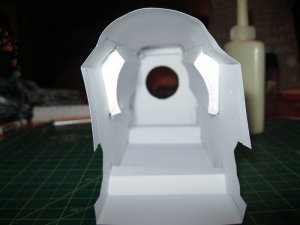
Forward Gun Body Complete
Here are some last pictures of the completed forward gun body. I'll have another update in the next few days.
Here are some last pictures of the completed forward gun body. I'll have another update in the next few days.
Attachments
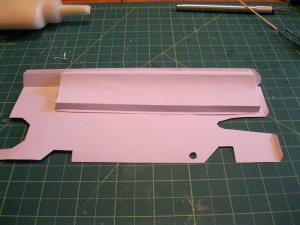
Forward Profile
Here are some more progress pics. This part is called the front profile and fits underneath the cooler assembly. I'm working on the middle part of the gun body now and will have some more pics in a bit.
BTW if you are looking for the plans you can find them at http://aliens.humlak.cz/ in the extras section of his site.
Attachments

Top Gun Body
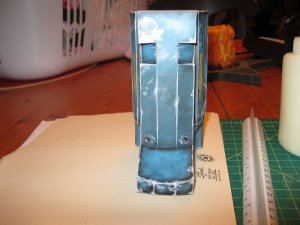
Here are some more pics of the gun body. This segment is the largest piece in the model and I've been struggling as to how to best approach the order of assembly. I decided to simply go from front to back however I think this was a mistake as I explain here.
I continued by putting together a top section of the body:


It looks OK except that the seam shows up a little too much. The problem came when I attached this to the cooler section with a few
side pieces.

The curve of this top piece doesn't completely match the curve of the top of the cooler. There is a big gap where the two parts meet and I'm not sure how I'm going to fix that without taking it off and starting over. In hindsight I think I should have built up the gun body in three segments; top, sides, and bottom and this is how I'm going to proceed going forward. For now I'm going to set this piece aside, pretend it didn't happen, and hope it fixes itself.
Here are some more pics of the gun body. This segment is the largest piece in the model and I've been struggling as to how to best approach the order of assembly. I decided to simply go from front to back however I think this was a mistake as I explain here.
I continued by putting together a top section of the body:
It looks OK except that the seam shows up a little too much. The problem came when I attached this to the cooler section with a few
side pieces.
The curve of this top piece doesn't completely match the curve of the top of the cooler. There is a big gap where the two parts meet and I'm not sure how I'm going to fix that without taking it off and starting over. In hindsight I think I should have built up the gun body in three segments; top, sides, and bottom and this is how I'm going to proceed going forward. For now I'm going to set this piece aside, pretend it didn't happen, and hope it fixes itself.
Lower Gun Body
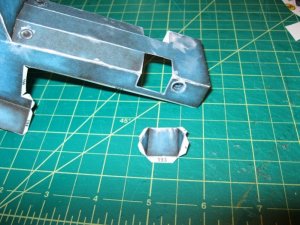
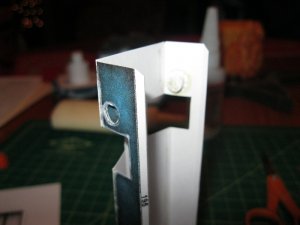
Moving on. Here are some more progress pics of the lower section of the gun body. I've included a reference picture from the instructions file for the model.


I like the detail in this little piece. I'm getting a little bit better at cutting out the circular parts.


And here is how it all looks put together.

Moving on. Here are some more progress pics of the lower section of the gun body. I've included a reference picture from the instructions file for the model.
I like the detail in this little piece. I'm getting a little bit better at cutting out the circular parts.
And here is how it all looks put together.


Great build on this one. Picking this one for your first model is an undertaking. If you can build Jan's models, you can build any model out there. Jan is known for his intricate models and folding patterns. There are many of his models built out there but few tutorials on how it was accomplished. thanks for your build sequence. One thing about the size of this model. is that I would use 110 weight paper. I would also laminate key areas and make/scratch build formers or bulkheads for added strength. As you build more, you will know what I mean. Enjoy and see you around the forums.
Magazine
Thanks for the post Silver, I appreciate it. I know now what you mean about formers, i just wish I had thought of this earlier. Some of the pieces that make up the detail of the rear, top gun body do this to a certain extent but I'm adding some modification to hopefully make it easier to assemble and provide some extra strength.
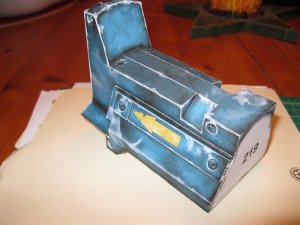
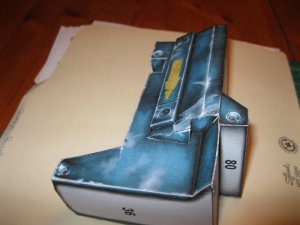
For now here are a few pictures of the magazine. This assembly is comprised of three pieces which in turn need to be glued together. The largest piece is pretty straight forward. There are a couple of curved parts however they are easy enough to cut, fold, and put in place.


The middle piece is also straight forward. Take the time to round the small section. This is important for both the side of the piece as well as fitting it to the top section.

And here the middle piece is attached to the top.

Thanks for the post Silver, I appreciate it. I know now what you mean about formers, i just wish I had thought of this earlier. Some of the pieces that make up the detail of the rear, top gun body do this to a certain extent but I'm adding some modification to hopefully make it easier to assemble and provide some extra strength.
For now here are a few pictures of the magazine. This assembly is comprised of three pieces which in turn need to be glued together. The largest piece is pretty straight forward. There are a couple of curved parts however they are easy enough to cut, fold, and put in place.
The middle piece is also straight forward. Take the time to round the small section. This is important for both the side of the piece as well as fitting it to the top section.
And here the middle piece is attached to the top.


Trigger
The trigger is printed on one of the same sheets that contains pieces for the magazine. Since I had it printed out I went ahead and assembled it even though it is being made out of order. The red of this really pops compared to the blue textures that are present up to this point.

This is the final assembled piece.

P.S. Jan if you read this, thank you for making the circular cutouts on the trigger the exact same size as my hole punch!
The trigger is printed on one of the same sheets that contains pieces for the magazine. Since I had it printed out I went ahead and assembled it even though it is being made out of order. The red of this really pops compared to the blue textures that are present up to this point.
This is the final assembled piece.
P.S. Jan if you read this, thank you for making the circular cutouts on the trigger the exact same size as my hole punch!
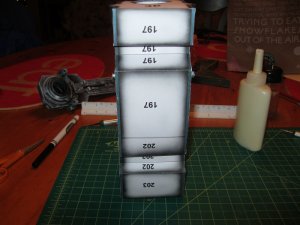
Breech
This is the side of the rear gun body and contains the breech.

The breech itself consists of five pieces that are glued together back to back. The end result gives some nice detail and depth to the assembly. The name of the game here is straight cuts and gluing all the way to the edge. Depending on the glue used you'll want to make sure to have some weight on the assembly as it cures otherwise you'll end up with a warped piece like me.

Here it is with all the pieces assembled.

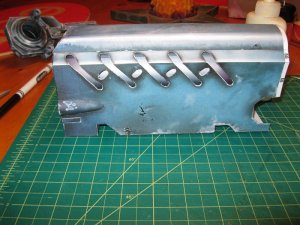
And lastly the whole side piece. I touched this up with a black and blue marker and as you can see it got away from me in a few places. I need to decide if it's worth printing, cutting, and folding the breech and inside circular pieces again vs. leaving it as is. I can hear the perfectionists on the list groaning as they read this. I’ll let you know.

This is the side of the rear gun body and contains the breech.
The breech itself consists of five pieces that are glued together back to back. The end result gives some nice detail and depth to the assembly. The name of the game here is straight cuts and gluing all the way to the edge. Depending on the glue used you'll want to make sure to have some weight on the assembly as it cures otherwise you'll end up with a warped piece like me.
Here it is with all the pieces assembled.
And lastly the whole side piece. I touched this up with a black and blue marker and as you can see it got away from me in a few places. I need to decide if it's worth printing, cutting, and folding the breech and inside circular pieces again vs. leaving it as is. I can hear the perfectionists on the list groaning as they read this. I’ll let you know.
Handgrip
Hi everyone. I hope you all made it through the holiday season intact and with some new, shiny craft supplies. The last part of the gun body is giving me fits; I've already made three attempts so I'm stepping back and figuring out the best way to assemble it. In the meantime I've started started on the handgrip.
This piece is comprised of several sub-assemblies and I've completed the three circled in the picture. Also for anyone who is building this, the part# 114 I've circled is actually part# 127.

I've taking Silveroxide's advice and I'm reinforcing the pieces with additional 110lb cardstock, specifically on the areas where one assembly attaches to another.Also I'm not building each subassembly by itself and then putting them together after they're complete. Rather it's more of a rolling assembly so there's a nice clean joint between the pieces.


And here is the what I have so far.

Hi everyone. I hope you all made it through the holiday season intact and with some new, shiny craft supplies. The last part of the gun body is giving me fits; I've already made three attempts so I'm stepping back and figuring out the best way to assemble it. In the meantime I've started started on the handgrip.
This piece is comprised of several sub-assemblies and I've completed the three circled in the picture. Also for anyone who is building this, the part# 114 I've circled is actually part# 127.
I've taking Silveroxide's advice and I'm reinforcing the pieces with additional 110lb cardstock, specifically on the areas where one assembly attaches to another.Also I'm not building each subassembly by itself and then putting them together after they're complete. Rather it's more of a rolling assembly so there's a nice clean joint between the pieces.
And here is the what I have so far.
Handgrip part 2
Here are pictures of the completed handgrip. My wife took the camera with her this weekend so I don't have any progress pics. This piece turned out to be kind of tough to put together and there are several places that have alignment issues. The inside pieces to this were the trickiest and my technique is still wanting. But from a distance it looks OK.
Only a few more subassemblies and I’m ready to put everything together and finish this model.
Upper Gun Body
Hello again. I finally got the construction of the upper gun body to where I was happy with it. It's not perfect however it's close enough for me to use it and move on.
This sub-assembly is a large main piece with some ribs that provide some depth detail. I initially built this without any internal reinforcement and it ended up really flimsy and hard to work with.

I cut off the upper tabs from the rib pieces and glued them to some cardboard. The cardboard came from a box of Frosted Mini Wheat breakfast cereal that bravely sacrificed itself to the cause.

This is the result after the rib has been cut out. One end of each of the ribs curve to help close off the spaces in between them. This was left unglued from the cardboard.

The small spaces in between the ribs are filled with the strips in the picture. I backed these strips with a second sheet of 110lb card stock to make them a little more robust. In this picture you can see how the ribs now give the main piece its support.


And finally here is the finished sub-assembly. It could be better but like I said I'll take it. It was a little difficult to get the ribs in and the main piece took a little abuse in the process. I added two more ribs, which are hidden, to the front a back to keep the shape along the whole length.

Hello again. I finally got the construction of the upper gun body to where I was happy with it. It's not perfect however it's close enough for me to use it and move on.
This sub-assembly is a large main piece with some ribs that provide some depth detail. I initially built this without any internal reinforcement and it ended up really flimsy and hard to work with.
I cut off the upper tabs from the rib pieces and glued them to some cardboard. The cardboard came from a box of Frosted Mini Wheat breakfast cereal that bravely sacrificed itself to the cause.
This is the result after the rib has been cut out. One end of each of the ribs curve to help close off the spaces in between them. This was left unglued from the cardboard.
The small spaces in between the ribs are filled with the strips in the picture. I backed these strips with a second sheet of 110lb card stock to make them a little more robust. In this picture you can see how the ribs now give the main piece its support.
And finally here is the finished sub-assembly. It could be better but like I said I'll take it. It was a little difficult to get the ribs in and the main piece took a little abuse in the process. I added two more ribs, which are hidden, to the front a back to keep the shape along the whole length.
Rear Gun Body Assembly
Now that I finished the upper gun body piece I'm ready to put everything in place. I strengthened the two side pieces with more cereal box cardboard.

I cut the tabs off the wrapper piece and edge glued it to the side pieces. This worked really nicely and the folds came out really nice and crisp.


And here is the finished assembly with the detail piece from last time.

Now that I finished the upper gun body piece I'm ready to put everything in place. I strengthened the two side pieces with more cereal box cardboard.
I cut the tabs off the wrapper piece and edge glued it to the side pieces. This worked really nicely and the folds came out really nice and crisp.
And here is the finished assembly with the detail piece from last time.
Final Gun Body Assembly
Now I have everything together so it's time to assemble the gun body assembly. To begin this I went back and added some reinforcement to the front piece. I printed out some of the pieces and used them as a template.

I then slid these inside the front piece.

I cut the tabs off of the lower piece and again edge glued them to the forward piece. Everything is going great...

...until this. Disaster. The rear assembly is too short and I ended up with a huge gap. I don't know how I managed to do this as everything seemed to fit together nicely when I did a dry fit.

This isn't the end of the world but it is pretty demoralizing to run up against this now. My plan is to scratch build a detail piece I can place over this to cover it up.
Now I have everything together so it's time to assemble the gun body assembly. To begin this I went back and added some reinforcement to the front piece. I printed out some of the pieces and used them as a template.
I then slid these inside the front piece.
I cut the tabs off of the lower piece and again edge glued them to the forward piece. Everything is going great...
...until this. Disaster. The rear assembly is too short and I ended up with a huge gap. I don't know how I managed to do this as everything seemed to fit together nicely when I did a dry fit.
This isn't the end of the world but it is pretty demoralizing to run up against this now. My plan is to scratch build a detail piece I can place over this to cover it up.
Holder
Hello again everyone. The holder is next up and is the second to last subassembly left. I'm using food packaging boxes to reinforce things.


This piece will fit inside the assembly. I removed the tabs and the cardboard end pieces will provide a firm attachment point all the way around.


It took me a little while to figure out how the pieces that make up the handle mounting spot were supposed to be folded but it turned out fine.

Hello again everyone. The holder is next up and is the second to last subassembly left. I'm using food packaging boxes to reinforce things.
This piece will fit inside the assembly. I removed the tabs and the cardboard end pieces will provide a firm attachment point all the way around.
It took me a little while to figure out how the pieces that make up the handle mounting spot were supposed to be folded but it turned out fine.