I learn as I go with decaling

Ralph

Remember...it's for fun!
Jun 18, 2002
5,134
0
36
64
St. Paul, MN
Visit site
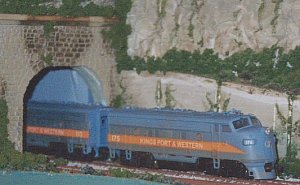
As I created decals for my freelanced railroad I learned a few things that I hope will be helpful for others. I wanted to have the name of my line in white letters within an orange strip on two F units.

I discovered quickly that ink jet printers like mine do not print in white...they print colors you can select as fill around blank characters to allow the white paper to show through as white letters. Testors makes a white backed decal paper for this purpose. I realized that the standard orange color in the background and fill selections in "Word" did not match the orange stripe I had already painted on my locomotve. Using the custom color option I finally matched the fill color as closely as possible to the orange stripe. It took many trials but once this was done I could create the decal and apply it to the strip so it would appear white letters had been painted in the stripe. After spraying the printed decal sheet with decal bonder I applied it to the loco and found that the white backed decal film is thicker than regular decal film. I could see the edges of the decal. I used some orange artist chalk to help blend the decal within the stripe.

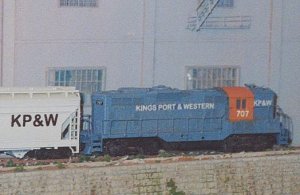
After it was all said and done it occurred to me that I could have simply created the stripe itself with whit letters within from the white backed decal film! :)

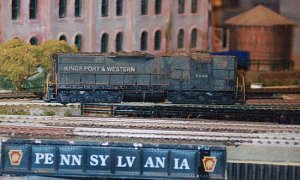
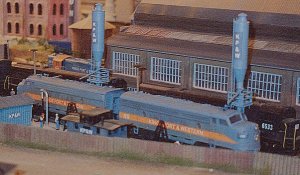
Here's how my effort turned out after some light weathering:
 

Attachments

  • 2-8-2007-01.jpg
    2-8-2007-01.jpg
    46.7 KB · Views: 74

Ralph

Remember...it's for fun!
Jun 18, 2002
5,134
0
36
64
St. Paul, MN
Visit site
I was surprised to find similar challenges even with black equipment like this former Pennsey SD9 that has been purchased by the KP&W. To get the white letters I made a small black strip with blank characters on Word that would come out as white on the decal film. Who knew that the black from my ink jet didn't exactly match the black loco! Well, Brunswick Green I suppose. Any way, the decal edges were obvious until I covered a good part of the loco body with a pigment wash. Now the decal is not so obvious on this hard working filthy engine. The pic tells me I need to weather the trucks and fuel tank as well. :)
 

Attachments

  • 2-8-2007-08.jpg
    2-8-2007-08.jpg
    53.9 KB · Views: 74

Ralph

Remember...it's for fun!
Jun 18, 2002
5,134
0
36
64
St. Paul, MN
Visit site
I managed to nail the blue color when I made decals to go on blue loco bodies. They blended in very well and only needed a couple of over sprays of dulcoat to make the edges less evident. The numbers on the orange cab are left over Microscale Penn Central numbers. The transparent film with white numbers made it a snap of course. Obviously it would be much easier to use a printer that prints white letters and numbers to do these jobs.
 

Attachments

  • 2-8-2007-22.jpg
    2-8-2007-22.jpg
    38.5 KB · Views: 67

Ralph

Remember...it's for fun!
Jun 18, 2002
5,134
0
36
64
St. Paul, MN
Visit site
I used clear decal sheets to letter these box cars. The cool thing about making decals is how easily you can create individual car numbers. I copied and pasted the KP&W logo and the reporting information several times and then went back and individualized the last couple of numbers (in pairs of course for each side of each car).
 

Attachments

  • 2-8-2007-11.jpg
    2-8-2007-11.jpg
    38 KB · Views: 67

Cannonball

More Trains Than Brains
Dec 4, 2006
1,564
0
36
55
St. Joseph, MO
I'm getting ready to do some experimenting with the white backed decal paper as well. For some reason, my printer crackles the black when I print. :confused: Not a huge deal since I will be cutting around most of it anyway but still odd. My red decals came out well though. We'll see how they look on the caboose when I'm done.
 

Ralph

Remember...it's for fun!
Jun 18, 2002
5,134
0
36
64
St. Paul, MN
Visit site
Best wishes with the decals Cannonball. Looking forward to hearing how they work out. I'm hooked on this despite the inconveniences of using an ink jet printer. Its fun!

Here's some covered hoppers at the Cargill plant....again, each is individually numbered to make operations with my switch lists more interesting.
 

Attachments

  • 2-8-2007-23.jpg
    2-8-2007-23.jpg
    37.6 KB · Views: 64

CAS

Member
Apr 10, 2005
242
0
16
61
Chicago, Illinois
I was thinking about trying it this way.

Keep your fill blank or white. Then go to your outline, pick the color that matches close to your color you need. And print that. The outlinr should blend in with the original color of your loco, or rolling stock.

this will be my next experiment.

CAS
 

MilesWestern

Active Member
Sep 20, 2005
1,800
0
36
34
CA
protopaintwest.googlepages.com
What a coincidence! :eek: I spent most of yesterday lettering one of my GP7's for my MV&P, the first ever decaling job I've done, and it kinda shows :p I'll post some pics in a seperate thread when I get my camera..

I really like the "Gulf Oil" colors alot and even considered using those colors for my Freelance road. I believe there's a shortline somewhere in Maryland that uses those colors, and it looks striking.

I think the KP&W will eventually be a freelance railroad as recognizable as the Maumee Route, the V&O, or the AM road! :) Start superdetailing these units, and take some pictures of them in a diorama outside, you may just get them publshed in RMC or MR! :)
 

Ralph

Remember...it's for fun!
Jun 18, 2002
5,134
0
36
64
St. Paul, MN
Visit site
CAS, looking forward to the results of your experiment!

Miles, thanks for the kind words. While I never expect to come anywhere near to the skill and artistry of the owners of those great model railroads I do owe them a debt for their example. I'm finding it a lot of fun to freelance, make decisions about design, add to the roster, etc. The best thing is that I'm never wrong about policies, procedures, and practices on the KP&W! :) The Penn Central is still present but as a back drop for this fictional line that interchanges with it.

Did I mention that it took me two or three tries on some of the roster to apply the decal straight? Sometimes it went on crooked and didn't always respond to my attempts to move it without folding up on itself and getting ruined. I anticipated accidents so I made extras on my printed decal sheets.


Ralph
 

Attachments

  • KP&Wlocoservice.jpg
    KP&Wlocoservice.jpg
    66.1 KB · Views: 37