

Hey, I made a hill!
- Thread starter TerryR
- Start date
You are using an out of date browser. It may not display this or other websites correctly.
You should upgrade or use an alternative browser.
You should upgrade or use an alternative browser.
Way to go Terry! Betcha you wont stop at that for long! You're well on the way to being a scenery expert.
Errol
Errol
Re:
It looks great for a first effort. A suggestion for future hills.....don't make them so smooth, leave them lumpy with peaks and dips. Don't worry about perfection. Nature isn't purfect. What did you use to make it?
SLOW..
It looks great for a first effort. A suggestion for future hills.....don't make them so smooth, leave them lumpy with peaks and dips. Don't worry about perfection. Nature isn't purfect. What did you use to make it?
SLOW..
I like hills...
I like hills. Hills are hilly. You can roll down 'em, sled down 'em in winter, sit on top them anytime to watch trains go by (and catch the scent of deisel smoke as it wafts up with a summer breeze)!
A spontaneous poem.
I would like to be on top of the hill to the right,
To watch trains go by day and night.
Mark
(For some reason I am enamored with the hill on the right )
)
I like hills. Hills are hilly. You can roll down 'em, sled down 'em in winter, sit on top them anytime to watch trains go by (and catch the scent of deisel smoke as it wafts up with a summer breeze)!
A spontaneous poem.
I would like to be on top of the hill to the right,
To watch trains go by day and night.
Mark
(For some reason I am enamored with the hill on the right
)Thanks all for your kind remarks.
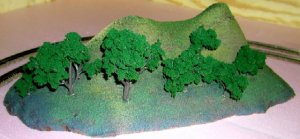
The hill was made from offcuts of the pink foam I used for the benchwork. I used 4 layers of 1.5" in fairly random shapes. The bottom layer was cut to fit the space and then each succesive layer was offset about (very much about!) 1.5" in from the previous one. That made for an 80' hill in N scale.
I used blobs of hot glue to stick the layers together but next time I will use something else (Elmers?) that I can coat the whole layer with - the seams had a tendancy to open up in the next stage. If you look carefully at the picture, you can see some of them.
Next I blended the layers with a surform held at about 45 degrees and just hacked at it. In the couple of places I couldn't quite get into with the surform, I used the little sanding drum on a Dremel. This got me to the shape very quickly but left a rather torn up surface. As Slow said, hills don't have to be too smooth but this was REALLY rough so I finished it off with a quick run over with hand-held 100 grit sandpaper. I may have overdone this but I was going for an old, rounded sort of a hill. None of this was very exacting work and the final shape (except the footprint) was as much of a surprise to me as it was to anybody else It took me about 2 hours to this point. I gave it a quick coat of some brown spray paint that I happened to have lying around and had dinner while it dried.
Earlier in the day, I had picked up some of the Woodland Scenics learning packs and I got to try a couple of them on this project. First I covered the whole hill in the basic mixed green fine turf. This pack (the landscape pack) also includes a brown undercoat which I used but this was probably redundant with my existing brown paint. I would skip one or the other next time. The Woodland Scenics undercoat was rather thin and didn't cover the pink foam very well so I would probably stick with my spray paint. It would probably be petter on plaster. I threw on a few highlights of the different colored turfs and gave the whole thing a coat of the glue.
While it was drying, I made up all the deciduous trees in the tree scenery pack. These are RIDICULOUSLY easy. After a little measuring and thinking, I discarded the two biggest trees as they were about 80' tall in scale which is not impossible but they would make a lot more sense in HO. I may yet put them on the back of the hill and let them just peek over the top.
I punched some holes with a small screwdriver, put a dab of hot glue on the base of each tree and planted them where they looked right. I planted them in descending size order, filling in between the big ones with smaller ones which seemed to work out for me.
I have two more of the WS packs - roads and rocks - so I'll probably have a play with those tonight.
Up until now, my main artistic talent was being able to pick up a paint roller by the right end two times out of three so I am very pleased with the results so far. I can see where it could have been better but I think I made a very believable hill in about 4 hours. My wife says that, had she not seen the intermediate stages, she wouldn't have believed I had made it.
The hill was made from offcuts of the pink foam I used for the benchwork. I used 4 layers of 1.5" in fairly random shapes. The bottom layer was cut to fit the space and then each succesive layer was offset about (very much about!) 1.5" in from the previous one. That made for an 80' hill in N scale.
I used blobs of hot glue to stick the layers together but next time I will use something else (Elmers?) that I can coat the whole layer with - the seams had a tendancy to open up in the next stage. If you look carefully at the picture, you can see some of them.
Next I blended the layers with a surform held at about 45 degrees and just hacked at it. In the couple of places I couldn't quite get into with the surform, I used the little sanding drum on a Dremel. This got me to the shape very quickly but left a rather torn up surface. As Slow said, hills don't have to be too smooth but this was REALLY rough so I finished it off with a quick run over with hand-held 100 grit sandpaper. I may have overdone this but I was going for an old, rounded sort of a hill. None of this was very exacting work and the final shape (except the footprint) was as much of a surprise to me as it was to anybody else
It took me about 2 hours to this point. I gave it a quick coat of some brown spray paint that I happened to have lying around and had dinner while it dried.Earlier in the day, I had picked up some of the Woodland Scenics learning packs and I got to try a couple of them on this project. First I covered the whole hill in the basic mixed green fine turf. This pack (the landscape pack) also includes a brown undercoat which I used but this was probably redundant with my existing brown paint. I would skip one or the other next time. The Woodland Scenics undercoat was rather thin and didn't cover the pink foam very well so I would probably stick with my spray paint. It would probably be petter on plaster. I threw on a few highlights of the different colored turfs and gave the whole thing a coat of the glue.
While it was drying, I made up all the deciduous trees in the tree scenery pack. These are RIDICULOUSLY easy. After a little measuring and thinking, I discarded the two biggest trees as they were about 80' tall in scale which is not impossible but they would make a lot more sense in HO. I may yet put them on the back of the hill and let them just peek over the top.
I punched some holes with a small screwdriver, put a dab of hot glue on the base of each tree and planted them where they looked right. I planted them in descending size order, filling in between the big ones with smaller ones which seemed to work out for me.
I have two more of the WS packs - roads and rocks - so I'll probably have a play with those tonight.
Up until now, my main artistic talent was being able to pick up a paint roller by the right end two times out of three
so I am very pleased with the results so far. I can see where it could have been better but I think I made a very believable hill in about 4 hours. My wife says that, had she not seen the intermediate stages, she wouldn't have believed I had made it.

Nice looking hill.
You're right about the WS undercoat. Its almost as thin as water.
But its great for Sculpta mold. I've heard of some people mixing in
undercoat when they are mix plaster and Sculpta Mold. I haven't tried it myself....
Might have too one day.
You're right about the WS undercoat. Its almost as thin as water.
But its great for Sculpta mold. I've heard of some people mixing in
undercoat when they are mix plaster and Sculpta Mold. I haven't tried it myself....
Might have too one day.
Hi Terry, looking good. Living up there would solve all my flooding problems.
My kingdom for a house on a hill.
t.
My kingdom for a house on a hill.
t.
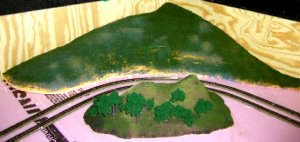
OK, this is hill #2
I did it pretty much the same way except that I skipped a couple of steps. I omitted the sanding entirely and I agree that the rougher finish looks better. I also omitted the Woodland Scenics undercoat in favor of my brown spray paint. The spray paint attacks the foam a little anyway which has a smoothing effect and leaves a tacky surface which is perfect for sticking the grass to.
I ran out of brown about 2/3 of the way down and used some yellow to finish up. A slightly darker yellow might have been better but I'm not unhappy with the result. It shows a little around the bottom but I'll cover that when I blend it into the landscape.
Attachments
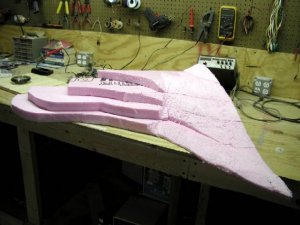
And I forgot one thing
I know I'm not supposed to use the "D" word here but glueing the foam with Elmers was definitely one on my less smart ideas. Elmers is water based and foam is waterproof...
After 10 hours it was still wet and not even slightly stuck
So, I went back to the hot glue and ran a bead all the way around the edge instead of just tacking it. That worked much better.
At least that gives me chance to post another picture. This is the foam blocks with the surforming half done.
Attachments
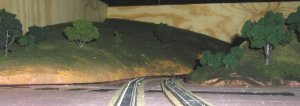
Hi Terry, I think it looks great , it`s nice see different colours showing through the grass within the scope of earth/slate/rock/ect.
I like the water thing
We have ALL done the "D" thing
Some of us could right a small book if we only had a memory
Keep up the great work.
I like the water thing
We have ALL done the "D" thing
Some of us could right a small book if we only had a memory
Keep up the great work.
You have a great thing going there - but---your tool bench is too neat
Good looking scenery though.
- but---your tool bench is too neat Good looking scenery though.
Tip
Try using wire. Shape it like you want your hill to look. Make some bumps and stuff...make it look natural. Then you just use strips of paper dipped in paper meshay. Then use plaster over top of the paper meshay to sculpt it further. Then you can use what ever you like...grass, trees or what ever. You don't have to make it so perfect and smooth.
Try using wire. Shape it like you want your hill to look. Make some bumps and stuff...make it look natural. Then you just use strips of paper dipped in paper meshay. Then use plaster over top of the paper meshay to sculpt it further. Then you can use what ever you like...grass, trees or what ever. You don't have to make it so perfect and smooth.