

S
You are using an out of date browser. It may not display this or other websites correctly.
You should upgrade or use an alternative browser.
You should upgrade or use an alternative browser.
- Status
- Not open for further replies.
Hey Soaring,
nice progress! I wanted to give comment as no one seems to comment your progress.. sadly...
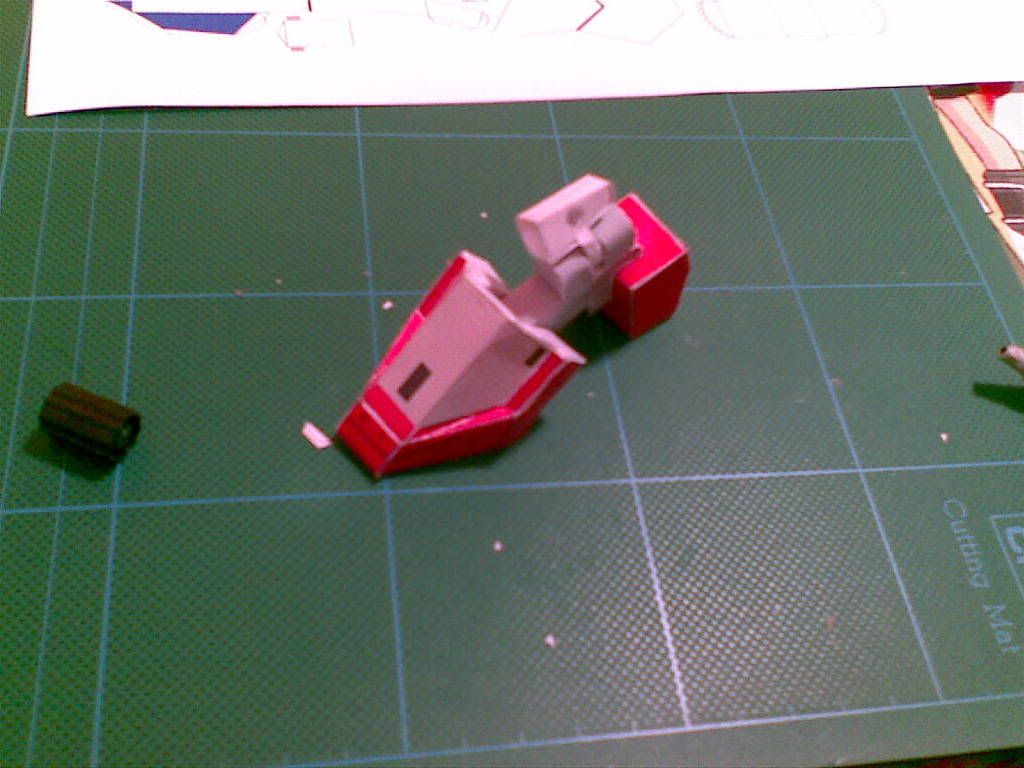
okay lets have designer discussion... I have also an equal pic of my gundam foot like below. I had implement 2 axis movement on my foot. the swaying action is much like yours.
But I had a considerable issue on creating joints... gravity... the heavier your model, you wont be able to pose it correctly, as paper joints are slippery and they just tend to fall down... (paper gundams will looks like lazy robots). I saw your cylinder/drum are not round, you tried to put edges. Is it success? I think the issue is to enlarge the contact faces in joints. In my view, small hole over thin paper will not adequately "grab" any given "cylinder" whatever their shape are.
You'll notice gravity issue when you built the whole leg.. (or maybe you wont if you already have a solution). I would be glad if you can share me some ideas over joints.
Oh yeah btw, I had my leg fully built, so is the torso and the hands. So regarding our competition, I think I'm a head of you.. .. lol, just joking.
Thanks
nice progress! I wanted to give comment as no one seems to comment your progress.. sadly...
okay lets have designer discussion... I have also an equal pic of my gundam foot like below. I had implement 2 axis movement on my foot. the swaying action is much like yours.
But I had a considerable issue on creating joints... gravity... the heavier your model, you wont be able to pose it correctly, as paper joints are slippery and they just tend to fall down... (paper gundams will looks like lazy robots). I saw your cylinder/drum are not round, you tried to put edges. Is it success? I think the issue is to enlarge the contact faces in joints. In my view, small hole over thin paper will not adequately "grab" any given "cylinder" whatever their shape are.
You'll notice gravity issue when you built the whole leg.. (or maybe you wont if you already have a solution). I would be glad if you can share me some ideas over joints.
Oh yeah btw, I had my leg fully built, so is the torso and the hands. So regarding our competition, I think I'm a head of you..
.. lol, just joking.Thanks
S
Soaring
EXACTLY! Gravity does take it's toll. I did forget to make a hole thoguh the bottom leg I fixed that
And Actually, to answer your question, the joints I have made, so far, are a complete success. The Joints hold firm, and what I do to do this, is I do make the cylinders with edges. This is mor effective, because it holds it's place when posing.
For example, a one rolled cylinder, pure cylinder form with no edges, works. But not effectivly. The joints will be able to move more freely, causing the "slump" or sort of mess up in the process.
But, with edged typed cylinders, or whatever you want to call them, they run into those holes. There are 8 edges, so the cylinder will run into the hole 8 times somewhere. They'll hold it's place in correctly, and it won't look like a lazy robot
You see, I had the same problem when building my Hazel Gundam. Since it was TOTALLY Scratch, the joints, I wasn't sure how I'd make my cylinders. Rolled cylinders , smooth ones, tend to have their own motion when you swing them in the direction their meant to go in. However, when I was working with Hazels hip joints, I tried Hexagonal cylinder shaped edges. They stop, like I said, and hold the direction of pose in mid air. They work like MAGIC! I suggest trying it!
By the way, your Gundam design is fantastic ^_^, and for the record, I think I'm beating you sign1
(Sorry if noone understood the conversation)
I fixed that And Actually, to answer your question, the joints I have made, so far, are a complete success. The Joints hold firm, and what I do to do this, is I do make the cylinders with edges. This is mor effective, because it holds it's place when posing.
For example, a one rolled cylinder, pure cylinder form with no edges, works. But not effectivly. The joints will be able to move more freely, causing the "slump" or sort of mess up in the process.
But, with edged typed cylinders, or whatever you want to call them, they run into those holes. There are 8 edges, so the cylinder will run into the hole 8 times somewhere. They'll hold it's place in correctly, and it won't look like a lazy robot
You see, I had the same problem when building my Hazel Gundam. Since it was TOTALLY Scratch, the joints, I wasn't sure how I'd make my cylinders. Rolled cylinders , smooth ones, tend to have their own motion when you swing them in the direction their meant to go in. However, when I was working with Hazels hip joints, I tried Hexagonal cylinder shaped edges. They stop, like I said, and hold the direction of pose in mid air. They work like MAGIC! I suggest trying it!
By the way, your Gundam design is fantastic ^_^, and for the record, I think I'm beating you sign1
(Sorry if noone understood the conversation)
Soaring... you beating me? really?
it's only this virtue we compete rite? I knew that you've been designing gundams since sometime ago, and of course you beat me :cry:... you had so many design before, since impulse is only myfirstops:.. Eh btw, does that well-known Hazel is your design? I had a chance building it when I was only a builder. As I recall, the hazel doesn't have any movable joints. Or may be its another Hazel.
Have you tried to visit my thread? I had more picture than you on my impulse:twisted:... sign1 I think I'm still beating you on the process (not for the quality ofcourseops
Back to designer discussion..
Did you make a fully round hole? or also an edged (octagon/hexagon) hole? If so, then I can understand you on why does they stopped. I did passed this idea however, since they won't give me the whole 360degree I want. Locked only on several given 8/6 positions.
My idea, which is under development, is to use plastic straws, they round and easy, not having to make a paper cylinder. I sand the straws and coat-em with plastic glue to give them random texture so they will no longer slippery. But this still not enough, the key is about the hole. it works at first but the more you plays with them, the hole got sloppier, and they no longer hold firm.
My next idea is to put another fixed paper "straw" around the plastic straw, so that straw will have to rolled inside the fixed paper straw, and they gave more area of contact for frictions (than just the limited contact of a thin hole). Haven't tried this, but logically this will work, and most importantly easier.
Appreciate any input. And I hope you are not considering me to hijack your thread for these discussion. If so, I'm so sorry, we can still use PM.
Thanks soaring!
it's only this virtue we compete rite? I knew that you've been designing gundams since sometime ago, and of course you beat me :cry:... you had so many design before, since impulse is only myfirst
ops:.. Eh btw, does that well-known Hazel is your design? I had a chance building it when I was only a builder. As I recall, the hazel doesn't have any movable joints. Or may be its another Hazel.Have you tried to visit my thread? I had more picture than you on my impulse:twisted:... sign1 I think I'm still beating you on the process (not for the quality ofcourse
opsBack to designer discussion..
Did you make a fully round hole? or also an edged (octagon/hexagon) hole? If so, then I can understand you on why does they stopped. I did passed this idea however, since they won't give me the whole 360degree I want. Locked only on several given 8/6 positions.
My idea, which is under development, is to use plastic straws, they round and easy, not having to make a paper cylinder. I sand the straws and coat-em with plastic glue to give them random texture so they will no longer slippery. But this still not enough, the key is about the hole. it works at first but the more you plays with them, the hole got sloppier, and they no longer hold firm.
My next idea is to put another fixed paper "straw" around the plastic straw, so that straw will have to rolled inside the fixed paper straw, and they gave more area of contact for frictions (than just the limited contact of a thin hole). Haven't tried this, but logically this will work, and most importantly easier.
Appreciate any input. And I hope you are not considering me to hijack your thread for these discussion. If so, I'm so sorry, we can still use PM.
Thanks soaring!
S
Soaring
Making this CLEAR, I DID NOT DESIGN HAZEL GUNDAM. The Designer is Mechanim8or, who is known as animaniac on this forum, I believe.
All I did was add some joints scratch built by myself- Sorry, I had to make that clear ^_^
Of course I checked out your thread I clicked on every link to photobucket, I think you should just host themfor everyone to see ^_^
And no, you're really beating me
Designer Disscusion ^_^
I created an edged hole, so they have stops and they hold firm. They give you a 360 degree movement, if you include locking it inbetween the 8 locks.
I tried straws, not the coating though, give it a try and tell us how you did it! It didn't work as hoped though :/ That last bit, is true and false, sorta. It does wear away if you use it too much. However, I tend to give it that wear away state, in order for the joints to have more smooth flowing movements, but still with a bit of locking, so it wont end up swaying all over the place when I swing it.
I'm getting that, sorta like a cylinder wrapped around by another cylinder, in order to give it motion? Yes, it will work, but I'm not sure about the little sway motion problem
Haha, this is definitely not hijacking, that would be if someeone posted some random advertisement that totally does not fit the topic
Nah, I love these kind of discussions.
By the way, you can try to use Squares as your joints. Then, use 6 sided holes for the square to be placed in. In gives it more rough, yet stable movement, worth a try for sure.
All I did was add some joints scratch built by myself- Sorry, I had to make that clear ^_^
Of course I checked out your thread
I clicked on every link to photobucket, I think you should just host themfor everyone to see ^_^And no, you're really beating me
Designer Disscusion ^_^
I created an edged hole, so they have stops and they hold firm. They give you a 360 degree movement, if you include locking it inbetween the 8 locks.
I tried straws, not the coating though, give it a try and tell us how you did it! It didn't work as hoped though :/ That last bit, is true and false, sorta. It does wear away if you use it too much. However, I tend to give it that wear away state, in order for the joints to have more smooth flowing movements, but still with a bit of locking, so it wont end up swaying all over the place when I swing it.
I'm getting that, sorta like a cylinder wrapped around by another cylinder, in order to give it motion? Yes, it will work, but I'm not sure about the little sway motion problem
Haha, this is definitely not hijacking, that would be if someeone posted some random advertisement that totally does not fit the topic
Nah, I love these kind of discussions.
By the way, you can try to use Squares as your joints. Then, use 6 sided holes for the square to be placed in. In gives it more rough, yet stable movement, worth a try for sure.
S
Soaring
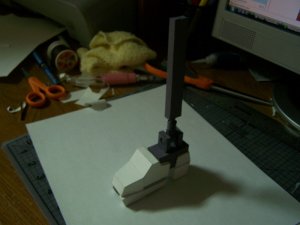
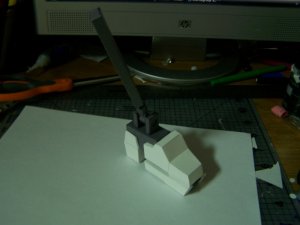
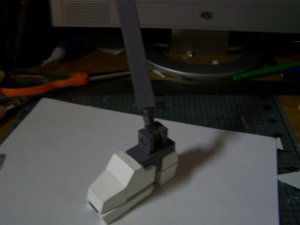
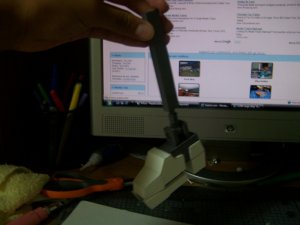
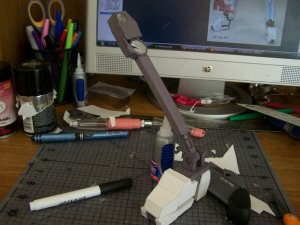
And Here are the photo's of step one on the skeleton! WOOT! Now, everything on the skeleton is not for show, you'll see little square boxes, but those will be used as place holders for some colored strips. Everything will be used
So, the foot only has two movements I couldn't get the last up and down one in there, sadly... More to come tomorrow! this is where engineering comes into play :twisted:
And theres the joints in action! How's that for paper
And yes, those joints joints are seperated, not glued, and they are kept in without afalling, pretty sweet ^_^
So, the foot only has two movements
I couldn't get the last up and down one in there, sadly... More to come tomorrow! this is where engineering comes into play :twisted:And theres the joints in action! How's that for paper
And yes, those joints joints are seperated, not glued, and they are kept in without afalling, pretty sweet ^_^
Attachments

By the way, you can try to use Squares as your joints. Then, use 6 sided holes for the square to be placed in. In gives it more rough, yet stable movement, worth a try for sure.
I'll give this a try... thanks
Yeah, I also believe this is a fruitful discussion
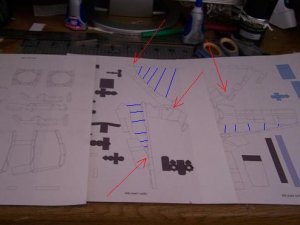
Hey, I don't know if your 2D pattern pictures are already final, or only WIP for testing. I just like to give some comment (sorry if you've already think about this also). It just look to me that you use pepakura's auto unfolding taken for granted. This paper part will look fragile at some points (red arrows) and you will spend more paper to print your models. I may suggest to manually edit the parts (like blue arrows) in pepakura. I used to do this manual editting to make your printable material neat.
well save paper save the earth they said
Attachments
S
Soaring
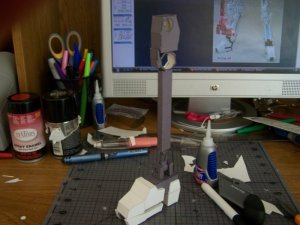
Great! Yes, I played around with pepakura before, but I'll get more into it. YEs, those certain places do look fragile, this is just for the WIP. I'll finalized the templates at a later date ^_^
S
Soaring
S
Soaring
S
Soaring
Well, I'm back , I had a great vacation, and I'll be shooting back from Virtue, EX-s and school in the coming weeks, look out for more updates ^_^
HI i just found this particular thread, but Im a gumdam fan and a builder who just stepped into using styrene modifications, I read that you builded a hazel model and I wanted to Know if there is any link to get that model since Im interested in paper modeling, also I wanted to congratulate you for building such an amazing and ambituous work... so As bad as it would sound.... are you planning on sharing this model... cause Im particulary interested in the frame that you are building... hope I dont insult you by asking this
thanks
thanks
what is your email, i have a full size and sd hazel somewhere, also, im intrested in the frame, as im going to start my own mobile suit 00 gundams, and your frame looks good,
thanks
thanks
what is your email, i have a full size and sd hazel somewhere, also, im intrested in the frame, as im going to start my own mobile suit 00 gundams, and your frame looks good,
thanks
hey Check your personal messages to find my email address so you can send them... it would be really appreciated
- Status
- Not open for further replies.