Guide to TR-1 Hazel Gundam

S

Soaring

Well, my first thread :)

Anyways, I wanted to point out that mechanicm8or created a really great TR-1 Custom Hazel Gundam. I will post the link to his site, if I am able to.
Since there's no instructions to his model, I want to make some photographic instructions. Also, this will be my second fully built kit xD Hi Nu and EX-s were just too difficult.

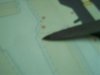
*So to start off, I printed the shield first. I'll post updates on the finished scoring of the shield in a few minutes.

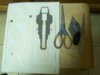
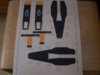
- Since I do not have most of tools you guys use, I will use these for this model

-67 lb of cardstock(148 g/m) White or cream cardstock
-Scissors (Two kinds, still scissors)
-X-acto knife (only on rare occasions for the parts)
-Cutting mat (No, not that green one, I use a table cloth)
-Super Glue (I don't know where to get Advanced Craft glue* at the store)
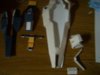
-Parts
-Toothpick (to wipe off excess super glue)
- Paper clip *bent* (In case of small edges or openings
-Tweezers or Nail filer (For scoring)
 

Attachments

  • 100_1270.jpg
    100_1270.jpg
    115.1 KB · Views: 16
S

Soaring

Step 1

Step 1: Scoring the pieces

-So, I start off with scoring the pieces which take me about oh, 5 minutes.

-Two things I would like to note is that I work on these models at night. Just before school... Anywho, my pictures will be blury, so excpect that! Night time here has horrible lighting, plus I don'tphotograph well with one hand, since I had to point the Filer at the tab.

Second, on scoring the model, here's what I like doing.
-On creases which aren't located on tabs, I score it on the doted or dashed lines.
- For score lines that indicate where a tab is, I like to score just a little above the lines. You have to look real hard at the attachment shown below. The filer is pointing a little just above the score line. That's where I score on tabs indicating where there is a fold.
 

Attachments

  • 100_1271.jpg
    100_1271.jpg
    80 KB · Views: 10
S

Soaring

12-19-07
Time: 10:37
Alright, good night folks, expect to get instructions on the shield finished tomorrow.
 
S

Soaring

6:50
Thanks Lex!
Anyways, It's school time in 30 minutes, be back in 5 hours!
 

57townsman

Member
Jan 21, 2004
168
0
16
Cypress, CA
That seems like a good model for a build thread, not too complicated but still big size :mrgreen:. Looking forward to seeing more :thumb:

SteveK
 
S

Soaring

Alright, Step 3

-Before going on to glueing and all the "sophisticated-ness" Let's print out the blue part of the shield.

As always, score the card. From here until the end of these photographic instructions, I'll say, Make sure to score first, but won't show a picture of the finished scored piece.

Anyways, there are two options which you can do with this part of the shield
Since there are two of the same parts printed on the same page, you can choosed just to cut out one full shield part. If you just choose to cut out one of the full sets ON THIS PAGe, you'll end up with 11 parts.

OR, you can cut all the parts of this page. Personally, I would cut only one inner shield part than to do the whole page. I'll show you what I mean later.

Anyways, some of the fold lines can't be seen TO well, so I'll post some foldings.
 

Attachments

  • 100_1274.jpg
    100_1274.jpg
    119.5 KB · Views: 6
S

Soaring

-Scoring, Cutting and pre-shaping, Oh my!

Ok, from here on in, if you see
-Scoring, Cutting and pre-shaping, Oh my!
It will basically mean Score the card, Cut the pieces, then fold the tabs and pre-shape it. This way, it will cut down on boring text and will make this go a bit faster. So let's get started with Step 4 of the shield

-Scoring, Cutting, pre-shaping, Oh my!

So, here wwe are cutting out the inner areas of the shield. As mentioned earlier, I prefered to cut only the three BASIC parts to the shield which will only apply to one shield. I didn't cut the small things out yet, but it will be finished and instructions for them will also be posted.

The attachment below shows two major areas. The right side, or the WHITE Side, (white parts) were from the previous page.

The blue parts from the page above this post, is the three parts I was talking about.

- Back from where we were, preshape the blue pieces. Then, you can assemble the shield WITHOUT Glue, to see where everything goes. I'll post the preshaped shield when I get back from the dentist's. Also, we'll get some x-acto knife action in here.
 

Attachments

  • 100_1280.jpg
    100_1280.jpg
    112.5 KB · Views: 8
S

Soaring

Eh, it's 7:30 Nigth time
I'm sorry guys, I'll make sure to post some pictures of the finished version, but I'll postpone the instructions for mybe a few dayss. Yes, days, not years or weeks. I'll make sure to post the progress, then the instructions xD
 

Master-Bruce

Active Member
Aug 15, 2007
1,012
12
38
Looking great. I've had this one for a while too but have never gotten around to building it.

Keep up the good work buddy.
 
S

Soaring

I'ma going to a Boring Christmas party today, I'll sit i nthe little room and paper craft ":)_ So by the end of today, hopefully, HALF of Hazel will be finished xD
 
S

Soaring

bleh, I'm sorry guys for the long wait, but you'll have to wait just a bit more :) I'm testing something at the moment. The strike Noir :) and Hi NU :)
 

Master-Bruce

Active Member
Aug 15, 2007
1,012
12
38
Both are great models! I love the Hi NU and will get to that one day. Twice the size of it's intended size I think.

One day anyway! LOL :)

As for the Strike, I now have it and I'm thinking of doing that soon. I can't decide between that, a Stike Gundam and a nice Ex-S.
 
S

Soaring

Well, When I dl'ed strike, it came in seperate parts, which was confusing XD Anyways, I'm testing TR-1's head
 
S

Soaring

Alright, let's restart these instructions! Merry Christmas, and to all a good night!

NOTE: I'll start the instructions OVER AGAIN, forget about the past posts. Now we gonna get this thing done :) Good night, see you all in 10 hours.