

It depends on what you want. Rocks, clear bottom, trees, rapids. Give your river a history and the rest will follow.
Got my bridge in, but need some input!
- Thread starter trainsteve2435
- Start date
You are using an out of date browser. It may not display this or other websites correctly.
You should upgrade or use an alternative browser.
You should upgrade or use an alternative browser.
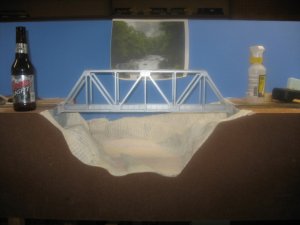
Looks great, but you still have the sheer drop situation on either side from the 'surface' of the layout at track level, down to the beginning of your foam layers. I know it's still in progress so I bet you've got a plan...you do have a plan, right?...What DO you plan to do there? ")
Also, I really like the silver color on the bridge. Why did you choose that? I'm always interested to know why folks choose the colors they do for structures. Is that a prototype inspiration or did it just look good to you? I think it's swell.
Here's a suggestion...model the river in flood. Swirling, muddy water with plenty of floating debris (maybe a shed roof just barely sticking up), and a short dock on one side just beneath the surface, with a couple planks being washed away. And of course the heavy rains that just fell to cause this disaster have left strong vertical streak marks down everything...the bridge and piers, plus new rain gullies washing down into the creek.
Galen
Hello everyone, just wondering..... Does anyone have any suggestions on how i could desguise the straight down portion on either side of my bridge abutments? I have thought and thought, but im stumped. Any ideas are welcome, and thanks!:cry:
Does anyone have any suggestions on how i could desguise the straight down portion on either side of my bridge abutments? I have thought and thought, but im stumped. Any ideas are welcome, and thanks!:cry:Woodland Scenics plastercloth over newspaper.trainsteve2435 said:Hello everyone, just wondering.....
I don't know what brand of bridge abutments you used but the Walthers brand has retaining walls that match the abutments. Maybe yours do to?
Well, you could put in retaining walls, as suggested, but I'd opt for trees and underbrush. First, round off the top edge of the foam on either side of the abutments, to give the impression that it's the top edge of a ravine. (I'm referring to the layer of foam that forms the sub-roadbed, beneath the cork on either side of the bridge.) Next, paint the vertical sides of the ravine either black, dark grey or green, or dark brown. Apply some ground foam weeds, grass, etc. to the top edge of the foam that you rounded-off, along with the banks of the stream, then start making trees and bushes. If you place enough trees and bushes, the exact nature of the ravine walls will not be apparent, as the dark painted background areas simply appear as shadows. In the three pictures that I posted on Page 2 of this thread, the stream bank on the far side of the water consists of a very low bank only about 1" in width, from the "water" to a cliff rising to track level. The cliff (it's light grey, and glimpses of it can be seen through the trees, especially under the bottom of the bridge trusses in the first photo, both high and low in the second, and up high in the third photo) is absolutely vertical, but the trees and the distance from the viewer disguise this fact. Because your scene is right at the layout edge, the dark vertical walls will disguise this even more effectively. Depending on what method you intend to use to make your "water", it's generally best to do the water first, as it's very easy to accidently knock bits of ground foam off the trees and onto the still-wet "water".
Wayne
Wayne
One word (and you ain't gonna like it): jigsaw.
Or maybe another: sawsall.
Wayne's suggestion sounds pretty good, quite clever actually. But I'd really think about making a few cuts, one one either side of the bridge abutment and on each side of the ravine. If you add some bracing just beneath the track up to the abutment it should hold...not sure how the rest of the underside looks to know what sort of effect cutting out major chunks will have.
I know it seems like alot of work for one spot, but it's already a good looking scene...go ahead and make it great! Take it all the way.
Galen
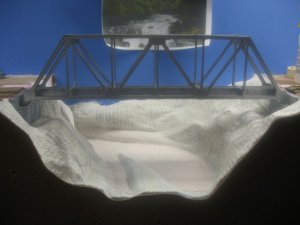
I think that it looks great. It looks like you solved the problem with the banks on either side :thumb: :thumb: Cheers aussie aussie
What did you use, it kinda looks like newspaper or something?
What did you use, it kinda looks like newspaper or something?
Thanks Josh, and yes, the banks kinda turned out ok! It is newspapers and tape as well as extruded foam and cardboard strips. I just hope it turns out as well as i plan. Thanks again for the positive comments.
steve:thumb:
steve:thumb:
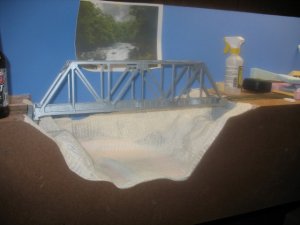
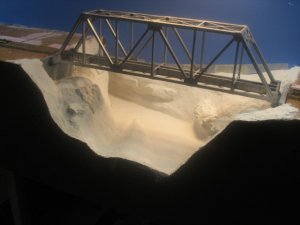
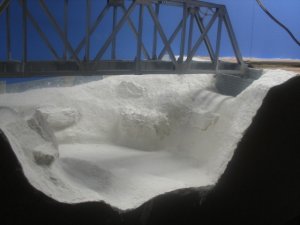
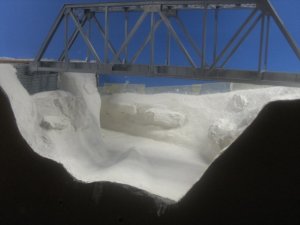
Ok, finally got some more progress done today. I got everything covered in sculptamold and some rock castings attached. I think im about ready to attempt painting the river bed, If anyone has any tips or suggestions, please feel free to let me know. Thanks!
Attachments

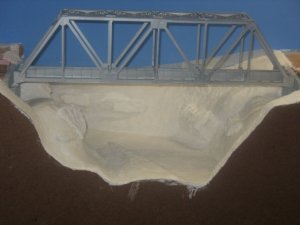
I agree; when viewed from eye level, your scene appears to be a lot deeper than in the earlier views, before the scenery was installed, and shot from a higher angle. The mini- scene that you're creating here will also draw attention away from the fact that the backdrop is so close, as the bridge and river will attract the viewer's eye.
The way you want to create your "water" effect will determine how you should paint the riverbed. Here's a link to some water scenes that I created on my first attempt at modelling water:
Finally, the "Pictures at 11:00" or quick Noah, get the boat...
If you scroll down after all the much-appreciated comments, there's a short explanation of how the scenes were done. (The use of Durabond refers only to my method, and you can disregard that part of the process, as you already have the plaster base in place.) While this method is very easy, there are many other types of materials and methods for making "water", and I'm sure that you'll get some other suggestions.
Wayne