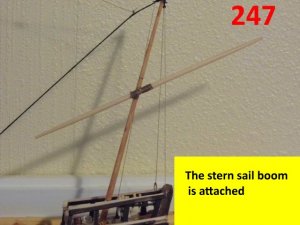
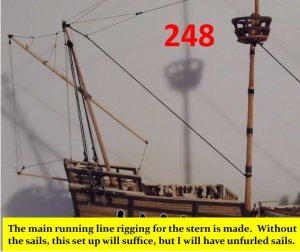
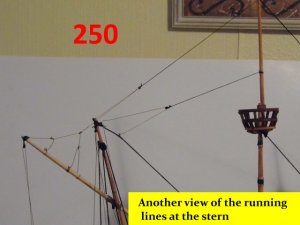
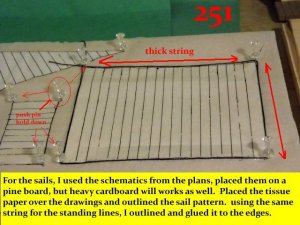
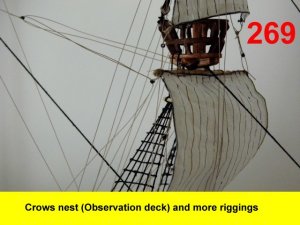
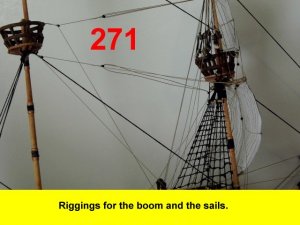
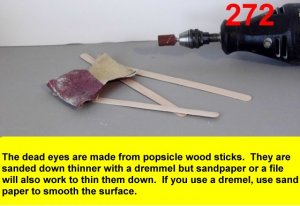
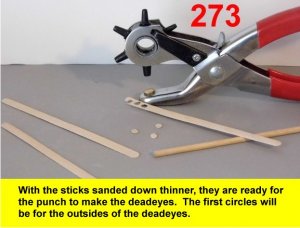
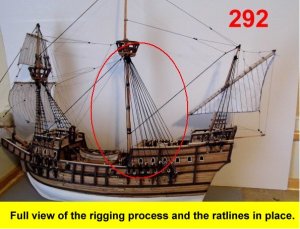
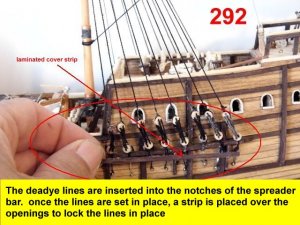
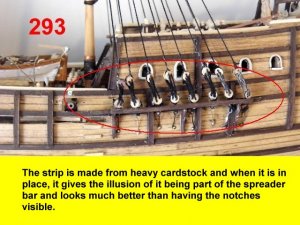
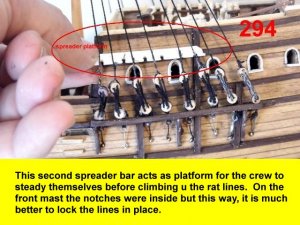
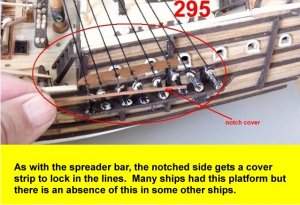
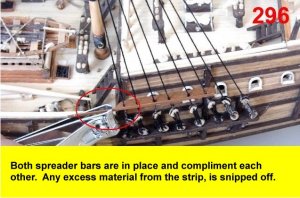
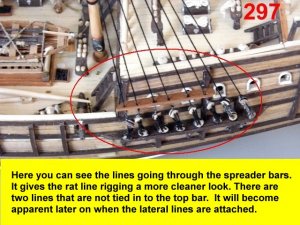
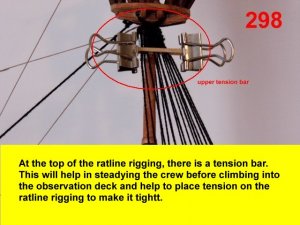
Galeon San Salvador Hybrid

silveroxide

Senior Member
Aug 22, 2007
2,036
525
113
Fayetteville NC
san salvador

There is a new member i have recomended this boat too. Unfortunately, he can't download the longitudinal planking I made for it, of course, since you used real wood, you did not have the problem of vertical lines making this is probably one of the finest builds of this model. :)

Thanks for looking in, Hopefully I can start to update this thread with photos soon.
 

silveroxide

Senior Member
Aug 22, 2007
2,036
525
113
Fayetteville NC
Time to resurrect this thread again. This portion will be on the standing line and some running line rigging. The reference on the rigging seems to differ from ship to ship but the Standing rigging is a standard. the running lines, seem to differ from ship to ship. i made the running lines as reasonable as possible. The next posting will cover the making of the sails. Until then, enjoy and see you all next posting.
 

Attachments

  • 243.jpg
    243.jpg
    51.1 KB · Views: 25
  • 244.jpg
    244.jpg
    57.7 KB · Views: 27
  • 245.jpg
    245.jpg
    52.2 KB · Views: 26
  • 246.jpg
    246.jpg
    54.9 KB · Views: 22
  • 247.jpg
    247.jpg
    52.2 KB · Views: 25
  • 248.jpg
    248.jpg
    50.1 KB · Views: 22
  • 249.jpg
    249.jpg
    44.8 KB · Views: 24
  • 250.jpg
    250.jpg
    38.8 KB · Views: 23

silveroxide

Senior Member
Aug 22, 2007
2,036
525
113
Fayetteville NC
Changed my avatar temporary. Will re-do my SOCOM patch later. It was a low pixel and it has to be larger now. Still playing around with the site and it is very different from the old style. For the moment, it seems a bit confusing but I am uploading and posting again. Enjoy and see you all soon around the forum.
 

silveroxide

Senior Member
Aug 22, 2007
2,036
525
113
Fayetteville NC
Got my avatar back. I should have just taken a photo of my patch on my old uniform. It is hard to google for this patch, it must be a collectors item now. My other patch that is hard to find, is the old ranger company patches from Korea and Viet-Nam, and the RECONDO pocket patch. See you all soon with the updates.
 

silveroxide

Senior Member
Aug 22, 2007
2,036
525
113
Fayetteville NC
On with the Build. The rigging is impressive but that will be for another thread. I was considering using cloth for the sails but from past experiences, the cloth seems to be too thick for the scale. I opted for white gift tissue paper, which is very light and about the thickness scale for the sails. The paper is very fragile and one way that I used to strengthen the sails, is to use a heavy thread around the edges. The purpose of the line is two fold. One, it gives it stability and cuts down on the ripping effect of the running lines when attached. The other, it gives a gripping or anchor points for the block and tackles and a point to attach the lines and the tackles. The tissue also has the added capability of adding symbols and lines more readily than cloth. Enjoy this portion and the next installment will show how the sails are attached, using the tissue paper and thick thread. Enjoy and see you all soon with more.
 

Attachments

  • 251.jpg
    251.jpg
    76.9 KB · Views: 20
  • 252.jpg
    252.jpg
    64 KB · Views: 18
  • 253.jpg
    253.jpg
    63 KB · Views: 19
  • 254.jpg
    254.jpg
    65.7 KB · Views: 18
  • 255.jpg
    255.jpg
    58.4 KB · Views: 15
  • 256.jpg
    256.jpg
    62.6 KB · Views: 15
  • 257.jpg
    257.jpg
    64.6 KB · Views: 19
  • 258.jpg
    258.jpg
    50.9 KB · Views: 19

silveroxide

Senior Member
Aug 22, 2007
2,036
525
113
Fayetteville NC
In the making of the running lines, I used the upholstery thread showed here. It is a very strong thread with a tremendous tensile strength, almost like a fishing line. The booms for the sails were adapted to the sails. Through references, there were various ways of running the lines and I tried to make them look feasible. Enjoy and see you all soon with more updates.
 

Attachments

  • 259.jpg
    259.jpg
    59.2 KB · Views: 25
  • 260.jpg
    260.jpg
    59.1 KB · Views: 21
  • 261.jpg
    261.jpg
    50.6 KB · Views: 21
  • 262.jpg
    262.jpg
    62.6 KB · Views: 20
  • 263.jpg
    263.jpg
    61.6 KB · Views: 21
  • 264.jpg
    264.jpg
    48.3 KB · Views: 20
  • 266.jpg
    266.jpg
    60.5 KB · Views: 21

silveroxide

Senior Member
Aug 22, 2007
2,036
525
113
Fayetteville NC
More stuff on the rigging.
 

Attachments

  • 267.jpg
    267.jpg
    65.3 KB · Views: 17
  • 268.jpg
    268.jpg
    76.1 KB · Views: 17
  • 269.jpg
    269.jpg
    57.6 KB · Views: 18
  • 270.jpg
    270.jpg
    47.2 KB · Views: 15
  • 271.jpg
    271.jpg
    54.2 KB · Views: 20

silveroxide

Senior Member
Aug 22, 2007
2,036
525
113
Fayetteville NC
this is one fantastic ship

Thanks for looking in and for your comment. I hope that your hand is mending well and that you can restart your build thread on the San Salvador.


Re worked the Dead-eyes, by using wood instead of card stock. With the card stock, I was getting one good dead-eye out of three. The drilling had a tendency to rip the lamination apart. By suing the wood ice cream sticks. the procedure was more rewarding. The work is going slow, due to the handmade details and the rigging is a monster. I do not believe, that I will try the HMS Victory. Doris has done a fantastic job in that department. Enjoy and see you all soon with more stuff.
 

Attachments

  • 272.jpg
    272.jpg
    53.9 KB · Views: 17
  • 273.jpg
    273.jpg
    56.1 KB · Views: 15
  • 274.jpg
    274.jpg
    64 KB · Views: 16
  • 275.jpg
    275.jpg
    39.6 KB · Views: 14
  • 276.jpg
    276.jpg
    41.5 KB · Views: 15
  • 277.jpg
    277.jpg
    43 KB · Views: 17
  • 278.jpg
    278.jpg
    47.6 KB · Views: 17

silveroxide

Senior Member
Aug 22, 2007
2,036
525
113
Fayetteville NC
Continuing with more rigging details. The center ratlines are coming along nicely. The original concept, was to make the ratlines on a jig. I had trouble aligning the ratlines to the keepers and the length was either too short and loose or too tight and throwing off the other rigging lines and making them limp. Later on in the build I will show how the ladder system is constructed. Enjoy and see you all soon with more.
smile.gif
 

Attachments

  • 279.jpg
    279.jpg
    68.2 KB · Views: 14
  • 280.jpg
    280.jpg
    60 KB · Views: 13
  • 281.jpg
    281.jpg
    79.6 KB · Views: 13
  • 282.jpg
    282.jpg
    71 KB · Views: 16
  • 283.jpg
    283.jpg
    75.8 KB · Views: 13

silveroxide

Senior Member
Aug 22, 2007
2,036
525
113
Fayetteville NC
The new deadeyes are better than the earlier ones made from card stock. While drilling, I hold a piece of a mini spatula to hold the piece inside the jig. If you do not hold the piece down, it will have a tendency to spin or fly out of the jig. The drill, is actually a piece of rod cut from a paper clip. It does not have the drill ridges but when cut diagonally, it leave a sharp cutting edge which will drill out the hole.

The last photo, is of a rigging jig for the deadeyes and threading of them.
 

Attachments

  • 284.jpg
    284.jpg
    45.5 KB · Views: 15
  • 285.jpg
    285.jpg
    54 KB · Views: 14
  • 286.jpg
    286.jpg
    48.5 KB · Views: 13
  • 287.jpg
    287.jpg
    29.7 KB · Views: 12
  • 288.jpg
    288.jpg
    54.3 KB · Views: 12
  • rigging-and-sails-5.jpg
    rigging-and-sails-5.jpg
    15.1 KB · Views: 14

silveroxide

Senior Member
Aug 22, 2007
2,036
525
113
Fayetteville NC
It is looking better with each little detail. the rigging is murder and there is much more to do. I added some extra details that are not in the plans but I found them in the references. The rigging as mentioned earlier for the ratlines, will be done while the long lines are in place. I tried the jig method, but I ran into conflict with the notches later on. This method works for me. Once the lines are in placed, they are locked in with a strip of laminated or heavy cardstock. By doing this, the lines seem to come through the spreaders. Enjoy and more is to come this way.
 

Attachments

  • 289.jpg
    289.jpg
    79.7 KB · Views: 17
  • 290.jpg
    290.jpg
    61.5 KB · Views: 14
  • 291.jpg
    291.jpg
    67.3 KB · Views: 11
  • 292.jpg
    292.jpg
    85.2 KB · Views: 15
  • 293.jpg
    293.jpg
    83.9 KB · Views: 11

silveroxide

Senior Member
Aug 22, 2007
2,036
525
113
Fayetteville NC
Still working on the rigging. There are more lines being attached that I lost count.
 

Attachments

  • 294.jpg
    294.jpg
    86.6 KB · Views: 12
  • 295.jpg
    295.jpg
    83.5 KB · Views: 11
  • 296.jpg
    296.jpg
    75.6 KB · Views: 12
  • 297.jpg
    297.jpg
    93.3 KB · Views: 12

silveroxide

Senior Member
Aug 22, 2007
2,036
525
113
Fayetteville NC
The main mast standing rigging/ratlines are almost done and the sails will be next. The ratlines have to be done first, because if the sails and booms were attached, it would be a hassle trying to attach the ratlines. here are shown a couple of techniques for aiding in the ratlines while attached.
smile.gif
 

Attachments

  • 298.jpg
    298.jpg
    62.7 KB · Views: 13
  • 299.jpg
    299.jpg
    75.7 KB · Views: 11
  • 300.jpg
    300.jpg
    82.2 KB · Views: 12
  • 301.jpg
    301.jpg
    76.7 KB · Views: 11
  • 302.jpg
    302.jpg
    63 KB · Views: 13

silveroxide

Senior Member
Aug 22, 2007
2,036
525
113
Fayetteville NC
The ratline riggings are finished. very tedious construction. Even thought they were done the easiest way, gluing them in place, it still consumed a lot of time. The upper ratlines for the main mast, were made using the swivel joints from a fishing accessory. For this scale, the #14 is about right. The sails will come next.
smile.gif
303.jpg 304.jpg 305.jpg 306.jpg 307.jpg
 

silveroxide

Senior Member
Aug 22, 2007
2,036
525
113
Fayetteville NC
After following Doris's latest post on the Caroline, I fee inadequate in my build. Hers look pristine and fresh of the launch dock, while mine look like it has been at sea for a while. We both have our own techniques for building but I believe that this will be the last tri-masted ship for a while. I think that I will build smaller sailing ships without all of that rigging,


So on with more rigging. I looked for references on the rigging of Spanish Galleons and they seem to be rigged different from each other. The mechanics are still the same but they are not as orderly as the English ship of the line which follow a strict order for rigging. I assume, that is were the term ship shape came into use, since the used a uniform flow for the rigging. Enjoy and see you all soon with more details, the anchors and the base.
smile.gif
308.jpg 309.jpg 310.jpg 311.jpg 312.jpg 313.jpg 314.jpg 315.jpg 316.jpg 317.jpg
 

silveroxide

Senior Member
Aug 22, 2007
2,036
525
113
Fayetteville NC
Now for the making of the anchors. I was going to make four anchors, two for in service and the others in the stowed position. The deck seemed a bit too cluttered with the anchor on it, that I decided to make just two anchors.321.jpg 322.jpg 323.jpg 324.jpg 325.jpg 326.jpg
 

silveroxide

Senior Member
Aug 22, 2007
2,036
525
113
Fayetteville NC
The ship is finished and there is just left some minor details and a different way to make that display stand. Like I mentioned earlier, My version has that used look to it, compared to one making its maiden voyage. More updates and soon on to something else.
smile.gif
333.jpg 334.jpg 335.jpg 336.jpg 337.jpg 338.jpg 339.jpg 346.jpg