French Battle Ship Paris 1940

jkrenzer

Member
Oct 2, 2007
126
0
16
Syracuse, NY
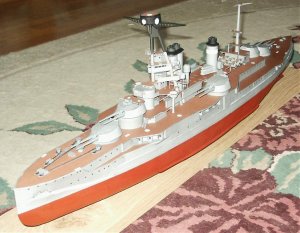
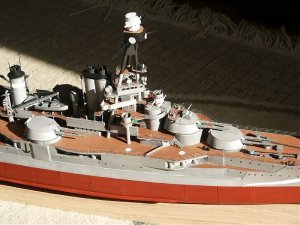
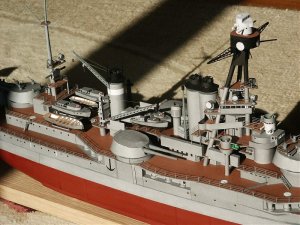
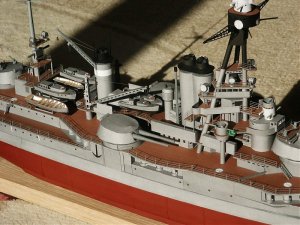
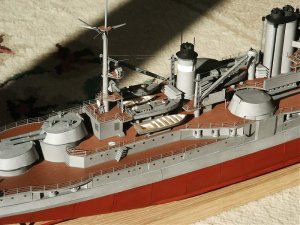
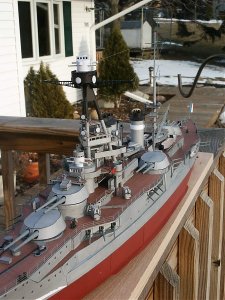
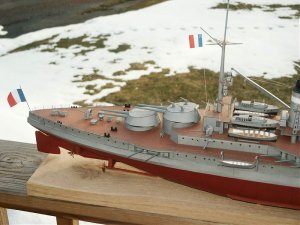
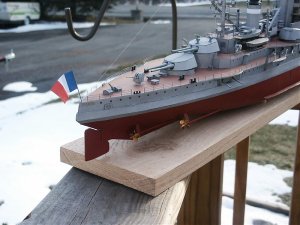
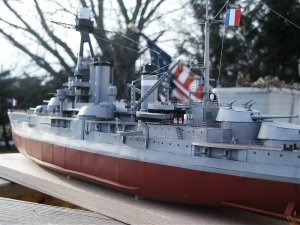
I started the Modelik Paris hull a few weeks back after recieving it. I was still working on the USS Porter but just had to dive into this ship. I got so wound up in that I only did just go back to finish the Porter.

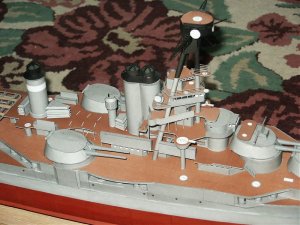
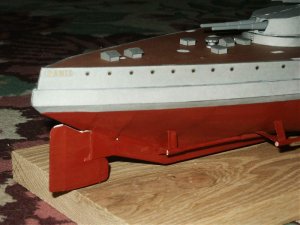
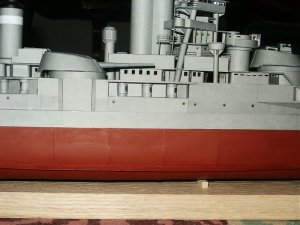
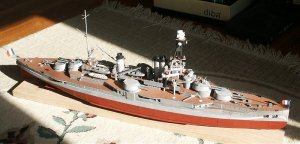
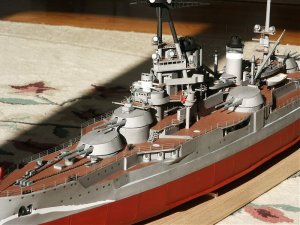
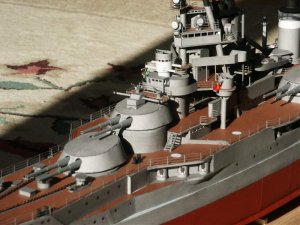
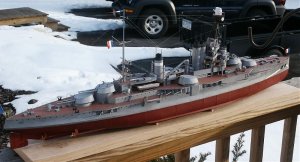
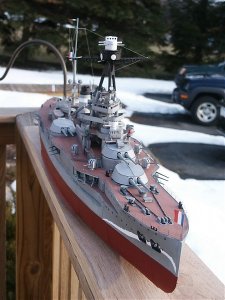
This is one of the best hulls I ever built. I used balsa 1/32 sheet for the main deck and 1/16 for all of the bulk heads and keel. The fit is tremendous on this model. I added no fillel for any of the hull plating and other than painting did no other refinements. The plating is the smoothest I have done yet.

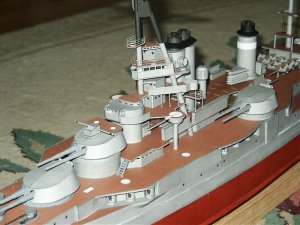
I got so excited with the hull I just had to keep going. The main turrets were the only issue so far. The wrap is off, I had to cut between the two barrel openinga and overlap almost 3 mm to get the barrels to line up with the holes. This is an error in the model as all of the other parts fit fine. I added extra paper to the back side of each turret to account for the now too short wraps.

I will post progress photos from this point foward.

:wave:
 

Attachments

  • PICT0141.jpg
    PICT0141.jpg
    187.7 KB · Views: 35
  • PICT0142.jpg
    PICT0142.jpg
    185.1 KB · Views: 24
  • PICT0143.jpg
    PICT0143.jpg
    152 KB · Views: 15
  • PICT0144.jpg
    PICT0144.jpg
    156.3 KB · Views: 20
  • PICT0146.jpg
    PICT0146.jpg
    192.9 KB · Views: 15
  • PICT0148.jpg
    PICT0148.jpg
    191.2 KB · Views: 14

jkrenzer

Member
Oct 2, 2007
126
0
16
Syracuse, NY
I am almost finished detailing the Paris. All that remains are the single deck mounted secondaries, the casemate barrels, two out rig derricks with boats, the screws, and rigging.

This model has been a pleasure to build. A ship of little historical importance, but the ship it self is so unique. It is rare that an old first generation dreadnaught be brought up to 1930's standards, retaining her wing turrets coupled with the 1920-1930's bridge makes for an oddly beautiful model.

Joe
 

Attachments

  • PICT0086.jpg
    PICT0086.jpg
    129.5 KB · Views: 12
  • PICT0087.jpg
    PICT0087.jpg
    194 KB · Views: 16
  • PICT0088.jpg
    PICT0088.jpg
    222.5 KB · Views: 15
  • PICT0089.jpg
    PICT0089.jpg
    221.4 KB · Views: 14

jkrenzer

Member
Oct 2, 2007
126
0
16
Syracuse, NY
A few more pic.s
 

Attachments

  • PICT0090.jpg
    PICT0090.jpg
    218.2 KB · Views: 13
  • PICT0092.jpg
    PICT0092.jpg
    193.9 KB · Views: 18
  • PICT0093.jpg
    PICT0093.jpg
    205.4 KB · Views: 14
  • PICT0094.jpg
    PICT0094.jpg
    174.3 KB · Views: 21

Beachead

New Member
Apr 13, 2007
53
0
6
N. Va, US
Your pics are so good that you convinced me to try it as well, sometime. I had looked at getting last year but there are other builds first. Your pics and your work look outstanding. Thanks,
 

jkrenzer

Member
Oct 2, 2007
126
0
16
Syracuse, NY
Finshed model.

The ships hull is fairly decent, I only added strips at each bulkhead and nothing on the above waterline. I love the links on the Junyo question I posted recently that shows an iteresting way of building the upper hull and improving its fit. I will try this when I build my Junyo.
 

Attachments

  • PICT0001.jpg
    PICT0001.jpg
    144.6 KB · Views: 21
  • PICT0002.jpg
    PICT0002.jpg
    137.1 KB · Views: 13
  • PICT0003.jpg
    PICT0003.jpg
    105.4 KB · Views: 15
  • PICT0004.jpg
    PICT0004.jpg
    136.9 KB · Views: 12

Beachead

New Member
Apr 13, 2007
53
0
6
N. Va, US
Simply way cool. I have a long way to go to get that good. One question: you replaced the paper decks and ribs with balsa? O.k. one more, how did you attach the paper plating, etc, to the balsa, white glue still? Thanks,
 

jkrenzer

Member
Oct 2, 2007
126
0
16
Syracuse, NY
I laminated the main deck and all other large surface area decks to balsa 1/32 sheet using white glue. I laminated the false deck, keel, and bulk heads to 1/16 sheet balsa with a glue pen. After the glue pen dried I scribed all of the paper formers and applied thin CA. The glue pen does not adhere very well after time but it also tends to warp alot lot less, no water. The balsa also cuts and sands easier the 1 or 2 mm card and creats a model 1/2 the weight. This works for me as I am not the best handler. Strength is till like lumber when done. Balsa and paper have similar thermal expansion coeficients as well.

I no longer build the hull by upper and lower halves. I always cut the keel as one piece height wise then slot the bulks heads every other one up and down. The waterlevel deck I slide into place boths sides shimmying back and forth. I then assembled the all of the hull frames without glue, then gradually worked with thin CA all the joints. I sqeeze the sides, tweek the bulkheads then apply the glue one drop at a time. This method seems to yield a very straight centerline.

The balsa main deck is always glued with the grain parellel with the axis of the ship. No wavy effect results. The balsa only seems to warp perpendicular to the grain but levels out easily over the bulkheads.

I glue paper strips with thicker CA to the bulkhed edges the use white glue brushed on the apply the plating.