[Free Model #3] - Building the Bald Eagles

gcsmith

G. Smith
Jun 2, 2007
6
0
6
Free Model #3

I'm not entering the contest, but thought I would include my effort at the Bald Eagle Build.


Jerry Smith
 

Attachments

  • IMAGE002.jpg
    IMAGE002.jpg
    153.2 KB · Views: 12
  • IMAGE003.jpg
    IMAGE003.jpg
    162.8 KB · Views: 14
M

Mark_1984

Neat job Jerry - it's a big model that makes an impressive display
 

gcsmith

G. Smith
Jun 2, 2007
6
0
6
Thanks for your comments. I really enjoyed building it. It went together much better than I anticipated.

Jerry Smith
 

metoo

New Member
Sep 15, 2007
28
0
6
Jerry wonderful build. This is such a great model.

Update on my progress with the computer:
I got a new hard drive and am finally able to get on the internet on my own computer.
I had been busy reinstalling all my programs but have decided not to do anymore because I am going to upgrade to Vista.
I will be working this weekend on trying to recover info off my old drive. I did have everything backed up to an external drive but didn't realize it was formatted in FAT32 and it wasn't backing it up. Too bad I didn't take the time to check. From now on everything will be backed up to the external drives and to dvds.

Anyway hope to be done with this mess this weekend and start working on the eagles early next week.

Kathie
 

metoo

New Member
Sep 15, 2007
28
0
6
I was asked if I printed this in photo mode and thought I would answer here in case anyone else was interested.

I did not. I printed this in the next to lowest setting on my printer. I have the choices (lowest to highest) of 1.draft, 2.text, 3.text & image, 4.photo or 5.best photo for my printer.

Now you would think that photo or best photo would give me the best printouts, but is all they did was saturate the paper(including photo paper) with ink and looked messy as well as make the paper wavy.

When I got this printer I printed different pages from models with all 5 settings to find the best for the models I wanted to do. You have already read what happened with the 2 highest settings. The medium setting 'text & image' was very good but with darker colors it had bubbly wet spots. With the 'text' setting it was as good as with the 'text & image' setting without the wet spots. The 'draft' setting looked just like a draft, so not so good.

I am using an Epson CX7400. If I was still using my HP I would of used the photo setting. The same with my Canon or Lexmark printers. All printers are different.


When I did mine I did a page that had all dark colors, then a page with dark and light colors together, then a page with all light colors, etc. I did this on both regular paper and photo paper(because I do a lot of pictures too). Some may say this is a waste of ink, but in the long run, for me it has saved me from having a lot of wasted ink & paper.

I did also find that what looks good on regular 20# paper will look good on all the different card stocks I print on. I also found if it didn't look good on the regular paper it doesn't get any better on the card.

This is probably all stuff a lot of you already know, but thought I would put it in here anyway.

Kathie
 

metoo

New Member
Sep 15, 2007
28
0
6
I'm back to working on the eagles. I didn't get much done tonight as the feet on the little one really strains my eyes. I wear very strong glasses when I work on things that small but can then only work for about 10 minutes a couple of times in an evening.

For some reason I can not see through a magnifying glass but have no trouble with microscopes. I'm thinking of getting one tomorrow as I would get plenty of use out of it.

Anyway here is the little bit I got done tonight. I got the leg part of the feet done for all three eagles. The little ones are on the toothpicks. The tool that is in the pic is one I made with a pin and a toothbrush. I cut the brush part off the toothbrush, heated the pin and inserted it in the toothbrush handle. I have made a few of these with different size needles and pins. They work great for small areas and tiny things. Just like little tiny fingers. I could not have done the little eagles feet without this tool.
100_0117c.jpg


Next will be the toes.
100_0118c.jpg


Update on computer problem:
I lost all 250G of info I had on that drive. I was the cause of the problem as I shorted out the computer. I have had this happen to me before so I should have known better. I have so much static electricity in my body that I need to wear a grounding strap when I am on the computer and I hadn't been doing it. It is such a bother having that cord hanging from my wrist but I have now promised myself I will always wear it.
This is an on going problem for me. Even going to the grocery store. I can not open the freezer compartments unless thry have rubber handles or touch the metal grocery shelves. If I do I am in great pain for days sometimes weeks from it.
Anyway I am not going to stress over it anymore.

Kathie
My web page: Kathie's Minis
 

metoo

New Member
Sep 15, 2007
28
0
6
Didn't do much yesterday on the feet. Just got the wedge glued were the claws (nails) will go. I left this over night to make sure the glue was good and dry.
100_0119c.jpg


Today I got a little more done.
Before I started gluing any more, I shaped the toes a little. I rolled the large ones on the handle of a paint brush. The small ones I rolled around a toothpick that I cut the tip off of. The littlest ones I rolled around the tip of a toothpick.
100_0121c.jpg


Got the toes glued except the nails (claws). I had no problems with these except on the littlest ones. I finally cut the tabs off those and had no more problems.
100_0122c.jpg


Next session I will put the nails on. I haven't even cut out the littlest ones yet as I figured I would lose them. I almost lost the toes earlier with a sneeze.

Kathie
http://kathiesminis.6te.net/
 

metoo

New Member
Sep 15, 2007
28
0
6
Finally found some time the other day to do some more on the eagles.
I was a little concerned about cutting out the nails for the tiny eagle as they are so small. I came up with an idea to make it easier. Before cutting them I glued the tips together using a light box to line them up and because I didn't want the tops to be glued I put my needle tools inside to separate the top part.

100_0123COMP.jpg


After letting them dry well I cut out the inside curve....glued them on the toes and then cut the outside curved. this worked well for me.
100_0124COMP.jpg


Now all the nails are on. starting to attach the toes.

100_0126COMP.jpg


All the toes attached. This was not too difficult but a bit fussy. I do feel I could of done a better job on them, though.
100_0127COMP.jpg


Now time to make the wing connectors.
100_0128COMP.jpg


All the components made and ready for putting them together and see the eagles.
100_0129COMP.jpg


Hopefully my next message will show all 3 completed eagles.

Kathie
Kathie's Minis
 

exzealot

Member
Jul 3, 2007
142
0
16
67
Lake Orion, MI
Kathie,

Looks like you made it through the most difficult part of the build; the feet! Congratulations.

Really strange and interesting about your static electricity problem. I have a similar problem, but not enough spark to kill a computer though. When I drive a car with cloth seats, I have enough electricity to arc-weld boilerplate. But when I drive a car with leather seats, I don't create the static electricity.

Ken
 

metoo

New Member
Sep 15, 2007
28
0
6
lriera, I don't know how soon we will see the finished eagles. Like the clumsy person I am, I dropped one of the wings and when I moved to find it, I lost my balance and stepped on it. Smashed it pretty good. That is the really good thing about these free models, when something like this happens I can just print out the parts I need again and rebuild it.

Ken, I am glad to hear the feet were the most difficult since I didn't find them too hard just time consuming. From now on it should be smooth sailing. Unless of course I do something stupid again and smash another part.
Maybe I need to get a leather chair for working on the computer. I have a cloth covered one now. I never even thought about the fact that could be contributing to my electric problem. Thanks.

Kathie
 

lriera

Member
Aug 28, 2007
183
0
16
70
Barcelona - Spain
Ooooohhh, I am sorry for this accident. But I have realised you are very optimistic, that's good in these situations. Looking to it even more positively, now you are going to be quicker and better because you have the experience. :thumb:

Greetings.
 

metoo

New Member
Sep 15, 2007
28
0
6
Thanks for the encouragement guys. I have the new wing printed, sprayed with sealer and almost all cut out now. With any luck I will get it rebuilt tonight and be able to continue on with the eagles tomorrow evening.
Kathie
 

metoo

New Member
Sep 15, 2007
28
0
6
THE EAGLES ARE DONE!
Well not really done as I haven't decided what I am going to perch them on yet, but the eagles are as completed as much as I am going to do from the canon model
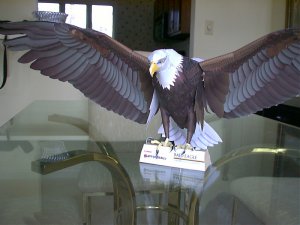
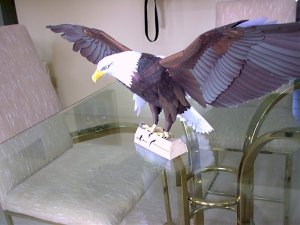
The following pictures show the three together, the large one alone and then the 2 smaller ones together.
The cabinet top they are sitting on is 37" wide. The wings aren't actually crooked. It is just the way I have them sitting.
Here they are:
100_0133comp.jpg


100_0140comp.jpg


100_0141comp.jpg


I kept track of time spent on building these and this is what I came up with rounded to the highest hour:

Printing, sealing and cutting out parts for all 3 eagles: 7 hours

Actual building of all 3 eagles:22 hours, this does not include wait time for glue to dry or rebuilding the wing I smashed or trying to fiqure out the directions.

Best things about this model: Gorgeous finished model, wonderful realistic coloring, most parts fit together very nicely and it was FREE.

Worst things about this model:The directions. The pictorial directions had too small of pictures to see the dark on dark parts and were not very explanatory.

As a beginner with a few simple models already been built, I felt this was a good model for me to do as it was a little challenging but not difficult. I would recommend that anyone wanting to build the eagle to at least do a few simple models of any kind first just to get the feel of paper modeling.

Well that's about it,
Kathie
 

gcsmith

G. Smith
Jun 2, 2007
6
0
6
Free Model #3 Cannon Bald Eagle

Fantastic Build! I second the notion that this work does not reflect that of a beginner.

Hope to see more of your works in the future.

Jerry Smith