

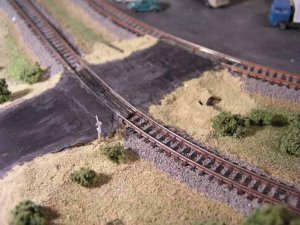
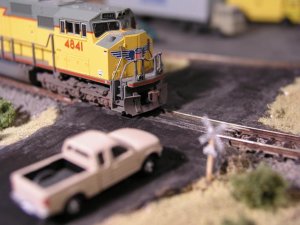
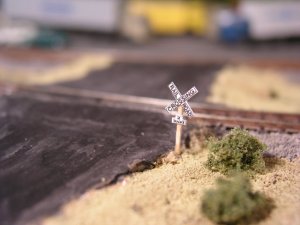
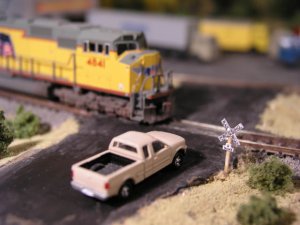
OK...after seeing so many good looking crossings on various layouts posted right here on this forum, I thought I'd try my hand at making a rural crossing from vinyl joint compound. Here's the results and as always open to critique. The compound was a bit too heavy and slightly too dry when it went on and cracked when drying. Although from a distance, the cracking looks pretty good and somewhat like repaving attempts by highway maintenance. I covered the whole thing with three coats of india ink and water mixture. The wooden strips between the tracks (I'm sure they have a proper name - but I can't think of it now) are wooden coffee stirs, cut to size then split in half, glued in place and colored. The drainage pipe was a simple plastic straw. So far, the wooden stirs do not affect car or engine performance, although I did notice that they slowed down an 85' passenger car slightly so I'll have to trim them at the ends. Atlas truck, Kato SD70, Blair track sign plastic sheet cut to size then glued to stick. I was trying hard to get the right looking grade up to and across the tracks. It needs more scenery - mostly roadside weeds and grass - but I wanted a clear shot without covering anything up with "greenery" for everyone to see before really trying to add some small rocks/grass/etc near the roadside. (I'm hoping this works because I have another two that are drying now and will need sanding and painting tomorrow. So if anyone has ideas to improve this look - I'm ready to read them. This crossing is at the far side of the layout...the other two are front-row-center.) The pictures were taken with a halogen light and at very close range so some of the small imperfections are not very disernable to the eye when you're looking at the "big" picture sitting at the layout.
First Attempt at Making a Crossing
- Thread starter Herc Driver
- Start date
You are using an out of date browser. It may not display this or other websites correctly.
You should upgrade or use an alternative browser.
You should upgrade or use an alternative browser.
If you lay down masking tape where the edges of the road will be before you put down the joint compound and then peel it up a little bit after you have applied the joint compound, it will leave you with nice crisp edges. Sometimes it raises the edges a little too much but that is easily fixable with sandpaper once it dries. I have also found that if you put a lot of joint compound down and it cracks while drying, leave the cracks, go ahead and paint them and they look like awesome pavement cracks. Just my technique! Looks good! Then after paint has been applied and dried, I stick on a thin piece of automotive pinstriping tape as a single solid white centerline for the road.
This looks good Herc - I like the roads quite a bit. One suggestion on the crossing itself: stagger the stir stick joints so there is no dominant "seam" in the middle of the crossing. I was going to suggest cutting the stir sticks thinner, then I remembered that you model N scale, and the thought made my eyes hurt! ")
I'll tell you what - I am very impressed with the detail on the SD-70! Wow. The weathering is perfect - very subtle. Is that your work?
Just a suggestion on the photos. If your camera has a zoom, move away from the subject matter as far as possible, bringing the composition back to where you want it with the zoom. This will give you more depth of focus.
Fluesheet - Stagger! Arrggghhh I should have remembered that. The first problem I realized was that I chose a curve to make the crossing at. Proved to be tough working with so small of sticks. I use medical clamps and tweezers from a stitch removal kit along with an Xacto knife...even using them it was a challange to get them aligned and glued into position. I will remember to stagger them on the two crossings I'll finish tomorrow. Thanks!
That Kato SD70 was dusty from the sanding - something I didn't notice till I shot the picture - but the weathering below "the paint line" is my effort. I tried paints but haven't found the right mixture to make it stick to the trucks without looking waaaaay tooooo painted on and heavy. So I use a very light amount of rust colored chalk for the trucks (with extra effort to not get it into the wheel and gearing) and couplers, as well as various brown shades for the fuel spill areas, exhausts and stairs. Normally, I use a bit of white along the top of cars and engines to simulate sun bleaching too.
Thanks for the picture help too...with that camera I'm still learning the "how-to's" of composing a good picture in Nscale.
WOW and on a curve to. You sure picked a hard one for a first one. Did a great job of it too. Looks great. Now all the others willbe a piece of cake
Herc Driver said:the weathering below "the paint line" is my effort. I tried paints but haven't found the right mixture to make it stick to the trucks without looking waaaaay tooooo painted on and heavy. So I use a very light amount of rust colored chalk for the trucks (with extra effort to not get it into the wheel and gearing) and couplers, as well as various brown shades for the fuel spill areas, exhausts and stairs.
Chalk is one thing I have not tried. Based on your results, I need to look into it and start practicing.
Re: the camara, I've been struggling with the same thing (focal depths) with my point and shoot recently, so it's been on my brain. I suspect I have it easy compared to you since I am modling in HO.
AndyWS
New Member
Nice crossing. One thing you might want to consider is signals/signage. For this narrow little road the lone crossbuck works, but not on crossings for more well-traveled roads, urban areas etc.
I posted a thread awhile back looking for people's experience with scale grade crossing signals and was rather dissapointed with the results. I believe I have finally found the ultimate in scale signals. These are really really nice although quite expensive:
http://members.shaw.ca/signalogic/
The crossbucks and track signs on these first two look weird because they are Canadian prototypes, but they make U.S. ones too.
http://members.shaw.ca/signalogic/gate_video.wmv
http://members.shaw.ca/signalogic/ped_gate_video.wmv
http://www.acs.ucalgary.ca/~keay/gateswlx.mpg
These pictures (and the last video above) are from the Wolverine Lynx Railroad: http://www.acs.ucalgary.ca/~keay/wlxhist.html


Notice the seperate masts for the cantilever with the overhead signals, and the gate/rear-
facing signals-as many prototypes are constructed.

I posted a thread awhile back looking for people's experience with scale grade crossing signals and was rather dissapointed with the results. I believe I have finally found the ultimate in scale signals. These are really really nice although quite expensive:
http://members.shaw.ca/signalogic/
The crossbucks and track signs on these first two look weird because they are Canadian prototypes, but they make U.S. ones too.
http://members.shaw.ca/signalogic/gate_video.wmv
http://members.shaw.ca/signalogic/ped_gate_video.wmv
http://www.acs.ucalgary.ca/~keay/gateswlx.mpg
These pictures (and the last video above) are from the Wolverine Lynx Railroad: http://www.acs.ucalgary.ca/~keay/wlxhist.html
Notice the seperate masts for the cantilever with the overhead signals, and the gate/rear-
facing signals-as many prototypes are constructed.
AndyWS said:I posted a thread awhile back looking for people's experience with scale grade crossing signals and was rather dissapointed with the results.
Andy, this is good stuff. You ought to start your own thread on signalling (or append it to your previously posted one) to make it easier for future information seekers to find it.
Wow...that is great Andy! You're right about the crossbucks/rural considerations. I was trying to accomplish two things at that crossing. First, I spent a while cutting those Blair signs (Nscale) and getting as right as I could on that wooden sign post so I wanted a place where they'd work. Secondly, I wanted to try the plaster method to making a grade and if it didn't quite look like a normal high traffic quality - that'd be ok. Third, the wooden crossing strips between the rails...sort of a test for size/shape. For Nscale, the wooden coffee stirs I used were the correct height to not interfere with the trains - which was most important to me. The next batch I make will be a bit more uniform in width and will be staggered. My largest mistake was the consistancy of the plaster. It ended up being too lumpy and too dry which made it difficult to work with and it cracked when it dried. I attempted two other crossings in the front of the layout but was so displeased with the way they sanded out, I covered them up with an asphalt road (Noch...I think) and will fix them at a later time. I'm guessing Woodland sells a road system that really works...but I was just trying different things around the house that I could use on the layout. I ended up making ok looking asphalt crossings...but those one day will be re-worked too.
Back to signals...those look great Andy. Actually, everything about the crossings, signals, fencing looks great. I appreciate all the effort people must have taken getting that layout looking the way it does. So many little details that make a complete scene.
Thanks folks for the opinions and critiques...I'd appreciate all the help I can get, since IMHO the crossing is one of the most critical things to model on a layout...to me in bridges the "trains and track" to the rest of the layout bridges, LPPs, cars, trucks, etc. And of course it is the natural focal point for trackside photography...so I really want to get mine looking right.
Novemebr Model Railroader has an article on making roads. He uses 7 layers of masking tape as a former for city streets (in HO). The ragged edges look a lot like the smaller highways I've driven on.