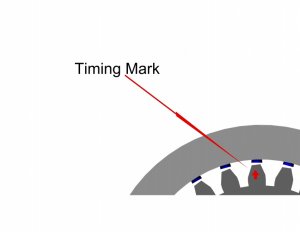
Ferrari Engine design and build

retunga

Designer
Jan 15, 2012
174
106
58
Planet Earth
www.watch_this_space.com
Thanks Z

I do in fact have a potertimeter in the electronics to slow it down, I just ran the motor at full speed to make sure that the model could do it, but I will most likely run it slower, The valve train will be open to see the parts working, what I have done is that if one wants to close the model up with clear plastic for dust or other reasons you can but still enjoy the working model at the same time.
 

Revell-Fan

Co-Administrator
Staff member
Administrator
Moderator
Aug 1, 2009
11,609
12,349
228
Vreden
The pure sight has enough power to blow me away... Great work so far!
 

retunga

Designer
Jan 15, 2012
174
106
58
Planet Earth
www.watch_this_space.com
Update time...

After 2 months of building and redesigning and building and modifying and correcting, at 10pm last night I have finally got the valve and cam shaft to
work and the design to also be repeatable for building.
There has been problems mostly around angles and tolerences of parts, and also giving enough for bends and rolls in paper...

The photos that I have uploaded is that of my test build model piece that has been cut and hacked and patched and so on, but the concept and functioning of the
part is what is important here.

enjoy.

R

IMG-20131025-00148_zps4f404b3b.jpg


IMG-20131025-00147_zps640797a0.jpg

Valve in the closed position.

IMG-20131025-00146_zps3eaa9af9.jpg

Valve in the open position

IMG-20131025-00145_zps286a6671.jpg
 

zathros

*****SENIOR ADMINISTRATOR*****
Staff member
Administrator
Moderator
Apr 5, 2013
13,498
9,549
228
I wish I had seen those switches, you could have used a much smaller magnetic switch, with zero contact to make the connections. They are cheap too. $1.67 each. You need only embed the magnet in the gear and embed recieving units into the outer ring, and run the wires out the back. The result would be no visible parts (visible here for clarity), obviously for anyone looking at this you would not want the parts to interfere with the gears.... Your method will work, and is quite robust. I just thought I would propose another one. Obviously, you need no input from me. Here's a link I use for calculating out LED's, it's easier than doing it in your head of with a calculator (plus, it has pretty pictures!):

http://ledcalc.com/ :)

guru.png


Source for Mag switches:
http://www.smarthome.com/7359/SECO-LARM-SM-207-5Q-W-Short-Round-Magnetic-Contacts/p.aspx


7359main.jpg
 

Attachments

  • Ret1.jpg
    Ret1.jpg
    44 KB · Views: 10
  • Ret2.jpg
    Ret2.jpg
    44.9 KB · Views: 57
  • Ret3.jpg
    Ret3.jpg
    36.8 KB · Views: 14

retunga

Designer
Jan 15, 2012
174
106
58
Planet Earth
www.watch_this_space.com
Pity... I have worked with these types of switches in the past, the one is the cost of the switches and also getting hold of them, I have tried to get info and shipping times in the past for electronic components from more than one supplier and as soon as you say where that item (s) needed to be sent, it is then like you have the plague, that is why I have ended up using the mech switches because of the reason.

:)
R
 

retunga

Designer
Jan 15, 2012
174
106
58
Planet Earth
www.watch_this_space.com
Update Time

I have at last completed the first cylinder head that will be used in the model, just 11 to go....

Here is a few photos of the first cylinder head.

IMG-20131120-00217_zpsd4eab38a.jpg


http://i268.photobucket.com/albums/jj13/quintin_cloud/IMG-20131120-
00214_zpsee28ddb1.jpg

IMG-20131120-00213_zps0fdc3c57.jpg


Valve's closed

IMG-20131120-00215_zpscdf3dac1.jpg


Valve's all Open

IMG-20131120-00216_zps6ecdc59e.jpg


This I guess can be considered the worlds first working cylinder head....:rolleyes:

R
 

retunga

Designer
Jan 15, 2012
174
106
58
Planet Earth
www.watch_this_space.com
Staggering amount of work is correct in saying, I am still busy making all the part just for the cylinder head, and at the moment I would best guess that I have made 60% of them....o_O
I have been busy since October with the head but that also includes a good few days where one is just not going to be able to model for what ever reason and that has happened alot.:(

But keep on going is the song that I continuely sing :):D
 
  • Like
Reactions: zathros

zathros

*****SENIOR ADMINISTRATOR*****
Staff member
Administrator
Moderator
Apr 5, 2013
13,498
9,549
228
Just putting some regular shiny Scotch tap on the cam would reduce much friction, some on the valve stem too. If the pistons are loose in the sleeves then I wouldn't worry, but you may want to do that on the rods to act as bearings and on the crank to reduce friction. It is really quite stunning. You are an inspiration and amazingly talented. :)
 

retunga

Designer
Jan 15, 2012
174
106
58
Planet Earth
www.watch_this_space.com
Well it is time for a photo update, the photo update was late November '13,:sour: in that time I have been building the better part of +/- 2700 parts into small assemblies :hungry:, now here is a photo of that effort that has gone into it in the last 7 to 8 months, now I can start building the cylinder heads and do the timing of the engine at last after 2 years of thinking how I am going to get it right.

20140705_142135_zps330c51bc.jpg


When I am finished assembling the 11 heads I will post again some photos.
:) :cool::D
R
 

Rhaven Blaack

!!!THE MAN BEHIND THE CURTAIN!!!
Staff member
Administrator
Moderator
Jun 12, 2009
12,515
9,888
228
Oregon
www.deviantart.com
This is an IMPRESSIVE PROJECT!!!
So when are you going to be fitted for your white "HUG-ME" jacket?
I am surprised that you are not singing this song (after building all of these parts :wacky:):

I will keeping an eye on this thread.
 

zathros

*****SENIOR ADMINISTRATOR*****
Staff member
Administrator
Moderator
Apr 5, 2013
13,498
9,549
228
That is one awesome collection of parts. Each, a model in it's own right. Incredible! :)
 

retunga

Designer
Jan 15, 2012
174
106
58
Planet Earth
www.watch_this_space.com
update time....
After 10 days I have now finally completed the building of all the cylinder heads :eek::cool:

In the photos below is the 12 cylinders head complete and also the heads in there correct spot on the engine, now the real fun is going to start in that of getting the timing correct and figures crossed working, if it does not work then it will remain a static model of the engine, but lets see how it goes.....

20140715_205051_zpsf415814a.jpg


20140715_210110_zps2dda722d.jpg


20140715_211016_zps6afe1ce7.jpg


What I will do is post more pictures after the timing work is done :rolleyes::cool:
 

zathros

*****SENIOR ADMINISTRATOR*****
Staff member
Administrator
Moderator
Apr 5, 2013
13,498
9,549
228
Please, don't take this wrong. This model is beyond awesome, but looking at it, I think you could do a two cylinder Ducati Desmo (Desmodromic valve train) engine quite easily. Maybe next time? It would involve far less parts. i had the opportunity to take a Ducati 600 Pantah up to 125 m.p.h.. The two cylinder motor redlined at 10,000 r.p.m.! Just an idea. It was the cylinder heads that made me think of that.

Now, back to the Ferrari engine, super, and excellent! :)


33-1098-Engine-72-dpi.jpg
 

retunga

Designer
Jan 15, 2012
174
106
58
Planet Earth
www.watch_this_space.com
Hi Zathros

Far from it, I have in fact been looking very seriously into doing to the desmo valve setup from the Ducati engine, one thing that would great is LESS parts, one thing that would be very important is getting the cams and followers spot on but that should easy to do after getting this engine valve setup correct. :)
R