Fast Tracks Jigs.

tetters

Rail Spiking Fool!
Jan 21, 2005
879
0
16
50
Toronto, Ontario, Canada
Fast Track Hand Laid Turnout Jigs.

http://www.handlaidtrack.com/item.php?id=1253&link_str=215::270::277&partno=AK-HO-T-6-ME83

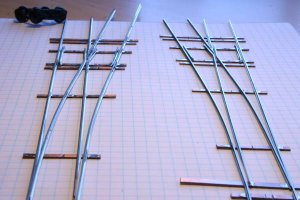
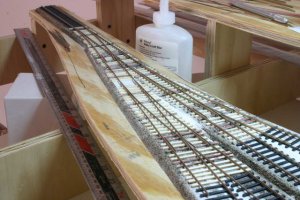
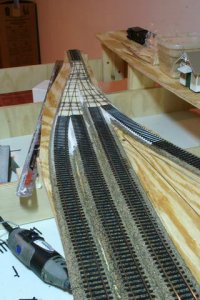
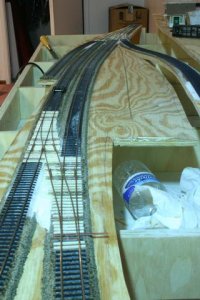
I'm curious as to what you gents think about these things. There must be some sense of accomplishment to being able to handlay your own track and truely make your layout unique.

As far as cost factor, is there any real benefit to this method of construction? After the initial start-up fee of course, in the long run, is there really any savings? Or am I wasting my time even considering this? The way I figure, if you are only making say two or three turnouts, then you'd be better off just buying the prefab ones and going on your way. However, if say you needed or had plans to do a batch, like 10-20 plus over the long term, then perhaps, if you have the inkling, the confidence, the time and a steady hand this could be an alternative.

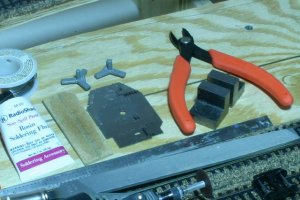
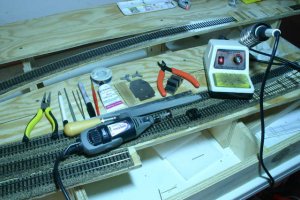
The only reason I ask as well as it will be sometime before I start actual construction and maybe banging off a couple of these once in awhile will keep me motivated, until I'm ready to start my actual building.

Yes, I'm an ambitious bugger who isn't afraid to try new things. :D
 

jkristia

Member
Aug 1, 2002
426
0
16
56
Simi Valley, CA,
Visit site
You can easily build turnouts without the use of any jig. Print out the template from the same web page, glue it to a piece of scrap wood and build your turnout right on top of the template. They may not come out right the first time you try it, and it may take you a long time (maybe a couple of hours), but already on the second or third one it becomes much easier, and should take only about an hour each one.
If you are planning on building only a couple of turnouts then buying a jig would of course make each turnout extremely expensive, but if you are planning on building 10-20+ then I would definitely consider it.

I just started on a small module (HO) after being out of the hobby for a couple of years, and on this module I will have 6 turnouts, 3 on the main and code 70 and 3 on the branch in code 55. During this week I got the 3 turnouts on the main build, took me probably total of 4 hours or less and I hope to finish of the remaining 3 turnouts over the weekend.

So whether you should buy the jig or not is entirely up to you, but it is not necessary if you just want to ‘try your hands’ on building turnouts. But be aware!, once you have built one or two you might get hooked……..

I don’t have any pictures of what I am currently working on, but I do have some pictures of some C40 hand laid I did on my N layout 4 years ago.

http://community.webshots.com/user/jkristia

Jesper
 

tetters

Rail Spiking Fool!
Jan 21, 2005
879
0
16
50
Toronto, Ontario, Canada
Wow that is awesome. It's so straight...so precise looking too. How do you do it? It looks better then prefab sectional/flex track on so many levels...oh boy I can feel myself getting in deep on this one. hahaha!

Yeah the only reason(s) I was even considering the hand built route is;

1) I'm in no hurry as of this moment.

2) I'm gonna need a lot of them!

3) I'm a bit of a sadist. LOL!!!
 

jkristia

Member
Aug 1, 2002
426
0
16
56
Simi Valley, CA,
Visit site
Here is a picture of 2 turnouts I build on top of a printed template.
The left is code 70 and the right is code 55. It really doesn't take much, order some ME rail from one of the online stores (unless you are lucky enough that your LHS carries it), order some PC ties from either FastTrack and CloverHouse, get yourself a NMRA gauge and a couple of ME 3 point gauges, and maybe a couple of roller gauges, a solder iron and a lot of patients, that is really all there is to it.

Jesper
attachment.php
 

Attachments

  • IMG_9861.JPG
    IMG_9861.JPG
    44.9 KB · Views: 214

tetters

Rail Spiking Fool!
Jan 21, 2005
879
0
16
50
Toronto, Ontario, Canada
Wow. Those look really good Jesper. I'm curious as to how you make the points and is there some sort of hinge for the rails that move located up where the frog is? It looks like the points kind of stay in one position and need a mechnical throw either by hand or electric to hold it in the other position. Is that correct.

So I don't pester you is there an on-line source that I can use to read-up on this?

I have so many questions.
 

Russ Bellinis

Active Member
Feb 13, 2003
4,501
0
36
78
Lakewood, Ca.
Visit site
On those type of turnouts, you actually bend the rail to throw the switch. They work much better than commercial switches with hinged points because you get a single piece of rail all the way to the frog and you get a natural easement when you bend rail. Code 83 and smaller rail is light enough to bend very easily.
 

pgandw

Active Member
Jul 9, 2005
1,002
0
36
cyclingshane73 said:
That's what I thought. I just wanted to be sure.

Would that type of "hinge", if you will, require a mechanical switch to hold it in place? I agree a bend creates a more natural curve I'm just wondering how it stays in place once the turnout get thrown to switch tracks. Would one of these guys be strong enough to hold it in place?

http://www.nmra.org.au/Layout_Tours/Saxon/Switch_Throw.html
I have had no problems with almost any type of throw on my handlaid turnouts. I did not use twin coil switch machines because I wasn't sure how the spikes would hold up to the jolt over the long term. I also put in a wire Z or V spring in the linkage to relieve the pressure of any over-throw from the slide switch - what I used most of the time because of the contact needed switch the frog polarity. The friction of the throw bar against the stock rail bases alone was sufficient to hold the points in place without any linkage attached on my code 70 HO turnouts. In fact, I threw the turnouts by hand by pushing th points (and flipped the slide switch for the frog polarity) for quite a while before I got around to installing a linkage.

Differences in my turnouts vs Jesper's (almost every hand layer has slightly different techniques somewhere):

- The only place I used PC board was for the throwbar. The rest was spiked to wood ties.

- I laid my turnouts in place on the layout (they were right up front) so they are a part of the track. The curves and frog number are whatever I need them to be.

- Biggest difference is in the wiring - Jesper may modify his when he installs. I cut 2 gaps in the closure rails up near the frog so that the points are insulated from the frog. The throwbar has a gap cut in the foil between the 2 points to insulate the points from each other. A feeder (I used 26 gauge magnet wire) was attached to each point up near the frog gap and attached to the adjacent stock rail. The feeders and the sliding surface of the PC board throw bar under the stock rails power the points and closure rail. As I said earlier, the frog is powered separately by a contact on the turnout throw. This gave me "DCC-friendly" turnouts with powered frogs long before DCC was even invented.

- I spike the closure rail, but leave the point portion of the rail free to flex. The "hinge" point is the last set of spikes before the point - I picked this by eye. This last pair of spikes would be dipped in glue before inserting for better holding. The hingeless design Jesper and I use does impart a slight circular motion to the throw bar, how much depends on track gauge and where the flex point is. In my case, some of that rotary motion is relieved by the points and closure rail sliding ever so slightly longitudinally past the spikes towards/away from the gap up near the frog.

- Due to several factors, including the slight rotary motion, the solder joint of the point to the PC board throwbar is the weak point of my turnouts. Others with similar construction have added a very small brass shim on top of the PC board throw bar on the inside corner of the point. This gives more soldering surface for the joint and a horizontal support for the point. Some others use vertical pins through the PC board into the base of the point. I will try one of these methods on my next layout.

US prototype practice is for hinged points (there are a few exceptions). The biggest downfall of stub turnouts was the inability to "bend the iron" when rail sizes got up much bigger than 80#. However, the hinges used by the prototype scale to be too small to be functional in the smaller gauges. The hingeless design of model turnout making is a quick way to making very smooth running turnouts. However, there are more fastidious track layers than I who do lay hinged turnouts. Usually, some type of spring wire against the point rail web serves as the hinge.

Fast Tracks jigs help a beginner in handlaid track to get very nice turnouts right from the start. They give the beginner much-needed confidence by using a proven system, and the jigs do speed the process. Drawbacks are that the jigs are spendy, and you need a another jig for every rail and turnout size you use. If you really like the Fast Tracks (or are really scared to hand lay turnouts), I recommend buying a jig in your most commnly used turnout size. Then use what you have learned to lay your own for the other turnout and rail sizes.

my thoughts, your choices
 

jkristia

Member
Aug 1, 2002
426
0
16
56
Simi Valley, CA,
Visit site
>> The rest was spiked to wood ties.
I tried that for simple straight track, but my skills are not at ‘spike’ level yet, and I also want to use C55 rail for the sidings and I’m afraid the spike heade is too big the that small a rail (or again, my skills are not up to the task).

>> - I laid my turnouts in place on the layout (they were right up front) so they are a part of the track.
Right, these 2 turnout were build on the bench just for practice. On the (small) module I’m working on the turnouts are build in place so they flow with the track.

>> Biggest difference is in the wiring - Jesper may modify his when he installs
Correct, there has to be 2 gaps, one in the frog and one in the closure rail, and then the frog will be powered through a dpdt switch.

For how to throw the turnout. I haven’t decided yet what I will do on the module, but I think I will just use a small dpdt swith mounted next to the turnout, but that is still an ‘open issue’.

Fred, so I gather you have done a lot of hand laid, so you might be able to give me some advice. I have a C70 main line turnout, and immediately after I will have a C55 branchline turnout. The problem is that the C55 turnout starts almost at the frog of the mainline turnout. I started building it yesterday, but ripped it off again as I didn’t like the transition, so now I’m thinking of building the turoout ‘floating’ in place, then when done, slightly lift it and add shimmes to one end to get it to C70 level and the slidt in the wood ties. How do you usually make a transition from one rail size to another ?

I will post some pictures over the weekd of how it turned out.

Jesper
 

60103

Pooh Bah
Mar 25, 2002
4,754
0
36
Brampton, Ontario, Canada
Visit site
Shane: Tim who does Fast Track is a Kitchener guy. He usually has a demo/sales stand at the Copetown show
I never used a jig to build tuenouts (my half dozen or so!). I think I would need to build a dozen or so identical to justify one of the jigs. I also wonder about hand building identical turnouts; one of the "advantages" of hand-laying is getting smooth flowing trackwork.
 

tetters

Rail Spiking Fool!
Jan 21, 2005
879
0
16
50
Toronto, Ontario, Canada
60103 said:
Shane: Tim who does Fast Track is a Kitchener guy. He usually has a demo/sales stand at the Copetown show
I never used a jig to build tuenouts (my half dozen or so!). I think I would need to build a dozen or so identical to justify one of the jigs. I also wonder about hand building identical turnouts; one of the "advantages" of hand-laying is getting smooth flowing trackwork.
The only advantage I can see to wanting identical turnouts is when laying a yard. Especially if you want to keep it consistent. Otherwise you're right about wanting smooth flowing trackwork. I'm seriously considering this as an option when the time comes to start building my track. There are over twenty # 5 switches packed into it and my space (width- wise at least) is limited. Plus I've never hand-laid track, a jig could be a good way to ensure I keep everything in check. It might also be a great way to build up my confidence as I have a curved-turnout and a couple of X-overs as well.

I will take the advice of trying a few hand laid w/o the jig and see how it goes. I'd like to get some advice on techniques how to file the frog points as well as the points for the moving track. It would seem that those areas would be critical when building your own turnouts so your cars don't pick the rails.

I'll aslo see if I can make it out to the show on February, the 25th. Are you sure that Tim is going to be there? It's about an hour's drive and I don't want to waste my time. I may bring the kids along.
 

tetters

Rail Spiking Fool!
Jan 21, 2005
879
0
16
50
Toronto, Ontario, Canada
Well I took a step towards attempting this project. I ordered some HO code # 83 Micro Eng Rail from my LHS this morning. It should be in early next week sometime. I picked up a pair of the those Xuron rail cutters too while I was there. I asked about the PCB ties and they said I could get some from Circuit City (Radio Shack). Has any one else picked up the PCB board for ties at CC? Otherwise I may order a batch on line and take it from there.

It was funny the guys looked at me like I had two heads when I told them I was going to attempt to handlay a turnout. But they were still pretty cool about it.

One more quick question as well. I have a 25W soldering iron. A lot of the stuff I've come across mentions a 30-35W iron. Will the 25W iron be adequate enough to use in the construction of turnouts? I've melted solder with it before, so I don't see why not. I'd also rather not run out and by ANOTHER soldering gun. I already own a 100-140 gun but that might get too hot. If all else fails I could whip out some propane and my flint and light a torch.sign1
 

60103

Pooh Bah
Mar 25, 2002
4,754
0
36
Brampton, Ontario, Canada
Visit site
Shane: I don't know about Tim. He does use trains .com under the name of Fast Track; you might PM him there. or see if they have a web site.
I don't know about the PC ties; I soldered some once and I don't know what watts I had. My ties came from a British turnout kit and I ignored most of them.
I think we have a turnout tutorial somewhere around,
 

Greg Elems

Member
Dec 19, 2002
404
0
16
66
Reno Nevada
Visit site
Jesper those are great looking switches. I did buy one of the jigs and the jig to file the rails to make the frog point. Probably the best $25 dollars I spent on that purchase. Now they sell a jig that not only helps you file the frog point but the same jig lets you make the switch points. I figure that after making 5 switches in S it paid for itself. I plan on making a yard with the #5 switches and figured at least 10 switches were needed so I went ahead and bought the jig. My first switch was a success and each one since takes less time and looks better. I chose to make the switch points hinged rather than one long rail from the frog. Either way you build the points you get a switch that beats anything you buy from Atlas, Shinohara or who ever. One advantage to the jig is it holds the rails, ties in gauge and in place till you are done. The switch I built without the jig took a little bit more work and fiddling with but was still nicer IMHO than the Atlas snap track switch I was going to use. At a minimum I'd get the point and frog jig to hold the rail to speed up the filing and give you consistent parts.

Greg
 

jkristia

Member
Aug 1, 2002
426
0
16
56
Simi Valley, CA,
Visit site
cyclingshane73 said:
Well I took a step towards attempting this project. I ordered some HO code # 83 Micro Eng Rail from my LHS this morning. It should be in early next week sometime. I picked up a pair of the those Xuron rail cutters too while I was there. I asked about the PCB ties and they said I could get some from Circuit City (Radio Shack). Has any one else picked up the PCB board for ties at CC? Otherwise I may order a batch on line and take it from there.

It was funny the guys looked at me like I had two heads when I told them I was going to attempt to handlay a turnout. But they were still pretty cool about it.

One more quick question as well. I have a 25W soldering iron. A lot of the stuff I've come across mentions a 30-35W iron. Will the 25W iron be adequate enough to use in the construction of turnouts? I've melted solder with it before, so I don't see why not. I'd also rather not run out and by ANOTHER soldering gun. I already own a 100-140 gun but that might get too hot. If all else fails I could whip out some propane and my flint and light a torch.sign1


Cool, rememeber to post some pictures of how it turns out.
I haven't tried code 83, but code 70 requires a lot more filing that code 55, so I figure c83 requires even more.

It might be a good idea if you watch the online video in FastTracks web site, there here explains in details how to build a turnout using his jig, and all of the techniques are the same if you build a turnout without the jig.

For PC ties, you can order them either from FastTrack or Clover House, those are the only 2 places I know of, but there might be other places where you can order it online.

When I file the frog and closure rail points, I use a very simple jig made of a little piece of hardboard with a groove made with a small saw, I lay the rail on the side with the base in the groove, this holds the rail in place while filling.

Today I finished 2 of the 3 code 55 turnouts and I will post some picture tomorrow.
For the solder iron, I think a 25w should be ok, I think what I have is a 40w with temperature control.

Jesper
 

jkristia

Member
Aug 1, 2002
426
0
16
56
Simi Valley, CA,
Visit site
Greg,
The module I'm working on only have 6 switches, so for this I didn't feel I could 'justify' to buy jig, but once I start the layout, then I'm sure I will buy a #6 code 70 jig and use that same jig for bith code70 and 55.

I did notice his PointFrog filing jig, but I find it quite easy to file the rail using the simple hardboard with a groove to hold the rail in place while filing. Sure, the angle of the rails at the frog point is not as perfect as it is with the jig, but once soldered I don't think it makes a difference.

The PointFrog jig you have is that for code 70?, if so, have you tried it with code 50, will it holde the rail firm while filing ?

Jesper
 

tetters

Rail Spiking Fool!
Jan 21, 2005
879
0
16
50
Toronto, Ontario, Canada
jkristia said:
Cool, rememeber to post some pictures of how it turns out.
I haven't tried code 83, but code 70 requires a lot more filing that code 55, so I figure c83 requires even more.

It might be a good idea if you watch the online video in FastTracks web site, there here explains in details how to build a turnout using his jig, and all of the techniques are the same if you build a turnout without the jig.

For PC ties, you can order them either from FastTrack or Clover House, those are the only 2 places I know of, but there might be other places where you can order it online.

When I file the frog and closure rail points, I use a very simple jig made of a little piece of hardboard with a groove made with a small saw, I lay the rail on the side with the base in the groove, this holds the rail in place while filling.

Today I finished 2 of the 3 code 55 turnouts and I will post some picture tomorrow.
For the solder iron, I think a 25w should be ok, I think what I have is a 40w with temperature control.

Jesper
Great! Looking forward to seeing some of those switches. Do you mind posting a picture of the piece of hardwood w/groove you use for filing your points. I'm sure its something very simple, I'm just a visual kinda guy.

I watched the video...several times. I get hooked into the idea the more I watch it.

That would be super. :thumb:
 

jkristia

Member
Aug 1, 2002
426
0
16
56
Simi Valley, CA,
Visit site
I took a picture of the tools I'm using. What I haven't bought yet is the roller gauges from railway engineering, I have some for N scale, and they are really helpful, but it is possible to build without.
attachment.php

and a closeup of the 'jig', I think you can see the groove I was talking about.
attachment.php


Jesper
 

Attachments

  • IMG_9884_closeup_jig.jpg
    IMG_9884_closeup_jig.jpg
    56.8 KB · Views: 97
  • IMG_9884.JPG
    IMG_9884.JPG
    65.9 KB · Views: 94

jkristia

Member
Aug 1, 2002
426
0
16
56
Simi Valley, CA,
Visit site
No to hi-jack your thread, but as promised, here are a couple of pictures of where I'm at.
I have uploaded larger versions to my webshot album
http://rides.webshots.com/album/118134441xkKyNt

edit: hmmm.. I don't know how to show the pictures without this extra link showing up. Anyways, here they are
attachment.php

attachment.php

attachment.php
 

Attachments

  • IMG_9877.JPG
    IMG_9877.JPG
    61.2 KB · Views: 90
  • IMG_9880.JPG
    IMG_9880.JPG
    39.1 KB · Views: 100
  • IMG_9882.JPG
    IMG_9882.JPG
    37.2 KB · Views: 101

pgandw

Active Member
Jul 9, 2005
1,002
0
36
jkristia said:
>> The rest was spiked to wood ties.
I tried that for simple straight track, but my skills are not at ‘spike’ level yet, and I also want to use C55 rail for the sidings and I’m afraid the spike heade is too big the that small a rail (or again, my skills are not up to the task).[\quote]

The smallest spikes (micro-spikes I think they call them) from Micro Engineering (ME) will work with code 55 rail. Also, Proto:87 Stores (http://www.proto87stores.com/p87stores/index.htm) has scale and slightly bigger than scale size spikes that will work with all sizes of rail, including code 40 in HO. I will be using Andy's spikes on my next layout, hopefully starting this coming summer after I move to a new house (with basement!:)).

Fred, so I gather you have done a lot of hand laid, so you might be able to give me some advice. I have a C70 main line turnout, and immediately after I will have a C55 branchline turnout. The problem is that the C55 turnout starts almost at the frog of the mainline turnout. I started building it yesterday, but ripped it off again as I didn’t like the transition, so now I’m thinking of building the turoout ‘floating’ in place, then when done, slightly lift it and add shimmes to one end to get it to C70 level and the slidt in the wood ties. How do you usually make a transition from one rail size to another ?

I will post some pictures over the weekd of how it turned out.

Jesper
Normal prototype practice is to remain with the larger rail size until after the turnout. The reason for this is the extra wear that turnout rails get compared to regular track. Note that curved track rail wears faster than straight track rail. Sometimes the modern prototype will increase rail size and/or switch to concrete ties just for high speed curves.

I used code 70 rail throughout as code 55 wasn't available when I built my last HO layout (yes, I'm a dinosaur), and code 40 couldn't be spiked with available spikes at that time. However, since I sand the tops of my ties after gluing them to ensure a level surface, I planned on just carefully sanding to leave the one side of the joint the necessary height above the other. With PC board ties, you will have to shim using .005" or .010" sheet brass.

I don't use rail joiners at all - I just butt the rail ends together. This avoids vertical mismatches and bumps where the joiners are. It's probably easier to make good butt joints (or solder them) with PC board ties.

I cut my PC board throwbars from sheet PC board using metal shears and/or an Atlas track saw/hack saw, but I can't imagine doing that for a bunch of ties. As somebody else mentioned Fast Tracks and Clover House are the most commonly used sources for PC board ties. I believe they come in 2 thicknesses.

Steve Hatch of Railway Engineering showed me a different technique for making frogs that didn't involve nearly as much filing at the HOn3 Symposium last June. He bends a single rail to form the complement of the frog angle. Then he files the head and base until a hole in the web appears at the bend. Last he folds back the rail so that the 2 filed sections meet at the point. Steve Hatch talks about his track laying techniques - he sells custom turnouts and track in HOn3 - on his web site at http://www.railwayeng.com/handlay6/hndly-h3.htm He also has the roller gauges and other track tips on his web site at http://www.railwayeng.com/

It's been a busy weekend so I couldn't get back to you sooner. You are doing some great work!

yours in handlaid track