dreadnoughts (Patoroch with Newobmij recolor)

terrinecold

Member
Apr 15, 2012
303
1
16
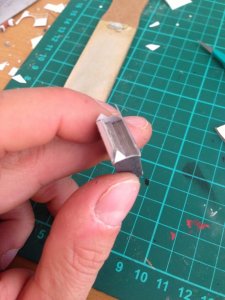
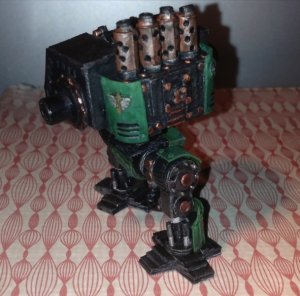
painted the skeleton, there are still a few "skeleton" parts in the back pack but I wanted to paint this part first as some area will be hard to reach once the backpack is installed.
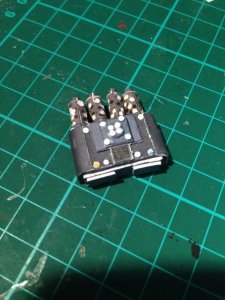
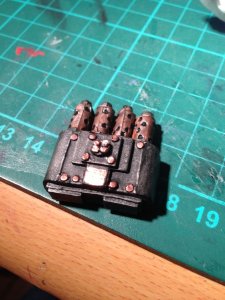
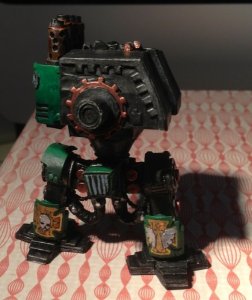
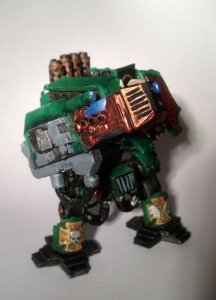
Anyway here are some pics, I have used a very simple scheme (after all it is only the skeleton), after the black primer I dry brushed everything with a regular silver acrylic (plate mail metal from army painter), then I did a dark wash (dark tone from army painter). Then I used some special metalics from valejo from their Liquid Gold range, this is the first time I use them and I was quite excited, they are not acrylic and soluble in alcohol and give an incredible shine, so nice in fact that I had to tone them down a bit with another wash. Anyway the parts that are using those paints are the pistons of the hydrolic actuators (I figured they would be shiny) and some bits that I painted copper because it looked nicer (no real reason).
Anyway here are the pics.
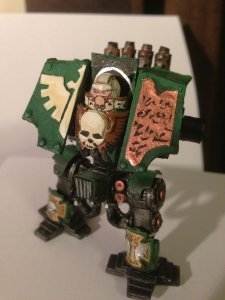
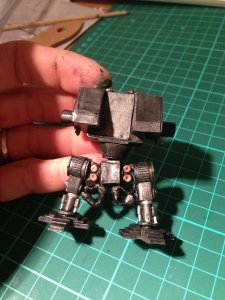
Pic 1: overview of the front
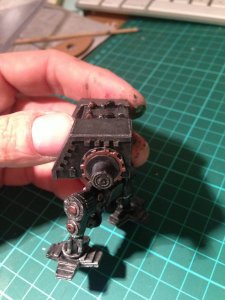
Pic 2: top and side
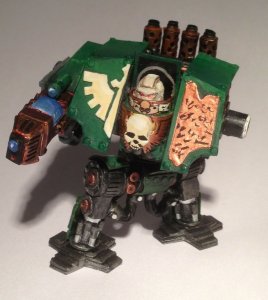
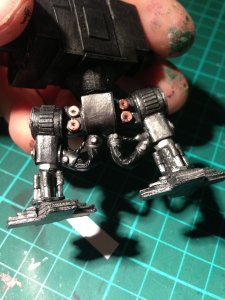
Pic 3: lower back. Note that the cables don't have a metallic shine.

Funny thing is that my wife who saw me work on it since I started didn't initially believe it was paper (we do have some plastic miniatures around and I did spend the afternoon painting some with my son).
 

Attachments

  • IMG_1161.jpg
    IMG_1161.jpg
    110.8 KB · Views: 13
  • IMG_1163.jpg
    IMG_1163.jpg
    94.7 KB · Views: 14
  • IMG_1164.jpg
    IMG_1164.jpg
    101.3 KB · Views: 15

terrinecold

Member
Apr 15, 2012
303
1
16
I have worked on the backpack which is the last part of the dreadnought "skeleton" and contains the power plant. Here are the pics
pic1: using thick cardboard for reinforcement
pic2: the backpack done, waiting for paint. Note the rivet made with a puncher, they are a bit big but can't really be made smaller as at this size the paper is already falling apart. I used some card from the back of blisters and it worked better than with actual paper. Note also that I used the same puncher to punch the cooling holes in the pipes and I am having difficulties getting them to line up.
pic3: the backpack painted. Since it is part of the skeleton it is the same black metal with some copper highlights.
 

Attachments

  • dreadnought-backpack1.jpg
    dreadnought-backpack1.jpg
    93.8 KB · Views: 11
  • dreadnought-backpack2.jpg
    dreadnought-backpack2.jpg
    109.4 KB · Views: 9
  • dreadnought-backpack3.jpg
    dreadnought-backpack3.jpg
    110 KB · Views: 19

silveroxide

Senior Member
Aug 22, 2007
2,036
525
113
Fayetteville NC
The bst way to make those holes, is to use your dremel and drill the holes the size that you need. If you should decide to do this, Drill the holes first, before you cut the part out. By drilling them out first, you will have stability of the part, due to the larger sheet giving you a good grip and the part will not grab and spin if it was cut out first. Also, the drilling method gives you more accuracy as to where to make the holes more evenly. Keep up the great work.
 

terrinecold

Member
Apr 15, 2012
303
1
16
will drilling work on a single non laminated sheet? In this case I have the single thickness perforated cylinder which is then backed by a multilayer non perforated one. The non perforated layer is painted black and the peforated one rust color.
Since these perforated cylinders either exhausts or gun barrels are pretty prevalent in war40k I'll have occasions to try it out anyway.
Also one thing that I didn't do for this model and did in the previous (and which I regret) is that in the case of the previous model I had drilled a hole through the pelvis and into the thights which was then filled with a toothpick (it could have been a paper cylinder for the same effect) which considerably strengthened the bond between those parts. As it stands each part of the dreadnought is very rugged but the links between pelvis and thigh and between the ankles and the feet are pretty week. Both had to be reglued. What is funny is that since the PVA glue bonds paper pretty strongly what happen is that the glued paper layer came appart. In any case I feel it is still sturdy enough and for now the result is very nice, much nicer than the last dreadnought I think. We'll have to see once it is "dressed" in its armor.
 

silveroxide

Senior Member
Aug 22, 2007
2,036
525
113
Fayetteville NC
Drilling on a single sheet card stock is possible. I use a block of wood as a back drop and drill straight into the wood but not through. Just enough to make the hole. I tried doing it with a nail and that works buts leaves a rough edge on the other side. Just remember to drill first before cutting the part out. I have a small hole punch, .5mm but as you said earlier, it is hard to properly align the holes. With the drill bit, you get to know exactly where you want to place the hole and not have it off sided.

On the Dreadnaught that I built a few years back, I rolled the toothpick (dowel) with the the paper hip joint and I drilled a hole into the leg connector See the Storm Talon Walker). Every mistake that you notice, is a learning curve, keep on modeling.
 

terrinecold

Member
Apr 15, 2012
303
1
16
Yes if you look back in this thread you'll see that I did something similar for the second dreadnought. Initially I had done it so the leg could pivot around it but the glue just welded everything together but it ended up for the best
 

terrinecold

Member
Apr 15, 2012
303
1
16
small update, I have now finished the leg assembly including all armour plating and done the armour for the backpack as well as fixed the backpack. I still need to add hoses to the back pack as well as the head/sarcophagus and armour plates on the shoulders, then I'll start on the arms
 

Attachments

  • dreadnought-half-paint1.jpg
    dreadnought-half-paint1.jpg
    97.1 KB · Views: 12
  • dreadnought-half-paint2.jpg
    dreadnought-half-paint2.jpg
    129.6 KB · Views: 16

terrinecold

Member
Apr 15, 2012
303
1
16
The torso is mostly completed and painted (additional decoration will probably be added as a last step once the dread is finished).

Here is a spin of the current state (since I am still limited to only 5 spins the lifetime of this link is not likely to be more than a few months).
http://arqspin.com/s/1zdmouwrpsz12

Attached pictures are:
Pic 1: the receptacle for the head (a bit more complex than on the template as I added actual hoses instead of just images)
Pic 2: state with the painted torso.

Notes on the head fabrication technic. I should have taken pictures of the head before mounting it. I am quite happy with the result. Instead of using the "petal" technic as in the template I used silveroxide's technic, created a filled cylinder of rolled paper and used a dremel as a lathe, I rounded the head by using a file on the rotating cylinder. Then I glued strips of paper on the top, roundels on the ears and other such details so that the head is really 3d. This is very important as I am not gluing a printed head face but painting it and painting 3d details is much easier than going free hand as applying a wash of a darker shade make the 3d pop very easily.

[edit: added the spin url]
 

Attachments

  • dreadnought dark angel sarcophagus.jpg
    dreadnought dark angel sarcophagus.jpg
    102.4 KB · Views: 11
  • dreadnought dark angel sans bras.jpg
    dreadnought dark angel sans bras.jpg
    81.2 KB · Views: 10

terrinecold

Member
Apr 15, 2012
303
1
16
built a plasma cannon arm for the dreadnought. I tried to make it look more like the plastic one from Forgeworld than the template (more greebles, hose are actual hoses not 2d thingies). Not completely happy either with the result or with the paint but it will have to do for now. In any case as with all my other dreadnoughts the arms can be swapped so I can always make another one later and swap it. I think I'll do the twin linked autocannon which came with the older dreadnought mk V template.

Note that when I took pic 1 I had the torso backward so you see the back of the legs
 

Attachments

  • IMG_1206.jpg
    IMG_1206.jpg
    103.3 KB · Views: 14
  • IMG_1207.jpg
    IMG_1207.jpg
    70.4 KB · Views: 10

Famous Dave

Member
Jul 30, 2007
110
36
23
Awesome builds. I am learing slot about the proper way to put these together from all you guys here at this forum. I will be glad to finally have a project that doesn't end up in the trash (hopefully soon) so I can post, too. Thanks to all of you.

Dave