dreadnoughts (Patoroch with Newobmij recolor)

Z

Zathros

Looks great. Should be an east touch up. What you can't reach will hardly be visible. Looks mighty fine to me. :)
 

terrinecold

Member
Apr 15, 2012
303
1
16
one problem with this one is that the shoulders are too close to the center sarcophagus, In addition the armor cladding on those shoulders is not correctly glued, I realized when making the backpack that they interfere with it (see the previous picture on how I had to actually cut the left chimney so iut is embedded in the armor to solve the interference). The other dread has the same problem but I scratch built some additional spacer parts so I didn't have to butcher the exhaust.
 

terrinecold

Member
Apr 15, 2012
303
1
16
First dread is finished, first I'll show the building pictures of the power fist, I tried to use Silveroxide over lamination technic and almost every part is solid paper with the exception of the wrist which is still a cone with 4 layers of 250g/m2 and one of 190g/m2 paper. I also tried to improve the designs of the finger and palm.

Finally as you can see from the last 2 pics of the assembled arm, I painted the arm instead of just edging. This both to do some weathering and to hide some imperfections. The main issue is that I have a hard time mixing colours that match the paper.
 

Attachments

  • dread 1 powerfist building01.jpg
    dread 1 powerfist building01.jpg
    95.5 KB · Views: 17
  • dread 1 powerfist building03.jpg
    dread 1 powerfist building03.jpg
    121.5 KB · Views: 17
  • dread 1 powerfist building04.jpg
    dread 1 powerfist building04.jpg
    185 KB · Views: 10
  • dread 1 powerfist building09.jpg
    dread 1 powerfist building09.jpg
    104 KB · Views: 17
  • dread 1 powerfist building10.jpg
    dread 1 powerfist building10.jpg
    107.6 KB · Views: 18
  • IMG_1074.jpg
    IMG_1074.jpg
    174.8 KB · Views: 14

terrinecold

Member
Apr 15, 2012
303
1
16
I am finishing the second and will probably add more details. I already have a plan for a third taking advantage of the lesson learned with the first 2 that I built in parallel.
 

terrinecold

Member
Apr 15, 2012
303
1
16
still working on weapons for the second dreadnought.
The left arm will be a twin linked heavy bolter. This comes from the newest dreadnought files from Patoroch. I have included the almost finished but unpainted (and missing a few raised decoration) version, then the painted one and for reference the plastic part from forge world. I have to say that when I found that reference I was amazed by how close the paper template was to it.

The painting makes the whole weapon much nicer, I don't think the pictures gives it justice as it over emphasize some of the paint texture, but in real life the fact that on the painted model I highlighted the upper edges of the weapon and shaded the lower part ( as one would on a miniature ) makes it look a lot better, specially compared to my usual "all edges edged black to avoid the default white" which is better than not edging but doesn't look as good as it could. I am also happy with how the little purity seal turned out.
 

Attachments

  • dread 2 weapons0.jpg
    dread 2 weapons0.jpg
    111 KB · Views: 10
  • dread 2 weapons2.jpg
    dread 2 weapons2.jpg
    105.9 KB · Views: 16
  • dread 2 weapons reference.jpg
    dread 2 weapons reference.jpg
    21.9 KB · Views: 85

terrinecold

Member
Apr 15, 2012
303
1
16
update for the right arm, it will be a close combat weapon, my problem was that I had a hard time choosing which between some kind of claws and a chain fist. I started on the claws and wasn't happy with the result for the paper blades. So I used some styrene sheets for the first time (I had bought some last week for a terrain project) and tried my hand at modeling the weapons with it. While doing that I decided that I might as well also model the chainfist and make them interchangeable so the pictures bellow show the WIP arm which is a mix of paper for everything but the hands which are paper and styrene and green stuff and magnets. Still some details missing and of course the paint.
I'd be glad to hear any advices on the styrene. Specially for cutting out small details such as the teeth of the chainfist I used my scissors for that but I am afraid to damage them .
 

Attachments

  • dread 2 weapons1.jpg
    dread 2 weapons1.jpg
    156.4 KB · Views: 14
  • dread 2 weapons3.jpg
    dread 2 weapons3.jpg
    177.3 KB · Views: 12
  • dread 2 weapons4.jpg
    dread 2 weapons4.jpg
    173.9 KB · Views: 15

terrinecold

Member
Apr 15, 2012
303
1
16
It doesn't show very well on a side view picture but there are 2 belts one for each of the twin linked heavy bolter. It could be spruced up a bit by raising the details of each link, what I have done is that I laminated it on a 250gsm sheet of papers (so it is 3 layers 2 160 and one 250) then I used my surgical knife to cut indentation at each link in the outside layer. The intention was that it should then behave more like a chain than a band of paper when putting it in position. It worked somewhat but not as well as I hoped.
I am almost done painting the close combat arm and the lightning claws, there should be pictures tomorrow evening.
 

Wojtee

Member
Jun 8, 2008
151
0
16
Prague, CZ
I like the weapons! Double bolter is my favourite, but the melee arms are absolutely cool, too. The styrene was a good choice. It could be done in laminated paper, but this way it is surely more rigid :)
 

terrinecold

Member
Apr 15, 2012
303
1
16
OK I have painted the CCW arm and the lightning claw (is that what it is called) CCW + mounted some kind of guns on the CCW arm .
My pictures are not so nice and I miss one from three quarter back which would show off the purity seals and some texture work done on the little wolf (I guess it is a wolf not a rabbit although it is darved by the dreadnought) pelt.

One remark is that I now think that the unpainted parts of the dread a a bit bland compared to the painted ones, but I will eventually paint it completely. The beauty of having built it of paper is that even unpainted it is nice.
 

Attachments

  • IMG_1090.jpg
    IMG_1090.jpg
    70.6 KB · Views: 13
  • IMG_1089.jpg
    IMG_1089.jpg
    66.9 KB · Views: 14

terrinecold

Member
Apr 15, 2012
303
1
16
a few pictures of dread 2 which is now done (painted completely). I'll make a 360 soon.
I know the quality of the pictures are not very good, my apologies, I am a lousy photograph ( I won't blame my camera).
 

Attachments

  • IMG_1097.jpg
    IMG_1097.jpg
    123.8 KB · Views: 14
  • IMG_1098.jpg
    IMG_1098.jpg
    110.4 KB · Views: 15

terrinecold

Member
Apr 15, 2012
303
1
16
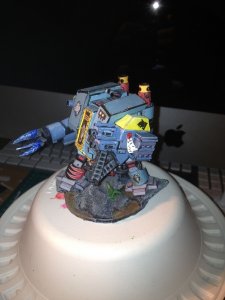
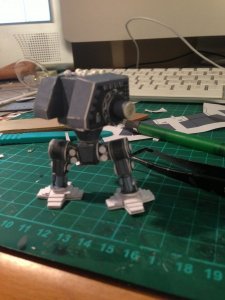
start of the build for the 3rd dreadnought, it will be a venerable from the dark angels. It will be painted so I won't bother with darkening the edges during the build, please don't worry about it.
I intend to make this dreadnought as robust as possible and to try diverse way of reinforcing it. This is both so it can be played with and as a learning experience.
Here is a description of the pictures you are seeing
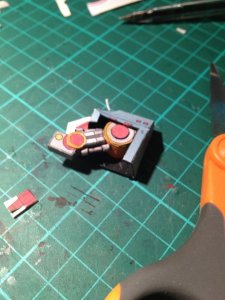
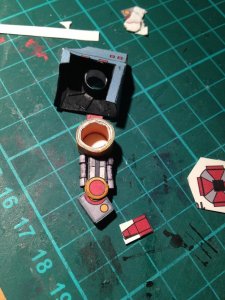
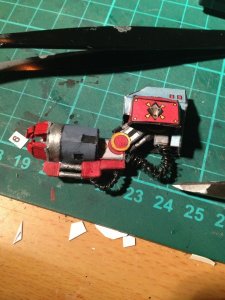
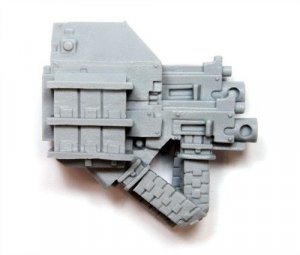
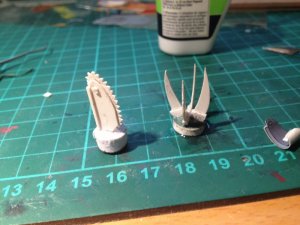
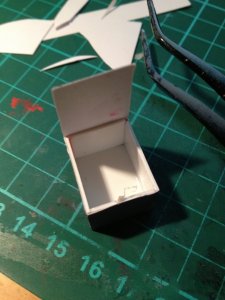
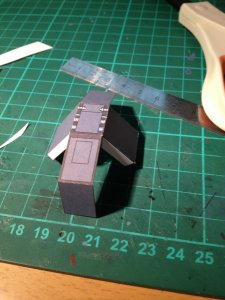
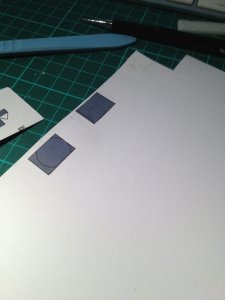
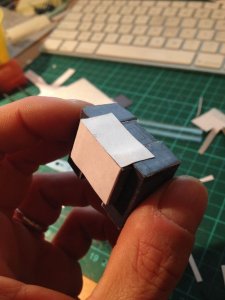
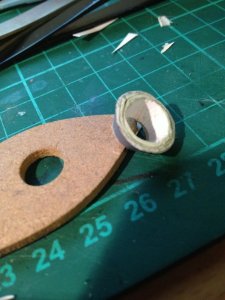
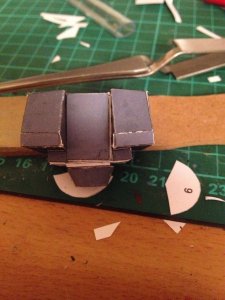
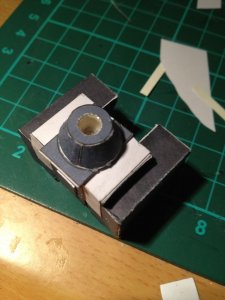
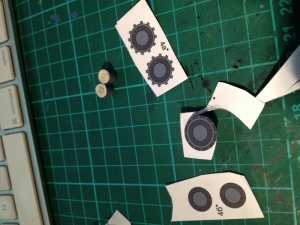
1,2: the first part, the central box of the torso. 2 shows the box cut and folded 1 shows it while it is being reinforced. I chose to reinforce with styrene plastycard glued to the paper with PVA glue and to itself with plastic cement.
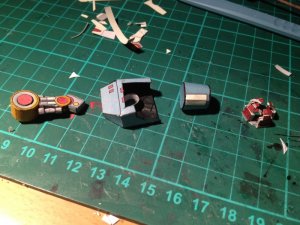
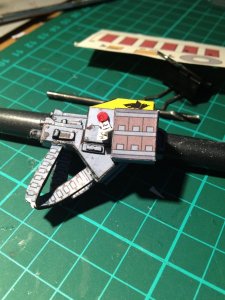
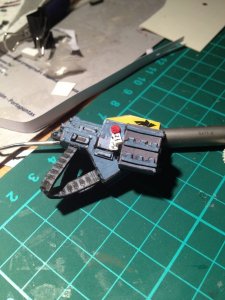
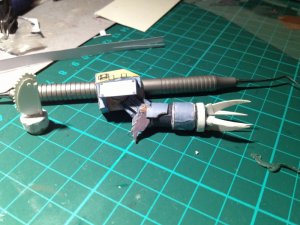
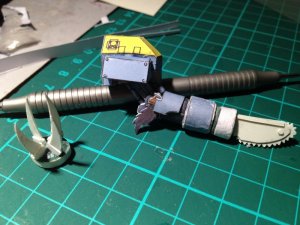
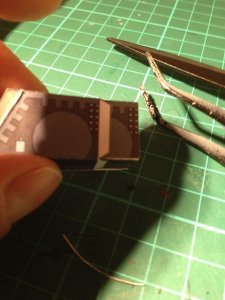
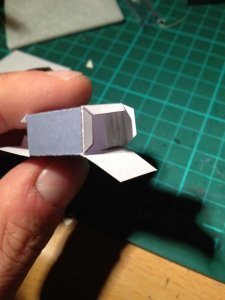
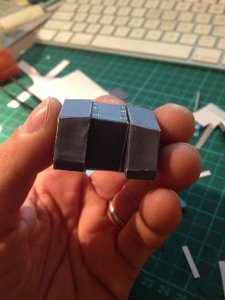
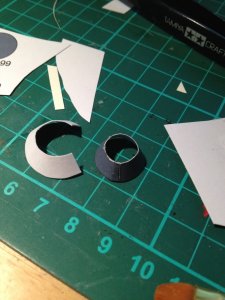
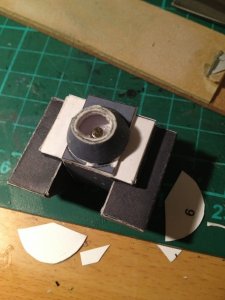
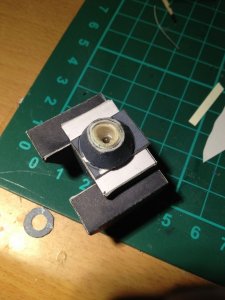
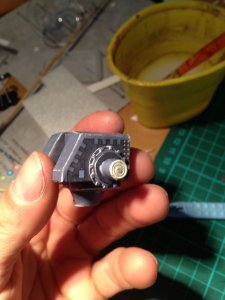
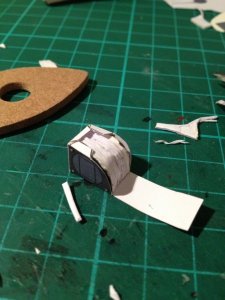
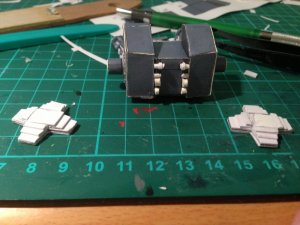
3,4: sides of the torso being reinforced, I am testing 2 ways to do so, first by adding a sleeve of stronger card inside and a diagonal foamcore reinforcement, second by filling the inside with layered foamboards which are cut to fit the shape (approximately in the case of the slopping front).
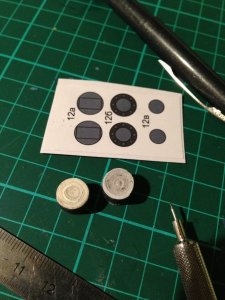
5: laminating the bottom plates for reinforcement on 250gsm paper (the printout is on 160gsm)
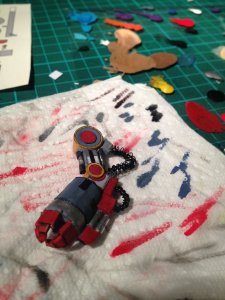
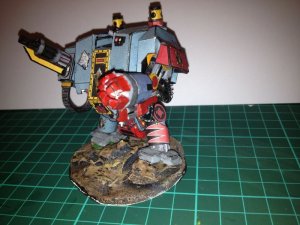
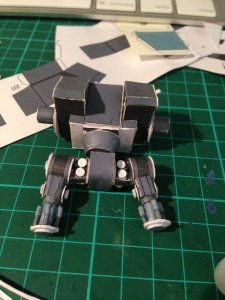
6: once the torso is assembled (sorry I skipped to little box things on each side at the bottom which were filled with foamboard as reinforcement, I reinforced the whole assembly with a bottom and a back bulkhead (160gsm paper).

Up to now thisis very solid.
 

Attachments

  • IMG_1100.jpg
    IMG_1100.jpg
    84.4 KB · Views: 10
  • IMG_1099.jpg
    IMG_1099.jpg
    94.5 KB · Views: 10
  • IMG_1103.jpg
    IMG_1103.jpg
    87.4 KB · Views: 12
  • IMG_1104.jpg
    IMG_1104.jpg
    66.2 KB · Views: 11
  • IMG_1105.jpg
    IMG_1105.jpg
    55.6 KB · Views: 11
  • IMG_1106.jpg
    IMG_1106.jpg
    76.4 KB · Views: 10

terrinecold

Member
Apr 15, 2012
303
1
16
note that the base elements from the dreadnought come from the Dreadnoyt_chapter2.pdf from Pattoroch, I find that it is a bit confusing as some of the parts will actually be coming from the custom dark angel templates but those are not marked in the base construction, also that pdf which is the last one in the dreadnought series contains updates of the basic dreadnought structure, when I started I didn't know it but I could read it on the russian forum where Patoroch publishes (thanks to google translate).

Description of the pictures:
1: results of the first assembly as you can see the right part of the torso is not as neat due to the inside foamboard reinforcement. This part of the model will be hidden by the armor plates so it is not a problem but it shows that the technic used on the right (diagonal reinforcement) which is almost as rigid is better.
2, 3: reinforcement of the bottom cone in the torso. The cone will be made of several layers of paper for a sidewall about 1.5mm thick
4, 5: assembly with the torso and first magnet. I have made sure that the polarity is compatible with the previously built dreadnoughts
6: Around the magnet I have built a sleeve which will guide the hip cylinder this is different from my previous dreadnoughts but they have suffered from "wobbly hips" syndrome because they missed this sleeve (the part is not in the template). I have then added a thin layer of epoxy glue in the sleeve and on top of the magnet to make sure it stays put.
 

Attachments

  • IMG_1107.jpg
    IMG_1107.jpg
    77.9 KB · Views: 11
  • IMG_1108.jpg
    IMG_1108.jpg
    90.1 KB · Views: 8
  • IMG_1109.jpg
    IMG_1109.jpg
    93.2 KB · Views: 9
  • IMG_1110.jpg
    IMG_1110.jpg
    104.8 KB · Views: 12
  • IMG_1111.jpg
    IMG_1111.jpg
    82.8 KB · Views: 11
  • IMG_1112.jpg
    IMG_1112.jpg
    84.6 KB · Views: 8

silveroxide

Senior Member
Aug 22, 2007
2,036
525
113
Fayetteville NC
Great technique in the lamination. It will make the Dreadnaught table top game ready, as it will be sturdy enough to play multiple games. I would have use non corrugated cardboard over styrene but then when I use card stock, I treat it like styrene. The heavy card stock will come in handy later in the making of the claws, which are a hassle at that small scale. Good job and Your son probably can't wait to use it at the games room. Dreadnaughts give a very good edge against the enemies of the Imperium. Enjoy and see you around the forums.
 

terrinecold

Member
Apr 15, 2012
303
1
16
I used the styrene for two reasons:
1st I bought those sheets so I am trying to find uses for them in places were I can learn how to use them without being too visible if I mess up. This is my first time using them except for dread2 claws and chainfist.
2nd I thought (still do) that the stronger bond of the plastic cement would make for a more rigid structure. White glue on cardboard is really strong too but the cardboard itself can sometime separate, that shouldn't happen with the styrene.
Anyway as mentioned I want to try many technics.
 

terrinecold

Member
Apr 15, 2012
303
1
16
Pic 1: preparing the connections between torso and shoulders. Note the paper cylinders which are full and the 3 layers of disks which have all been laminated on paper up to about .5mm thickness
Pic 2: the connections are attached to the torso (the lines on the torso make me think that I should add another layer of greebles)
Pic 3: showing how the pelvis is filled with layered paper
Pic 4: Pelvis and thighs are attached, note that each thigh is supposed to be 2 separated moving pieces/rods but the paper part in the template simulate this by having a black triangle where there should be space between the rods. Since my thighs are filled with layered paper I have filed a notch in between the rods so the separation is real. I have also materialized the bolts that hold said rods attached to the pelvis, they are the white disks that you see. It should look much nicer painted. Finally the link between pelvis and torso ( a paper cylinder with a magnet at the tip to mate with the one we glued up there) is fitted.
 

Attachments

  • IMG_1128.jpg
    IMG_1128.jpg
    159.1 KB · Views: 8
  • IMG_1129.jpg
    IMG_1129.jpg
    71.4 KB · Views: 9
  • IMG_1131.jpg
    IMG_1131.jpg
    93.6 KB · Views: 11
  • IMG_1132.jpg
    IMG_1132.jpg
    134.3 KB · Views: 10

terrinecold

Member
Apr 15, 2012
303
1
16
OK here is the build continuing, I am done with the "skeleton", basically the parts of the dreadnought which are common to all dreadnoughts.
Pic 1: preparing the knees.
Pic 2: The assembled legs including ankle hydraulics
Pic 3: the feet and greebles on the top of the torso
Pic 4: complete assembled skeleton
Pic 5: Primed the skeleton in black to prepare for painting
 

Attachments

  • IMG_1116.jpg
    IMG_1116.jpg
    103.8 KB · Views: 19
  • IMG_1117.jpg
    IMG_1117.jpg
    100.3 KB · Views: 14
  • IMG_1122.jpg
    IMG_1122.jpg
    151.9 KB · Views: 12
  • IMG_1123.jpg
    IMG_1123.jpg
    84 KB · Views: 10
  • IMG_1125.jpg
    IMG_1125.jpg
    112.2 KB · Views: 13

silveroxide

Senior Member
Aug 22, 2007
2,036
525
113
Fayetteville NC
It is coming along nicely and I see that you picked up the lamination techniques. That will make the model sturdy enough for tabletop gaming. keep up the great work.