Don't laugh too hard...It's my first attempt!

steamhead

Active Member
Apr 16, 2005
2,360
0
36
75
Brownsville, TX
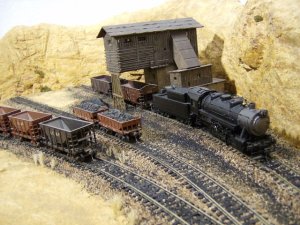
Hi...Some of you may have seen pics of my mine (El Diablo). It's a three spur affair. One for the tipple that'll hold a couple of regular hoppers or 4-5 little ore cars; another to hold empties to be moved to the tipple once the tipple's empties have been filled; and a third to hold the ones filled & ready to ship out. The third track will have a little platform to unload the once-in-a-while boxcar that brings supplies to the mine.
It's in approximately 8 square feet of real estate.
 

Attachments

  • HPIM0841.JPG
    HPIM0841.JPG
    72.2 KB · Views: 14
  • HPIM0842.JPG
    HPIM0842.JPG
    137.4 KB · Views: 15
  • HPIM0843.JPG
    HPIM0843.JPG
    124.1 KB · Views: 12

ocalicreek

Member
May 4, 2005
824
0
16
48
Puyallup, WA
groups.yahoo.com
After my long post, here's a shorter one. Say Steve, what are your thoughts on all this? Are you leaning towards larger or smaller, changing configuration of your tracks, prototypical or representational, or what?

btw Gus, cool mine.
 

Nazgul

Active Member
Jan 22, 2006
992
0
36
63
Ohio
Thank you everybody for the input and thanks Gus, for the awesome pics!!!:thumb::thumb::thumb:

What are my thoughts???
In the end I decided to go smaller than the mine I currently have....but keep the look of it. I am doing the "turtle creek coal" kitbash from MRR:
Model Railroader Magazine - Model Railroading, Trains, Track Plans - A coal mine and details for the Turtle Creek Central

Model Railroader Magazine - Model Railroading, Trains, Track Plans - Turtle Creek coal mine video

I will keep the three tracks but only two will be going under the mine. This should open things up a little and look a little more convincing. It should also allow for more scenic details around that area.

While I've been thinking...I have been working on finishing one of the stores I put together a long while back...it needed window treatments, signage, and a wood deck out front:

I cut and glued pieces of a manila folder for the shades (white paper for the store front shades):
photos012small.jpg


next I used ribbon for curtains:
photos019small.jpg


photos014small.jpg


I used wooden coffee stirrers with an ink-wash for the planks on the deck:

follow this link to the finished pics:
http://forum.zealot.com/post738381-30/

I made the signage on the pc (except for the "open" sign...came with the kit)
..........There ya go!

I am waiting for the back issue of MRR that has the mine kitbash in it...when it arrives, I will get started.:thumb:

Take care:wave:
 

RonP

Member of the WMRC
Holy crap it took a week and a few fights with the ol lady about how long i was on the pc for but i read the whole layout story you have here.

I hope to have the assistance you have received over the last year and a half. I will use many of the idea's you and your assist ors provided here thank you very much.

Actually sometimes i felt sick at how much work you have got done and realized that a camera to provide updates to the layout fans is an integral part of procuring such a thread. I will purchase a new camera ASAP (my son threw my last one in with the dishes).

Anyways great work and thank you for all the entertainment.
 

steamhead

Active Member
Apr 16, 2005
2,360
0
36
75
Brownsville, TX
Was it dirty..??? :mrgreen:

This thread is a treasure trove for beginners and old hands alike. I've been keeping an eye on it since Steve started it...there's a world of good ideas and it's an inspiration to many of us "all-thumbs" guys.

This is one guy (among many others here) that you gotta take your hat off for. :thumb:
 

RonP

Member of the WMRC
Was it dirty..??? :mrgreen:
This is one guy (among many others here) that you gotta take your hat off for. :thumb:

My hat is definatly off to Nazgul. After the first 5 pages the wife said "Are yoiu going to watch this movie with me or what?" when i didn't reply she came over to see what i was doing. I had the same look on my face that whole time :eek:
 

Nazgul

Active Member
Jan 22, 2006
992
0
36
63
Ohio
Stop it guys! You're embarrassing...............somebody:gaptooth:

Seriously though, it is nice that we can all learn and share together. I haven't done much that is "new" here, but I can tell you that I have spent hours and hours reading and looking at hundreds of threads on the Gauge and hundreds of sites online for "how to's" and ideas:winker:.

I needed the issue of MRR with the coal mine kitbash (couldn't read the measurements online)...just got it, so I will be starting it soon:thumb:

I have finished the other store I made....a couple of pics:
The last pic is both structures
 

Attachments

  • photos 051 small.jpg
    photos 051 small.jpg
    74 KB · Views: 11
  • photos 064 small.jpg
    photos 064 small.jpg
    73.5 KB · Views: 16
  • photos 041 small.jpg
    photos 041 small.jpg
    76.4 KB · Views: 16
  • photos 065 small.jpg
    photos 065 small.jpg
    63.8 KB · Views: 18

UP SD40-2

Senior Member
Apr 29, 2006
2,709
0
36
58
Fantastic Job!!!

Steve:wav: , WOW!!!:eeki::eeki::eeki: TOTALLY AWESOME JOB on "Kurt's General Store"!!!:thumb::thumb::thumb: EVERYTHING LOOKS FANTASTIC ON IT!:winki::mrgreen: , the weathering, window shades, planks, and signs in the windows(the Indian one is my favorite:winki::mrgreen: ). WELL DONE, MY friend, WELL DONE!:bravo:
:deano: -Deano
 

Nazgul

Active Member
Jan 22, 2006
992
0
36
63
Ohio
Thanks guys:thumb:
Gus...MY hat is off to you and all of the awesome work that YOU do!:thumb:
Galen...the kits came with lights but I don't have plans to use them:eek:ops:
Deano...thank you!...the sign is a mailpouch tobacco sign
David: 2 buildings and he's doing the fancy lacy curtains already! OK, Steve, how did you do it?

If you mean, and I'm sure you do, the curtains in the upper left window...they are a pic supplied with the kit, one of many on a printed page of window treatments and interior scenes...to be honest, they are the only ones I liked on the entire page.
photos 059 small.jpg

The other curtains are cut from a cheap white paper napkin (the kind that are folded in half and then half again) When unfolded, they have texture and a semi see-thru quality........alright, they're CHEAP!:twisted:
photos 068 cropped small.jpg

photos 068cropped 2.jpg

It was an experiment...:winker:

Had to work all day today, so nothing got done:cry:
I will try and start the mine this week...hopefully
take care:wave:
 

Nazgul

Active Member
Jan 22, 2006
992
0
36
63
Ohio
Galen... I up-loaded pics directly from my pc. I used the paper-clip icon to insert the attachments into the reply where I wanted them. I previewed the post and all looked well. After posting, I looked at it again and it looked fine, but...the next day, the thumbnails appeared. This happened when the Gauge first changed months ago and I haven't tried it since. Apparently the problem persists...i used to do it this way all the time but now it won't work. This only happens when I up-load DIRECTLY from my pc. If anyone knows what the problem is or what I'm doing wrong, let me know.

I have started to cut and sand the parts for the Mine kit-bash...will post when there's something to see:winker:

Take care:wave:
 

UP SD40-2

Senior Member
Apr 29, 2006
2,709
0
36
58
Steve:wav: , the OLD way we used to upload pics to a POST was to click on the paperclip to upload it, then we would click on the paper clip AGAIN, and click on the attachment to put it in the post:winki: , NOW, just do the same as before, but DON'T click on the paperclip to finalize putting it in the post, now after you upload the pic, it automatically goes to the bottom of the post:winki: . i Hope that helps:smilie: .
:deano: -Deano
 

ocalicreek

Member
May 4, 2005
824
0
16
48
Puyallup, WA
groups.yahoo.com
Steve, sounds like you're doing it just the way I have been. I too upload directly from the pc using the paperclip to pull up the upload menu. SO I'm not sure what the difference is. Looking forward to the mine shots, but no hurry, take your time and enjoy it!
 

91rioja

Member
Mar 18, 2006
317
0
16
55
High Point, NC
Only a few pages to catch up on. . . .

Steve:

Glad to see that you are back at it again. Nice idea on the NRV Mine. I too got a second kit to work with. You are, as usual, doing great work. Keep it up.