

Don't laugh too hard...It's my first attempt!
- Thread starter Nazgul
- Start date
You are using an out of date browser. It may not display this or other websites correctly.
You should upgrade or use an alternative browser.
You should upgrade or use an alternative browser.
This is not supprising that you are doing FANTASTIC and the most REALISTIC work that I have ever seen but I just have to say that this is looking so COOL!!! Keep it up Steve!!! :thumb: :thumb: :thumb: :thumb:
Yep that'll work for a road,for me i just built up the area for a road ( I think you have the better plan) .Now this is just a thought but where the hill is going to be on the right side of the road you may want to leave some areas for wood or stone retaining walls after all we can't have the mountain washing out the nice roadway ,I did this that hard way to and had to dig out an area for reataing wall.
,I did this that hard way to and had to dig out an area for reataing wall.The other way to handle keeping the road from washing out is to model the road as "blasted rock" and the hill as a big rock. Particularly since the tunnel you modeled is blasted out of solid rock.
Steve, I am glad to see you back at "work" again. I really started to miss your thread. . That tunnel portal is awesome, but I think you know that already . I think, the water tank, build into the hillside sounds like a very good idea. Can’t wait to see your next post .
. That tunnel portal is awesome, but I think you know that already . I think, the water tank, build into the hillside sounds like a very good idea. Can’t wait to see your next post .I've always been a fan of foam...but your use of the cardboard strip lattice is something to pay attention to. I'd never been convinced of its strength, and it always just seemed like a lot of work for something that's gonna be hidden eventually. So I'll put in a request now for a few in-progress shots of what goes on top of the lattice, and some comments on pros and cons as you experience the construction, thanks.
Great use of the WS foam, too.
Great use of the WS foam, too.
prodigy2k7...Thank you!:thumb:
Deano...Thanks buddy....I have 1 timber portal and have ordered 2 more...should have them tomorrow
Steven...Thank you for the kind words!:thumb:
Josh...First of all, thank you for those very very gracious words:thumb:ops: ...I would also like to say that I'm sorry that I haven't been following your various projects close enough. Your work and enthusiasm are both outstanding and inspiring!!!:thumb: I will find the time to keep an eager eye on your various projects.:thumb:
Lynn...I had some WS inclines and risers left over and figured that if I was ever going to use them, It would have to be on roads. It has the advantage of making it easier to lay the roads out where you want them first and then building the scenery around them. I know it is doing it "backwards" but it seemed to work...so far.
Kurt...Thank you for the wonderful words of encouragement my friend:thumb:
http://www.jlinnovative.com/Catalog.ASP?WCI=DisplayProduct&WCE=%2044774&WCU=FgGgKFYdB8IOCPu5gLoAtn55pvaGnuGZ
joesho... Them are some mighty fine mountains you got there:thumb: :thumb: :thumb:
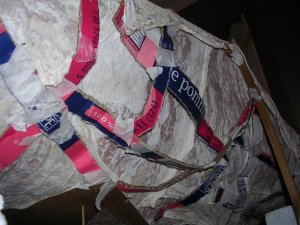
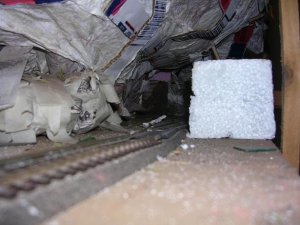
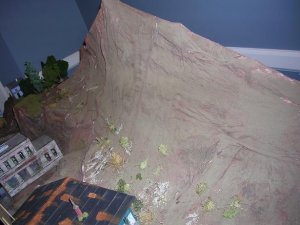
but the basket weave method seemed to make sense for my needs. Since the benchwork is on wheels and the back of the layout normally is pushed up against the wall...I had the luxury of leaving the back "open" allowing me full access to hidden tracks without the need for access holes or removable structures/scenery. A few pics to illustrate:


If I had a walk around layout or didn't have access to the back...then foam would have probably been my choice. As far as strength is concerned...my first mountains were made this way and I had no problems:thumb: As long as the plastering is done right, the strength should be there. I will show how I cover/finish all this as I progress:thumb:
I didn't get done much tonight...just widening and support on the lower road:


Still a lot to do...............I'll keep ya all posted:thumb:
Take care
Deano...Thanks buddy....I have 1 timber portal and have ordered 2 more...should have them tomorrow
Steven...Thank you for the kind words!:thumb:
Josh...First of all, thank you for those very very gracious words:thumb:
ops: ...I would also like to say that I'm sorry that I haven't been following your various projects close enough. Your work and enthusiasm are both outstanding and inspiring!!!:thumb: I will find the time to keep an eager eye on your various projects.:thumb: Lynn...I had some WS inclines and risers left over and figured that if I was ever going to use them, It would have to be on roads. It has the advantage of making it easier to lay the roads out where you want them first and then building the scenery around them. I know it is doing it "backwards" but it seemed to work...so far
.I have been giving all my thought to retaining walls down below that I hadn't even considered the need for them (or blasted rock as Russ suggested) up high. Thank you Lynn for the timely nudge:thumb:Now this is just a thought but where the hill is going to be on the right side of the road you may want to leave some areas for wood or stone retaining walls after all we can't have the mountain washing out the nice roadway
Kurt...Thank you for the wonderful words of encouragement my friend:thumb:
Here is the pic that I saw that made me aware of this possibility:I think, the water tank, build into the hillside sounds like a very good idea.
http://www.jlinnovative.com/Catalog.ASP?WCI=DisplayProduct&WCE=%2044774&WCU=FgGgKFYdB8IOCPu5gLoAtn55pvaGnuGZ
joesho... Them are some mighty fine mountains you got there:thumb: :thumb: :thumb:
I too, am a big fan of foamGalen:
I've always been a fan of foam...but your use of the cardboard strip lattice is something to pay attention to. I'd never been convinced of its strength, and it always just seemed like a lot of work for something that's gonna be hidden eventually. So I'll put in a request now for a few in-progress shots of what goes on top of the lattice, and some comments on pros and cons as you experience the construction, thanks.
but the basket weave method seemed to make sense for my needs. Since the benchwork is on wheels and the back of the layout normally is pushed up against the wall...I had the luxury of leaving the back "open" allowing me full access to hidden tracks without the need for access holes or removable structures/scenery. A few pics to illustrate: If I had a walk around layout or didn't have access to the back...then foam would have probably been my choice. As far as strength is concerned...my first mountains were made this way and I had no problems:thumb: As long as the plastering is done right, the strength should be there. I will show how I cover/finish all this as I progress:thumb:
I didn't get done much tonight...just widening and support on the lower road:
Still a lot to do...............I'll keep ya all posted:thumb:
Take care
Nazgul said:Josh...First of all, thank you for those very very gracious words:thumb:
Thanks for the kind words Steve. I really havn't done much lately besides weathering lolI am learning so much from this thread, I will deffinetly be refering to this thread and to you when I start my new layout and need help on the rock formations/mountains/hills.
BTW, that road is going to look so cool, It has a nice flow to it :thumb: :thumb: And leaving that mountain back open is a neat idea to!!
:thumb: :thumb: Keep it up, I am taking notes like a good student should
sign1Steve, glad to hear you have the tinber portals on the way. that water tank shed would look GREAT!!!:thumb: I REALLY LIKE how you widened the road, it will make parking along it for the store BELIEVABLE! GREAT WORK so far!:thumb: :thumb: :thumb: -Deano
, glad to hear you have the tinber portals on the way. that water tank shed would look GREAT!!!:thumb: I REALLY LIKE how you widened the road, it will make parking along it for the store BELIEVABLE! GREAT WORK so far!:thumb: :thumb: :thumb: -DeanoSteve I too had WS risers left over and used them where I remebered to at the time.sign1 As for the cardbord strips I used this technique for the mountain that climbs my walls , it worked great because all I had to do was staple the top to the wall and bottom to the incline risers put some weaving pieces ( errrrr well actually now that I think of it I used contruction paper like you get at dollar store) put the plaster cloth on in layers slapped on the plaster and did some overlapping bragdon rock molds. I've made a point of trying every technique anyone has ever suggested or I read about. The only down falls I can see and haven't witnessed is if I have to drill the holes for the trees will the holes going into hollow cause a problem , ah probably not
So lets model on Steve:thumb:
So lets model on Steve:thumb:
The only down falls I can see and haven't witnessed is if I have to drill the holes for the trees will the holes going into hollow cause a problem , ah probably not
I don't know how thick a shell your scenery has, but, on thin shell scenery, I have found that once a tree is glued in place, working some fine sand around the base of the trunk, and saturating it with water/whiteglue/detergent mix, will form a sturdy base for the tree.
On a fixed layout, this may not be really necessary, but on a module, like mine, it has been the best trick ever.
Pete
Steve, I leave for almost a month, and the only thing you have to show for it are 6 portals?????sign1
Nice progress on the layout. I hope you've had some time to run trains on it in the last month. I'm liking the work so far; keep it up.
Now, if I could only keep off the golf course and on my layout. . . .
Nice progress on the layout. I hope you've had some time to run trains on it in the last month. I'm liking the work so far; keep it up.
Now, if I could only keep off the golf course and on my layout. . . .
Josh...never take notes from a fellow student...it can only lead to a trip down to the Principal's officeJosh:
Keep it up, I am taking notes like a good student should sign1
sign1
Deano...I've always thought that tank looked neat...I hope I can find a suitable place:thumb:
If I can make a few small parking areas, I will...if not, then the road will have to suffice.
BTW, thanks for all the help you have been to me throughout the planning stages of this area:thumb:
Lynn...I agree...I have found no real drawback to the basket weave method. I have also used foam and they are both good ways to get the job done. so...."let's model on"!:thumb:
Pete... Great tip!:thumb: Thanks
Chris...Thanks Buddy:thumb: :thumb: ...but you better put the clubs down...I'm expecting an update any minute now............
OK...I did in fact finally get the 3 timber portals and 1 timber retaining wall.
I finished 2 portals (minus the final dirt and soot). I painted them medium brown and then instead of the inkwash (alcohol/india ink) I used black acrylic paint heavily watered down as a wash and to darken individual timbers. I wanted to try this so I could dullcoat it after all is done. It seems to have worked as well as the inkwash.
Here's some pics:


I'll finish the rest and then get back to the plastering:thumb:
Take care
Nazgul said:Josh...never take notes from a fellow student...it can only lead to a trip down to the Principal's office
sign1
BTW, my mouth is pouring drool right now all over the keyboard over those timber portals
:thumb:How did ya get the black rivet holes in the wood? did ya just paint them on?
Steve, WOW! cripes Steve, those portals look "SLAP FANTASTIC"!!! the random wood colors just flat out made the job!:thumb: :thumb: :thumb: the rest of the work you have done looks to be coming along quite NICELY TOO!:thumb: i am VERY ANXIOUS to see what it will look like with the plastering on it. THANK YOU for the update!...oh and STUPENDOUS JOB!!!:thumb: :thumb: :thumb: -Deano
, WOW! cripes Steve, those portals look "SLAP FANTASTIC"!!! the random wood colors just flat out made the job!:thumb: :thumb: :thumb: the rest of the work you have done looks to be coming along quite NICELY TOO!:thumb: i am VERY ANXIOUS to see what it will look like with the plastering on it. THANK YOU for the update!...oh and STUPENDOUS JOB!!!:thumb: :thumb: :thumb: -DeanoPortals look great Steve . I often thought about making some I can now see how it would be easier placing the portals then build the mountain out to them.ops:
ops:Thanks guys:thumb:
Josh...If you look really close you might be able to see that the holes are raised bolt heads. They are part of the plaster form and I just took a black marker and carefully dabbed them. The Woodland Scenics portals really are nicely detailed.:thumb:
Josh...If you look really close you might be able to see that the holes are raised bolt heads. They are part of the plaster form and I just took a black marker and carefully dabbed them. The Woodland Scenics portals really are nicely detailed.:thumb: