Cylon Basestar (TNS)

Chilihead-Do

New Member
Dec 16, 2011
32
0
6
Dortmund, Germany
I'm building the Cylon Basestar from stevespaper.
Because it doesn't contains too much parts, so it's easy to build.

What a fatal mistake. wall1
Right is: Not that much parts.
Not right is: Easy to build (really weird folding and fuzzy instructions)

But I paid for the printing, so I'll build it. :mrgreen:

Printed on DIN-A3 (297mm x 420mm) Sheets with 160g/qm

The first part is the central core.
It's a little tricky to build because of the mechanism in it.
You can turn it 180 degrees, so that you can set the model to space or atmospheric configuration.

IM000431.JPG

Assembled central core

IM000437.JPG

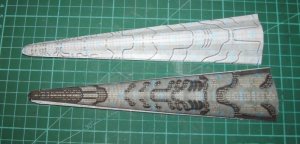
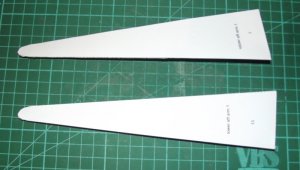
Parts for the wishbone center (lower half)

IM000439.JPG

Parts for the wishbone center (upper half)

IM000444.JPG

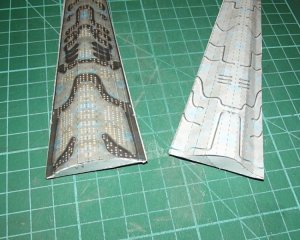
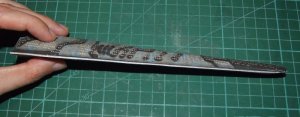
Assembled upper half of the wishbone center

Hard piece of work because it's hard to see how to fold the parts.
 
Z

Zathros

A very organic looking spacecraft, and it looks like you are on the right track! :)
 

Revell-Fan

Co-Administrator
Staff member
Administrator
Moderator
Aug 1, 2009
11,611
12,352
228
Vreden
Hi, there! You printed it on A3 paper? Wow, that'll make it ... 73 cm big..! :-o I definitely wanna see this!

Sorry if you're having trouble; I unfolded it and had no time for a complete test build :eek:ops: . I quick-built the central core and one aft arm and one fore arm, Rhaven test-built the wishbone centers. It can be done. If you are uncertain concerning the foldings just take a look at the pages with the lined parts. If you crease the paper along those lines the parts should assemble quite well. BTW, the long thin formers for the arms are optional; the parts hold their shape without them. I included them just in case. And don't use water-based glue; the result won't be any good then. Good luck! I'm looking forward to seeing the finished model!

Greetings from Germany! :wave:
 

Revell-Fan

Co-Administrator
Staff member
Administrator
Moderator
Aug 1, 2009
11,611
12,352
228
Vreden
To give you an idea of how the aft arms are supposed to look like I give you some pics of my test-build (you see one upper and one lower half). Please note that the area which connects to the wishbone center is not even but curved. All folding and cutting lines follow the edges of the original CG model. Hence it might be helpful to download the Base Star CG model from the Google SketchUp Warehouse site, load it in SketchUp and select "view" - "edges" - "show all edges" ("Ansicht" - "Kantenstil" - "Alle Kanten anzeigen").
 

Attachments

  • DSCF3940.JPG
    DSCF3940.JPG
    94.3 KB · Views: 12
  • DSCF3941.JPG
    DSCF3941.JPG
    79.6 KB · Views: 11
  • DSCF3943.JPG
    DSCF3943.JPG
    135.3 KB · Views: 9
  • DSCF3944.JPG
    DSCF3944.JPG
    79 KB · Views: 12

Chilihead-Do

New Member
Dec 16, 2011
32
0
6
Dortmund, Germany
Thanks all.

@Zathros: Maybe it looks organic, but there's nothing more mechanical than a damned Toaster-Basestar :mrgreen:

Due to several problems I totally messed up the lower wishbone center wall1

1. I used the wrong glue
It hardens fast, but not too fast, nice to use.
But it waves the paper like hell.
Just have a look:
IM000446.JPG


2. I folded it incorrectly. On the dark ground it's very hard to see where and how (mountain/valley) to fold. Perhaps Revell-Fan can make a picture of the lower wishbone-parts where the lines are clearer to see. That would help much.

3. When I fold the paper the top coat breaks and you can see the white paper under it.
Any solutions to avoid this? I think it's a laser-printing-problem. Same with inkjet printings?
Here you can see:
IM000447.JPG


But don't worry, to give up is not an option :mrgreen:
The new sheets are ready (only 400m to the next copy-shop)

edit: removed off-topic stuff
 

Chilihead-Do

New Member
Dec 16, 2011
32
0
6
Dortmund, Germany
The upper arm parts are ready.

IM000455.JPG

IM000456.JPG

This time without waving the paper :cool:

It will be a nice, big thing:
IM000457a.JPG

Yes, one arm isn't completed and the arms are not glued to the wishbone, just to see how big it will be.
And we see:
IM000457.JPG

about 74cm! Nice :twisted:

Next parts: lower wishbone (I'm scared of it :eek:ops:) and lower arms.
 

Revell-Fan

Co-Administrator
Staff member
Administrator
Moderator
Aug 1, 2009
11,611
12,352
228
Vreden
Great work so far! I'll see what I can do concerning the upper wishbone foldings. Keep it up!
 

Revell-Fan

Co-Administrator
Staff member
Administrator
Moderator
Aug 1, 2009
11,611
12,352
228
Vreden
I digged out the original plans of the lower wishbone half and marked the folding lines (quite tricky at the short edges: I had to guess at certain points but that shouldn't be much of a problem). I hope this helps you. Begin with part 48 and attach all surrounding parts one after the other. Remember there is a smooth curve which makes part 48 the highest point of the half.

If you are uncertain of a folding glue (or better: tape) the hull parts together and place the hull onto part 49 on a flat surface. If you see any mistakes bend the wrong folding(s) into the other direction, changing mountain fold to valley fold and vice versa, until everything fits. IMO the taping option is the most effective way because it prevents the parts from being damaged. When everything fits the parts can be permanently attached with glue. I'm looking forward to seeing your progress pics.

Concerning the chipped edges: This is a common issue when it comes to pre-shaping the parts. If you want to achieve a sharp edge you must crease the folding line(s). After assembly you may cover up any imperfections with water colours or felt tips. So you achieve a very pleasing result. If you build a figure or statue or an object with many smooth curves you may consider not to use a cutter but to bend the part around an edge. I used the edge of my table and my metal ruler when I pre-shaped the parts for my Yoda. This way I achieved a smoothly curved edge without damaging the texture.
 

Attachments

  • cbs-folds.rar
    1.9 MB · Views: 17