cnw1961 challenge #1

cnw1961

Member
Jan 7, 2006
846
0
16
65
Germany
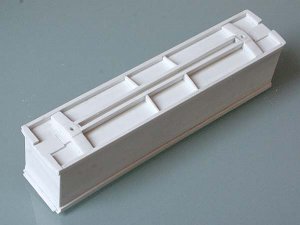
Here is my entry. I want to build a wood boxcar like the accurail car in the pic. I want to use styrene, stripwood and some Tichy Train detail parts. I already scratchbuilt some structures and was satisfied with the results, but this is my first attempt to build a freight car – it might end as a monumental failure. In this first pic you can see how I started to build the styrene body. Next step will be to apply stripwood.

Boxcar1.jpg
 

cnw1961

Member
Jan 7, 2006
846
0
16
65
Germany
Thanks for your encouragement, but I am afraid, it’s the finish that counts, not the start., OK here are some more pics of my progress.
To build the body of the car I use .040 styrene. For finer detail I sue .020 or .012 styrene.
Before I started, I thought I should apply the stripwood right at the beginning, but now I see there are some other tings to be done first. First step: work on the ends of the body to prepare for Kadee coupler boxes.

Boxcar2.jpg

Boxcar3.jpg
 

cnw1961

Member
Jan 7, 2006
846
0
16
65
Germany
To see if the coupler boxes are at the right height, I need to build the underframe and install the trucks. The underframe is made of strips of .040 styrene. For the thicker parts I glued the styrene in some layers and filed and sanded it until it had the right shape.

Boxcar5.jpg

Boxcar6.jpg
 

cnw1961

Member
Jan 7, 2006
846
0
16
65
Germany
In the next pic you can see the underframe glued to the body, the holes for the trucks are already drilled.
 

Attachments

  • Boxcar7.jpg
    Boxcar7.jpg
    36.2 KB · Views: 518

cnw1961

Member
Jan 7, 2006
846
0
16
65
Germany
I didn’t plan to get so far this weekend, but I got carried away the moment I started. Now that the weekend is over, I’ll have to slow down.

O.K. One more update for today. I glued thin .040 stripwood to the sides. It really starts to look like a boxcar.

Boxcar10.jpg

Boxcar11.jpg
 

cnw1961

Member
Jan 7, 2006
846
0
16
65
Germany
I did’nt make much progress today. I cut some .040 x .040 and .070 x .012 strips of styrene to make the braces on both ends of the body. And I installed coupler boxes and Kadee #58 couplers to see if they are working properly. That’s it for today.

Boxcar12.jpg
 

wickman

Member
Dec 8, 2005
546
0
16
62
Ontario canada
Wow nice job it looks great with the strip wood I never realized this could be done. I'll have to show my son this thread he's 15 and very adventurous . I bin trying to line him up with summer RR tasks so far I have him pretty busy on the electrical end, but I bet he'd like to do something like this.:wave:
 

cnw1961

Member
Jan 7, 2006
846
0
16
65
Germany
I continued to work on my boxcar today. The next step was to build the roof. I made it of .040 styrene. I didn’t cut two halves for the roof, I just made one piece, cut the styrene half way through in the middle and bend it along tihe cut. It is much easier to assemble it in one piece. I cut it slightly bigger than necessary to sand it down after assembling to achieve a perfect fit.

Boxcar14.jpg

Boxcar13.jpg
 

cnw1961

Member
Jan 7, 2006
846
0
16
65
Germany
The roof should protrude .020 on both sides. To achieve this, I laid a sheet of .020 styrene on the sandig paper. Then I took the boxcar and laid it on the styrene with only the roof touching the sandiing paper. I sanded the roof until the side of the car was firmly touching the styrene.

Boxcar15.jpg
 

cnw1961

Member
Jan 7, 2006
846
0
16
65
Germany
In this pic you can see the result of my efforts. I am glad it is really looking like a boxcar now. I wasn’t so sure when I started this.

Boxcar16.jpg