

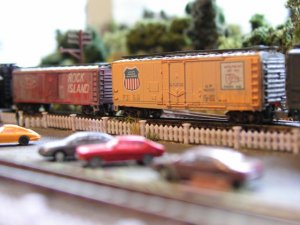
Here's my first real shot at weathering a whole train, 12 cars and two diesels in all...and considering this is Nscale, please give me some honest feedback. I'm rying to get them to look used, some grimey'r than others. The basic technique was to clean with iso-alcohol, spray paint on flat primer and let dry, then apply a coat of burnt umber/alcohol mixture and wipe in a downward motion off. The wheels (mostly all metal as these are +25 year old Bachmann's) are metal and were painted in a rusty mixture I blended for some of the track. It wouldn't quite stay applied as I would have liked - the wheels being almost too slippery to hold the paint. But please - be blunt and honest - I can take it. I'm looking to improve, and your opinion will matter! Thanks.
Car Weathering - Critiques Please!
- Thread starter Herc Driver
- Start date
You are using an out of date browser. It may not display this or other websites correctly.
You should upgrade or use an alternative browser.
You should upgrade or use an alternative browser.

Very nice job. I always say that you cant go wrong with weathering...except if you weather waaaaaaaaay too much. But those look pretty good. Is that ATSF loco a BAch or a Life Like?
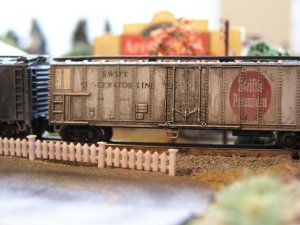
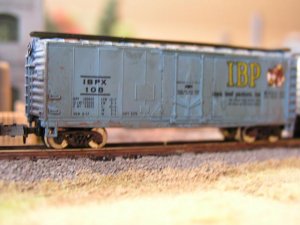
Those are LifeLike...the two-pack that they sell with a caboose. I figured I'd get the technique right with those before graduating to the Atlas and Kato's. I actually want to weather those two diesels a bit more (they are slightly weathered now...the dummy unit more than the head unit). It seems like it's a fine line between weathering too much and a bit too much but either way - you know when you've crossed the line...it just doesn't look right. It was also a challange using spray paint with N scale. (I'm guessing HO would be easier to utilize using this technique.) I found using a spray can trigger and a sweeping motion from about 8 inches away put down a fine mist. The trick (which I don't think I have the hang of yet) is getting the gray primer only half way up the car and not painting the whole car side. Burnt Umber was an acceptable choice to blacken things enough. It worked best at the ends of the cars that were painted to be dirtier than the sides. The alcholol wash takes the gleam off of just about everything. That Swifts car used to be a brilliant silver.
have you tried the "weather and remove" method? This is the method I use. It is very simple. Apply weathering where you want it (wheather its with a paintbrush or airbrush), then choose a plastic friendly paint remover or thinner. I usually dip a Q tip on the paint remover (I like Chameleon paint remover) and rub downwards. This also creates the illusion of running paint along with the weathering. once I get a camera, i'll post a couple locos that ive done.
Herc, i think your doing a GREAT JOB!:thumb: your "swift" car is a little dirtier then i like them, yet i like that one the best so far") . i was into N scale, weathering N scale i think is harder then doing HO, just my opinion. i like how you did your cars in various stages of filth:thumb: . remember, the lower part of a freight car is "dirtier" then the upper half . the more cars you do, the EASIER and BETTER you get!:thumb: . keep up the GREAT work Herc:thumb: , and keep us posted how they come out! -Deano
. i was into N scale, weathering N scale i think is harder then doing HO, just my opinion. i like how you did your cars in various stages of filth:thumb: . remember, the lower part of a freight car is "dirtier" then the upper half . the more cars you do, the EASIER and BETTER you get!:thumb: . keep up the GREAT work Herc:thumb: , and keep us posted how they come out! -Deano
. i was into N scale, weathering N scale i think is harder then doing HO, just my opinion. i like how you did your cars in various stages of filth:thumb: . remember, the lower part of a freight car is "dirtier" then the upper half . the more cars you do, the EASIER and BETTER you get!:thumb: . keep up the GREAT work Herc:thumb: , and keep us posted how they come out! -DeanoDeano -
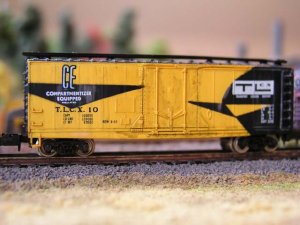
Good point about the bottom/upper half weathering differences...I thought of that when making this first real attempt at a "total" train effect and tried to accomplish it on this attempt. That Swift car was tricky in that it was already a bright silver that needed dulled down quite a bit, and the blackening only highlighted oversized rivit/fastener patterns. Your suggestion of using primer gray was a good one. I liked the dirty-but-not-too-dirty look it gave, but the trick is keeping the spray pattern below the middle of the car...and I'm still working on that one. Next time, I'm going to change the angle of the can a bit (aim much lower off the car) and allow the overspray cloud to hit the car...and if that doesn't work, I might attempt to slightly mask the car to keep the spray below the car's midpoint. Of course, I could just break down and buy an airbrush - but that would just make too much sense. Next on the list, some more practise on other cars and start doing some of the engines. I need to get the technique down...I'm running out of "practise" cars.
SeriousSam - I remembered you mentioned that technique before in a previous thread and I tried that one too using the alchohol to remove some of the paint. Iliked that way for the end of the cars. Good tip!
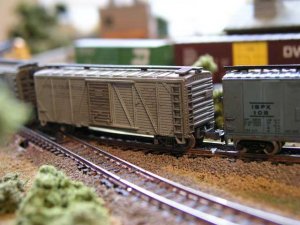
On these cars...I was going for some rust, a little less weathering, and the last one is heavily weathered just to see how it would turn out.
Good point about the bottom/upper half weathering differences...I thought of that when making this first real attempt at a "total" train effect and tried to accomplish it on this attempt. That Swift car was tricky in that it was already a bright silver that needed dulled down quite a bit, and the blackening only highlighted oversized rivit/fastener patterns. Your suggestion of using primer gray was a good one. I liked the dirty-but-not-too-dirty look it gave, but the trick is keeping the spray pattern below the middle of the car...and I'm still working on that one. Next time, I'm going to change the angle of the can a bit (aim much lower off the car) and allow the overspray cloud to hit the car...and if that doesn't work, I might attempt to slightly mask the car to keep the spray below the car's midpoint. Of course, I could just break down and buy an airbrush - but that would just make too much sense. Next on the list, some more practise on other cars and start doing some of the engines. I need to get the technique down...I'm running out of "practise" cars.
SeriousSam - I remembered you mentioned that technique before in a previous thread and I tried that one too using the alchohol to remove some of the paint. Iliked that way for the end of the cars. Good tip!
On these cars...I was going for some rust, a little less weathering, and the last one is heavily weathered just to see how it would turn out.
Attachments
your getting better with each car Herc!:thumb: let the grime collect along the bottom sides of the car . are you dull coting the cars when you are happy with them? if not, you can go back and work on the cars some more:thumb: . if you are dull coting them, DON'T go back into it, the results wont be good. when the car is finished to your liking, I DO RECOMMEND using dull cote:thumb: . don't worry, YOU ARE ON TRACK!:thumb: -Deano
. are you dull coting the cars when you are happy with them? if not, you can go back and work on the cars some more:thumb: . if you are dull coting them, DON'T go back into it, the results wont be good. when the car is finished to your liking, I DO RECOMMEND using dull cote:thumb: . don't worry, YOU ARE ON TRACK!:thumb: -DeanoThey look good, but for my personal taste I would not want them as dirty as some of your dirtier cars. And if they were to get that dirty there would need to be some scrub marks on the important numbers and such, so the railroad crew could read what car it was.
Overall, excellent! Can hardly wait to see what you do with the locos
Overall, excellent! Can hardly wait to see what you do with the locos
Thanks for all the comments...this is a "learning in progess". I agree LoudMusic, a few of the cars turned out dirtier than I would like too, but since they are not dull coated yet, I can go back and lighten them up a bit. Overall, I think I over did it on some. In the future, I will try to limit the "gray line" of primer to half the car height, and blacken/grime less than I heavy-handed did this time. Now...where did I put those other clean and shiny cars..........
A couple of other details to try:
Splash over the wheels.
On sliding door cars, a few horizontal scrape marks where they closed the door with a fork lift.
On some car or loco, a clean patch where someone rubbed his shoulder along the dirt, maybe on the walkway bt the cab door.
Splash over the wheels.
On sliding door cars, a few horizontal scrape marks where they closed the door with a fork lift.
On some car or loco, a clean patch where someone rubbed his shoulder along the dirt, maybe on the walkway bt the cab door.
Hey Herc driver!
Like your work, the "Swift" car is my favorite, followed by the 1st box car in the 2nd set of photos.
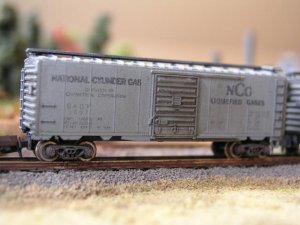
I guess my 2 comments are these: 1) on those cars that you used a "faded" type weathering, from what I usually see on real box cars, dark areas fade much faster and more drastically than light areas. It is not a consistent all over fade. For example: I recall seeing a photo of one of the white Guilford box cars with the black and orange "G" and reporting numbers/paint. Of course the white did not look faded, but the dark G and reporting marks were faded and chipped and rubbed in certain places. Also, with the fading, the seperatley painted name and reporting marks chip away a bit.
2) comment is: I wouldn't worry too much about over-weathering. While we all tend to like the nice clean cars we buy at the LHS, here in South Florida, and as I recall from my days in the northeast, freight cars are a mess. Almost every day I see the local box cars CSX uses and they are covered in grafitti, dirt, dust, often very hard to see reporting marks and railroad names or logos are obliterated. They are EASILY as dirty as your most extreme car. Intermodal spine cars from TTX? can't see a spot of yellow on them, its as if they were painted brown; the only clean boxes are the newer ones, and even a fair amount of those have been grafitti tagged. I saw a shiny new CP Rail 60' excess height box with the nice beaver logo, entire bottom of the car was covered in grafitti.
Most of the places these freight cars are going and sitting are a mess, weeds in the tracks, broken fences, rail debris, garbage. Weather hits em' too, look at photos of CP Rail red diesels in the winter, they are a dirty, brown mess. Constant Florida sun fades the blue paint on FEC engines (whose "white cab roofs" are usually more of a graphite gray due to dirt), and turns red Ortner hoppers more- orange. And older cars? I have a NS video and the old "southern serves the south box cars"? They are missing most of the letters!
I like where you're going with your weathering. All the things people say about using india ink or chalks are true, they work!
What can I say, I'm a dirt fan!
all my best!
Like your work, the "Swift" car is my favorite, followed by the 1st box car in the 2nd set of photos.
I guess my 2 comments are these: 1) on those cars that you used a "faded" type weathering, from what I usually see on real box cars, dark areas fade much faster and more drastically than light areas. It is not a consistent all over fade. For example: I recall seeing a photo of one of the white Guilford box cars with the black and orange "G" and reporting numbers/paint. Of course the white did not look faded, but the dark G and reporting marks were faded and chipped and rubbed in certain places. Also, with the fading, the seperatley painted name and reporting marks chip away a bit.
2) comment is: I wouldn't worry too much about over-weathering. While we all tend to like the nice clean cars we buy at the LHS, here in South Florida, and as I recall from my days in the northeast, freight cars are a mess. Almost every day I see the local box cars CSX uses and they are covered in grafitti, dirt, dust, often very hard to see reporting marks and railroad names or logos are obliterated. They are EASILY as dirty as your most extreme car. Intermodal spine cars from TTX? can't see a spot of yellow on them, its as if they were painted brown; the only clean boxes are the newer ones, and even a fair amount of those have been grafitti tagged. I saw a shiny new CP Rail 60' excess height box with the nice beaver logo, entire bottom of the car was covered in grafitti.
Most of the places these freight cars are going and sitting are a mess, weeds in the tracks, broken fences, rail debris, garbage. Weather hits em' too, look at photos of CP Rail red diesels in the winter, they are a dirty, brown mess. Constant Florida sun fades the blue paint on FEC engines (whose "white cab roofs" are usually more of a graphite gray due to dirt), and turns red Ortner hoppers more- orange. And older cars? I have a NS video and the old "southern serves the south box cars"? They are missing most of the letters!
I like where you're going with your weathering. All the things people say about using india ink or chalks are true, they work!
What can I say, I'm a dirt fan!
all my best!
They look good.
If you get the same question I get? "Its a nice looking car, why are you going to wreck it by making it look dirty?" Just anwer with"Thats life".
If you get the same question I get? "Its a nice looking car, why are you going to wreck it by making it look dirty?" Just anwer with"Thats life".
You're doing a good job with the dirt and rust HercDriver. The only other thing you need to add is the dusty dirt kicked up on the bottom of the cars. If you don't have or don't use an airbrush, you can get a pretty good look out of those weathering powders - there are some with adhesive mixed in that stay in place without a lot of sealer.
Val
Val
My great thanks to for offering their suggestions...I really appreciate it. Clearly, when weathering Nscale, and airbrush would work better than simple spray paint for the finer application of a base color like gray or black. So far, it has been a trick to put little amounts of paint onto the cars evenly as they would be weathered naturally. Deano's technique works well, although I have been using a watered down paint instead of india ink wash as suggested (I'm still having trouble finding india ink around these parts - even at art stores and such.) And I have visited one of the car weathering sites online - but was surprised that almost every picture was a single car - not a consist to give you the feeling of what each car would look like in a string of cars. And there were few techniques offered. Maybe I missed some of the better sites...so I'll keep searching. My goal is to make a good looking train of cars, not just a display case show piece that never sees the tracks. But I realize that not everyone has the same ideas and goals in sight when weathering cars. Everyone's suggestions have helped me a great deal - thank you all.
Let me ask this...what material do you like to use to rub off the paint? So far, paper towels don't give me the controled removal of paint that I'd like. Paint brushes seem to give too much of a uniform appearance instead of the random weathering that real cars seem to have. What do you use for Nscale cars?
Let me ask this...what material do you like to use to rub off the paint? So far, paper towels don't give me the controled removal of paint that I'd like. Paint brushes seem to give too much of a uniform appearance instead of the random weathering that real cars seem to have. What do you use for Nscale cars?