

building my own millenium falcon
- Thread starter dnalor
- Start date
You are using an out of date browser. It may not display this or other websites correctly.
You should upgrade or use an alternative browser.
You should upgrade or use an alternative browser.
Z
Zathros
Just be very careful playing with it. One crash into a wall or corner you didn't see and "woompf" major rebuild. Also, don't let anyone fly it unless they have one you can hold in collateral!!
ah")
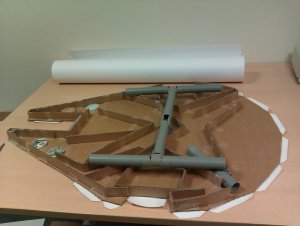
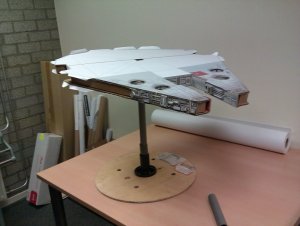
This bird is one that is going to hang from the ceiling in my computer room which is under construction..
I have at this moment problems with figuring out how to make an inside frame of tubes for connecting it to a wall mount.
First a made a little tube with a dia off 3cm from the turret place to the side between the escape-pod and the engine.
But i think it is not enough to hold the falcon up in flight mode.
Now my complete vacation i'm figuring out what to do.
And Yesterdag i came up with the idea: Just like the real prop to make a connection point in 1 turrents (the one below)..and make the turrent detachable with magnets or so.
And 1 connection point in 1 of the escape pods..and also a magnet-attachment for the exterior .
I have the tubes and joint for creating an H of tubes in the inner falcon.
But i have to make some kind of connection to the wall mount..
Maybe with a big boult but that is for my next week of vacation to figure out that problem.
Z
Zathros
I hung a bi-plane from a ceiling and a year later, I was astonished to find a layer of fine grim embedded into it's surface. This would also look very nice framed onto a wall and would be protected. Also, people would be able to really look at it's details, especially glassed on both sides, you could flip it around now and then. Just some suggestions, either way, you will have quite the show piece!!
With the glass would look great..
But what is greater then a fly-by mmmm
Just like in tesb passing astroids..
But what is greater then a fly-by mmmm
Just like in tesb passing astroids..
I hope so
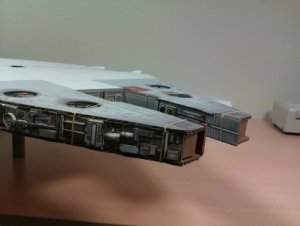
Now working on the engine backside..but my ledstrip hasn't arrived yet..
So i have to let it open untill it comes...and that would be at least 2 weeks.:-(
Now working on the engine backside..but my ledstrip hasn't arrived yet..
So i have to let it open untill it comes...and that would be at least 2 weeks.:-(
I wish I had gotten to you before you ordered the LED strip. There's this great product called Easy LED which would be perfect for your needs:
http://starshipmodeler.biz/shop/index.cfm/product/2175_93/easy-led---20cm.cfm
Just trim it to the length you need and hook it up to the included power supply. Couldn't be simpler. Best part is Starship Modeler can get it to you quicker than just about anybody. Even the guys overseas where you live can get it in less than a week.
the one i orderd is almost the same.
http://www.dealextreme.com/p/12v-smd-led-strip-30cm-blue-5282
but sometimes they are somewhat slow..
Ah well..those tiny flaps are killing me let see how long i''m working on that engine.
maybe the leds are still in time
aH..
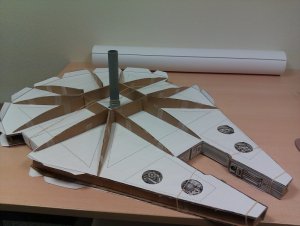
Finally all the flaps are ready..
Now i have to collour them...weather them.
They are to clean grey. for an old engine...
Also i try to hotglue them straight in the engine.
on the picture they stand...hum hangs loose in their socket..just for a testfit..
i like test fitting
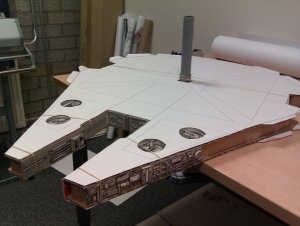
i working also on a stand for the falcon...
Finally all the flaps are ready..
Now i have to collour them...weather them.
They are to clean grey. for an old engine...
Also i try to hotglue them straight in the engine.
on the picture they stand...hum hangs loose in their socket..just for a testfit..
i like test fitting
i working also on a stand for the falcon...
Attachments
Z
Zathros
All those vines in the back, you could put in a blower motor and use it as a desk fan!! Something like a Dyson Millennium Falcon Desk fan.
Today i've started with the underside of the main hull.
I tried the orginal ribs that are supplied with the model but they were straight...not slightly bend..
And they were small..
Now i made some ribs and they are larger and more round on top.
i hope that the hull still fits
I tried the orginal ribs that are supplied with the model but they were straight...not slightly bend..
And they were small..
Now i made some ribs and they are larger and more round on top.
i hope that the hull still fits
Attachments
 me too..
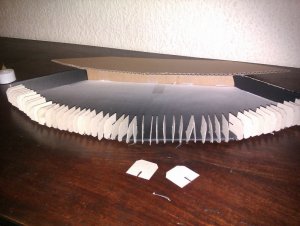
At the moment i'm working on the bottem part of the ship..
It's hard to get the curved shell..but the first quarter piece is installed
And i''m still waiting for the ledstrip...the good news is that the strip has been send...bad part it still takes 2 weeks before it arrives in belgium.
Then i can glue the upper and lower part finally together.
and attach the side stuff in to place..
WHEN they fit..