

Build Report Stahlhart Papercraft Beijing Drum Tower
- Thread starter zathros
- Start date
You are using an out of date browser. It may not display this or other websites correctly.
You should upgrade or use an alternative browser.
You should upgrade or use an alternative browser.
2nd!
Totally second that and add a mouth-opening admiration and awe! :thumb: :thumb:
You offerings to the world are astounding. This is really one beautiful architectural study. It's wonderful!
Totally second that and add a mouth-opening admiration and awe! :thumb: :thumb:
It took me quite a while to prepare this, but finally I'm ready to publish this thread:
The model:
This is going to be my first build report. I'm going to build the model of an aspiring young designer, who until now has mostly been known for his plane model designs and is infamous for his madness of producing many many versions of each model. This latest model doesn't have twenty-something versions but twenty pages. It has 252 numbered parts, but effectively they are more than 300, because some parts have duplicates. It's also not a plane, but stahlhart's first serious building release. I intend to build it 100% exactly the way it is shown on the stahlhart website. (There is a good reason for that…)
Like all Stahlhart models, the Drum Tower is available for free download.


The subject:
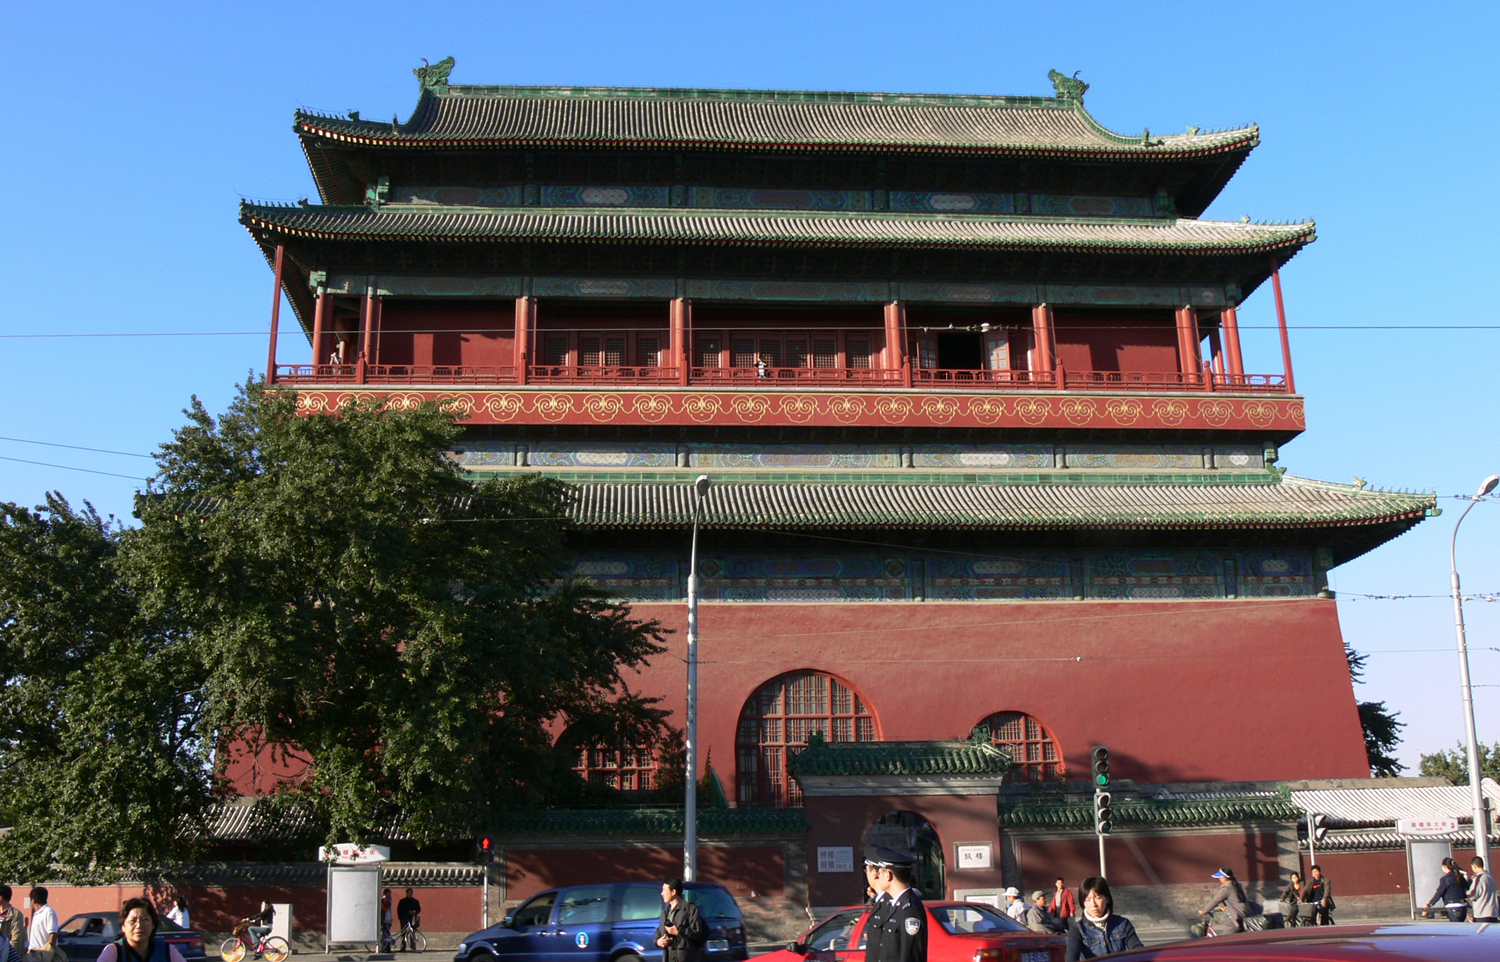
The Beijing Drum tower is a major tourist attraction today. In the times of the Chinese Empire, it was the center of civil Beijing. This is where the emperor's time-masters kept track of time and announced it with huge drums. The structure depicted in the model is the one that can be seen in Beijing today, which is a 19th century reconstruction of the Drum Tower of Ming Dynasty time. The first Drum Tower on that position was build in the 13th century as the city known today as Beijing was the Capital of the Mongolian empire (the biggest empire in history if I‘m not wrong)
The model:
This is going to be my first build report. I'm going to build the model of an aspiring young designer, who until now has mostly been known for his plane model designs and is infamous for his madness of producing many many versions of each model. This latest model doesn't have twenty-something versions but twenty pages. It has 252 numbered parts, but effectively they are more than 300, because some parts have duplicates. It's also not a plane, but stahlhart's first serious building release. I intend to build it 100% exactly the way it is shown on the stahlhart website. (There is a good reason for that…
) Like all Stahlhart models, the Drum Tower is available for free download.
The subject:
The Beijing Drum tower is a major tourist attraction today. In the times of the Chinese Empire, it was the center of civil Beijing. This is where the emperor's time-masters kept track of time and announced it with huge drums. The structure depicted in the model is the one that can be seen in Beijing today, which is a 19th century reconstruction of the Drum Tower of Ming Dynasty time. The first Drum Tower on that position was build in the 13th century as the city known today as Beijing was the Capital of the Mongolian empire (the biggest empire in history if I‘m not wrong)
It starts with the doors in the central structure, which were actually open in ancient time. But as the model depicts the present-day condition, the doors are glued on the walls in a recessed position. This requires quite good accuracy. The first floor is easy to build. In its center, a supportive structure is added, which will later carry the load of the upper platform.


- Apr 5, 2013
- 13,498
- 9,549
- 228
Good God man, your models are so awesome, that statement is quite scary!! It is quite a beautiful building, and I imagine your model will be an accurate and beautiful representation of the structure. I think this will be quite popular!It's also not a plane, but stahlhart's first serious building release.
This is a great model to download. The art work is fantastic. Highly recommended if you like architecture. :thumb:
Started building this model about a month ago.
Regards,
Fred
Started building this model about a month ago.
Regards,
Fred
Building the drum chamber is rather easy, but then the fiddly part starts. 24 columns need to be created, which will in the end be lined each on both sides by a bar, which needs to be cut out 48 times. In the picture they are seen with the eaves, whose ornaments need also some skill for cutting tiny things.
The eaves are glued onto the corners of the roof. The columns of course on the platform. Unlike shown in the instructions, I have installed the columns on the platform first and then glued the sidebars on them one by one, first all left-hand ones, then all right-hand ones. I think it's a matter of patience and personal preferences, which method is better.
The beams on top of the columns are fun to assemble, but installing is tricky, as one needs to make sure that all columns are aligned in the right place. That might sound easy, but trust me it isn't. In my build, a problem was, that on the tiny parts, the laser printer's toner came off, so I corrected with red paint, which I usually don't.
The last picture shows the installation of the first railing. Note how at the end, the inner side is not glued yet. This is to glue the adjacent east side railing's glue tab onto it first.
Looks like some content from this thread has dissappeared, so I'm reposting:
After a decorative wall has been added on top of the first floor, next is the frame structure which will become the lowest roof. The tricky part is here to bend the lower plate up and the roof edges outward just right so they will fit.
On those edges, the sloped roofs are glued, with their rear bent down for support.
From below an inverted sloped part is glued on it, which has the structure of the roof-carrying beams on it. This kind of structure looks like many small trees and is a typical element of Chinese classic architecture, which holds the roof beams and looks decorative at the same time.
After the roof frame is installed, another decorative wall is added on the top of it. A bent bar is then glued into the angle created by wall and sloped roof, which is a band of decorative ceramic tiles on the original building.
Glueing on the decorative wall needs to be done with extreme care. I was a bit sloppy and it turned out the Lower side of the Platform didn't fit properly (see arrow on the picture). This is crucial, because if the platform doesn't fit then another inverted sloped section that represents the platform support structure won't fit at all.
The upper platform side is glued on the top, supported by the central support structure, concluding the lower part of the Tower.
Building the drum chamber is rather easy, but then the fiddly part starts. 24 columns need to be created, which will in the end be lined each on both sides by a bar, which needs to be cut out 48 times. In the picture they are seen with the eaves, whose ornaments need also some skill for cutting tiny things.
The eaves are glued onto the corners of the roof. The columns of course on the platform. Unlike shown in the instructions, I have installed the columns on the platform first and then glued the sidebars on them one by one, first all left-hand ones, then all right-hand ones. I think it's a matter of patience and personal preferences, which method is better.
The beams on top of the columns are fun to assemble, but installing is tricky, as one needs to make sure that all columns are aligned in the right place. That might sound easy, but trust me it isn't. In my build, a problem was, that on the tiny parts, the laser printer's toner came off, so I corrected with red paint, which I usually don't.
The last picture shows the installation of the first railing. Note how at the end, the inner side is not glued yet. This is to glue the adjacent east side railing's glue tab onto it first.
The upper roofs are next. First, another roof frame is created, similar to the first one.
The only difference to the lower roof is, that supportive walls are glued under the lower roof-support-structure. Again, the rear side of the sloped roofs is bend down to act as their support. Another decorative wall is glued on top of the middle roof, also with the tile edges as on the lower roof (not seen in pictures).
The final top roof is basically build the same, except that on the long sides, the main roof is glued. The gables and some ornament structures on the are added on the crest.
When glueing the roofs onto the upper floor, one needs to take care, that the connecting wooden pillars at the corners of the platform are placed correctly at the corner of the roof above the platform. After the roofs are glued onto the tower, the main structure is finished.
Time to start on the surrounding buildings.
To have a stable ground, it‘s better to glue the vast outer ground plates on a piece of harder cardstock. For lack of a better material, I chose an unfolded Cornflakes box for this, which worked quite well.
The pedestal starts again with supporting structures. The central one wlll be directly under the supporting structure inside the main tower, the others carry the corners.
Then the pedestal walls are build, with the upper sides bend down to become the inner sides of the railing walls.
When building the ramps, better watch that the main surface is not bend or pushed too much, or it won't be straight enough.
The upper glue tabs are not bend entirely down, as they reach into the central structure and are lter glued onto the base plate of the main tower.
The west and set ramps are basically the same, only mirrored. All this building is quite simple and enjoyable.
Next are the peripheral buildings, first those next to the pedestal.
In the mold they are named after their directions. They have tiny differences,
for example, the Northeast house has yellow windows (which are glued closed
from inside at the real site). Each house is connected to the pedestal with a connecting piece. In the north, these have a tiny extension build on top and doors at the sides, as another room was created behind that. These connecting parts are not part of the original Drum Tower. Actually even the side houses may not have been.
To allow builders to build the pedestal without the houses, the wall behind the houses has no mark, where the houses go.
The houses are all build the same and are still in a size comfortable to build. The marked ground spaces don't fit exactly, which i schussed by the thickness of paper.
The model was originally designed for 120 gsm-Paper, but even at the same weight, thickness may vary. With a 160 or even heavier paper, this might cause serious problems.
Each house is glued on thicker yardstick to create a tiny pedestal, which each of them stands on.
Funny thing is, that the south houses are in a restricted area of the site, so the designer had to enter there to take photos for reference. But as at the time, the no admittance sign was only in chinese, he would have had a good excuse to stray in there.
The south gate is starting to get more fiddly, consisting of a gate with thick walls attached and two tiny houses, which are again build the same way as the previous ones. It‘s very important with the gate, to make sure, that the two big signs on the gate will face outward. The Ornament elements on the roofs are tiny, but not too difficult to install. The original actual door of this gate is a grating, which was too tiny to reproduce in the model, which is why the gate is left open. Another important thing to take care of is that the doors of the two tiny houses face the gate.


In my build I didn't follow the instructions (because I was creating them along the build) which is why the east and west gates were next. They consist of tiny gate houses and two pillars that flank a big heavy door.
The pillars and in particular their roof are the tiniest parts in this model and require a bit of skill in dealing with small parts. Again, the houses are build the same. This time, one has to make sure, that the south side uses the correct part, as they are a little different from the north walls.


The pillars and in particular their roof are the tiniest parts in this model and require a bit of skill in dealing with small parts. Again, the houses are build the same. This time, one has to make sure, that the south side uses the correct part, as they are a little different from the north walls.
The next step was the north gate, which today is actually the main gate, because it's opposite of the square between Drum Tower and Bell Tower. That square is today a parking lot for big tourist busses and many small red rickshaws.
Tourists do not enter the premise throughout the gate, but through a door in the west gate house, through a security check. This was a result of an event in 2008, when the trainer of an american olympic athlete was stabbed to death on the Drum Tower by an insane person. The insane person was reported to then jump to death himself from the upper platform.
In the model, the north gate features some of the most small parts in the model, namely the roof decoration of the gables and ridges. These tiny ornaments depict a saintly person riding an angelic bird , followed by a number of creatures that depict certain aspects of luck, with the last one always being the dragon. The amount of creatures between the bird-rider and the dragon is a testament to the importance (or sometimes the size) of a building.
Something one needs to pay good attention to when building the model is to again make the correct side of the gates face outward. Also the actual gate door is not glued in the center of the gate, but near the outer side of the gate, approximately 2mm from the outer edge.
In another picture, the outer walls can already be seen build. They are quite simple, consisting of two parts each. Only difficulty with them is to score and fold them without bending them in a wrong direction.
In the last picture, the north gate is already installed.
The final parts are those of a tiny shed near the west gate. This shed is probably not part of the original structure, but then it's quite unclear anyway, which of the building as it can be seen today is genuine and which has been added in modern time.
The West gate house is by the way the toilet of the tourist location, which you can actually see in the model, if you enlarge enough.
When drawing the model detail, *the designer* invested a lot of passion into creating tiny details, such as inscriptions on the gates, Door locks on the gates, a poster showing drum and bell tower and a tiny map of the area. As the model is completely in vectors, these details would come to fruition if one would enlarge the model. But as the model is already rather big, one has to have the space and the necessary passion for architecture models to dare an enlargement. For some of the more tiny details, an enlargement may be nice. But an enlargement would also make tiny inaccuracies more obvious.
Overall the model has a few tiny inaccuracies, but nothing that would seriously spoil the building fun. In it's finished shape, it looks rather impressive, especially when placed in a high place. It's impressiveness imho comes mostly from the excessive detail work, in which the elaborate ornamentations of the original building are defined quite well rather than being blurred to simplify. I *have heard* that the designer is rather proud of the detail work.
The final step of the model is glueing the tower in place. The model is designed in a way, that the tower could be left loose and taken off (for storage or whatever) but of course the joints between ramps and tower ground plate will look better if glued.
Here are the final pictures of the build. Doesn't this build look exactly like the one on the Stahlhart website. You see, I'm such a fanatic fan of stahlhart models, that I went to great lengths to even copy tiny construction mistakes that were made in the build of the model shown on the website! Just compare them, they are 99,99% the same, I would even dare 100%. (LoL – in case you still didn't get it, the model looks exactly the same, because it is the same, and *the designer* is myself)


This is all for this thread, I hope you enjoyed reading it.
The West gate house is by the way the toilet of the tourist location, which you can actually see in the model, if you enlarge enough.
When drawing the model detail, *the designer* invested a lot of passion into creating tiny details, such as inscriptions on the gates, Door locks on the gates, a poster showing drum and bell tower and a tiny map of the area. As the model is completely in vectors, these details would come to fruition if one would enlarge the model. But as the model is already rather big, one has to have the space and the necessary passion for architecture models to dare an enlargement. For some of the more tiny details, an enlargement may be nice. But an enlargement would also make tiny inaccuracies more obvious.
Overall the model has a few tiny inaccuracies, but nothing that would seriously spoil the building fun. In it's finished shape, it looks rather impressive, especially when placed in a high place. It's impressiveness imho comes mostly from the excessive detail work, in which the elaborate ornamentations of the original building are defined quite well rather than being blurred to simplify. I *have heard* that the designer is rather proud of the detail work.
The final step of the model is glueing the tower in place. The model is designed in a way, that the tower could be left loose and taken off (for storage or whatever) but of course the joints between ramps and tower ground plate will look better if glued.
Here are the final pictures of the build. Doesn't this build look exactly like the one on the Stahlhart website. You see, I'm such a fanatic fan of stahlhart models, that I went to great lengths to even copy tiny construction mistakes that were made in the build of the model shown on the website! Just compare them, they are 99,99% the same, I would even dare 100%. (LoL – in case you still didn't get it, the model looks exactly the same, because it is the same, and *the designer* is myself)
This is all for this thread, I hope you enjoyed reading it.