BSG Defender

Sky Seeker

Well Established Member
Hello everyone. Just thought I'd share what I've been working on lately. This is a model of the BSG (BattleStar Galactica) new series Defender ship.

Top View - front section
P7180394.JPG

Front section bottom side with reinforcements.

P7180395.JPG

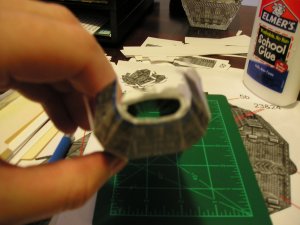
Top and bottom front section assembled with reinforcements in between.
P7180402.JPG

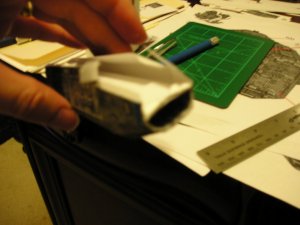
Bottom view front section assembled.
P7180403.JPG

Top view front section assembled.
P7180404.JPG
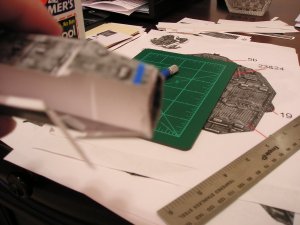
Back view front section before mid section is joined to bottom section and pre-assemblage of the mid section.

P7180405.JPG
The old design of the main engines just had a grey matte background with a series of bumps (right), I decided to add something a little different to the engines using polychromatic paper (left) with raised ridges and changes color in white light. I was originally going to a foil with crinkled ridges, but I couldn't find the right foil. So I opted for this instead.

P7180409.JPG

The "paper" in a different light.
P7180412.JPG

Application of the top of the mid section.

P7180413.JPG

Reinforcement of the mid section.
P7180414.JPG
 

Sky Seeker

Well Established Member
Here is the mid section fully assembled.
P7190417.JPG
This is the addition of one of the the main engines.

P7210424.JPG

End view of the engine.
P7210425.JPG

The engines actually were pretty tough to get on. I added bulkhead reinforcements internally to increase the strength of the structure. However, I wasn't satisfied with what I had, so I added some strips to attach the main engine to the mid section.(see below).
P7210432.JPG

Assembled ship with engines (top view).
P7210438.JPG

Bottom view P7220449.JPG

P7210439.JPG
End view (engines)
P7210433.JPG
The next step is to add accessories like guns and my first attempt at greebling (this should be interesting) before I add the launch bays. (Hey it IS a BSG model).

Hope you enjoyed the pics.

Sky Seeker
 

Sky Seeker

Well Established Member
really cool, I need to catch up on the BSG stuff!
Hey thanks Spaceagent!

I'm still looking for a decent turret design. Judging by the scale of what I'm dealing with here, I might have to go with black painted toothpicks. I'll probably experiment with both paper and toothpicks and see what works the best.

Sky Seeker
 

Sky Seeker

Well Established Member
Revell-Fan,

Great to hear from you! Hey, thanks for the praise master instructor and the engine designs! The engines remind me of gearz' model of the BSG TOS which had a blue tint (my inspiration for the polychromatic paper). Nice design.

Thanks for stopping on by!

Sky Seeker
 
Last edited:

Revell-Fan

Co-Administrator
Staff member
Administrator
Moderator
Originally the Defender was a design made by a fan. It featured the engine section of the TOS BSG, therefore the similarity. It was in the final episode of season 2 when one of the VFX techs incorporated the design in the new series making it canon. A similar thing happened to the Berzerk Battlestar. :)
 

Sky Seeker

Well Established Member
Originally the Defender was a design made by a fan. It featured the engine section of the TOS BSG, therefore the similarity. It was in the final episode of season 2 when one of the VFX techs incorporated the design in the new series making it canon. A similar thing happened to the Berzerk Battlestar. :)

Revell-Fan,

Well I'll be darned. I knew that from my research on the Defender, but didn't know that about the Berserk though. Thanks for sharing the background info. Also, in my travels on the net I found a ship called the Protector. It looks like the BSG TOS with the exception that the engine assembly is turned 90 degrees. Do you know anything about that one?

Sky Seeker
 

zathros

*****SENIOR ADMINISTRATOR*****
Staff member
Administrator
Moderator
Man, that is awesome!! I the fact that this ship could be greebled into something quite fantastic! Great job! You nailed this.
 

Sky Seeker

Well Established Member
Hey thanks Zathros! I still have a lot do do with this model. Greebling is just one part, the weapons and engine side pods still need to go on, and they are small having LOTS of curves.

As it is said "it ain't over till the fat lady sings".

Sky Seeker
 

Sky Seeker

Well Established Member
Greetings everyone! Haven't done too much with the model as of late. I've finished a turret and have done some "greebling", but nothing earthshaking yet. Will post some pics soon though. Those cylons won't exactly be quaking in their boots from something still in "space dock" (the top of my file drawers).

Sky Seeker
 

Sky Seeker

Well Established Member
Hello everyone. Just thought I'd finally upload some new pics of what has been done so far.

upload_2015-9-7_21-57-53.jpeg

These are some engine pods for the left and right sides of each engine.
The badly mauled sections at the top are the result of NOT scoring the paper before folding. For those of you out there totally new to paper modeling it is ALWAYS a good idea to score first before folding to get crisp folds. Some people use an X-acto knife to LIGHTLY score a fold. I usually end up cutting through the paper with the knife so I use a pointed slightly blunted metal tip and trace over the fold lines multiple times before folding.

upload_2015-9-7_22-2-5.jpeg

This is the forward bottom with forward turrets and a main gun.

upload_2015-9-7_22-3-11.jpeg

Right back side.

upload_2015-9-7_22-3-43.jpeg

Front view of the engines looking back with the inner engine pods.

upload_2015-9-7_22-4-35.jpeg

Back view of the pods from the engines.

upload_2015-9-7_22-5-21.jpeg

upload_2015-9-7_22-5-39.jpeg

Top view of the forward section.

upload_2015-9-7_22-6-10.jpeg

Front oblique view. Note the additions of the command centers on top with a view of the right bottom turret below.

upload_2015-9-7_22-7-9.jpeg

Inner runway of the launch bay.

upload_2015-9-7_22-7-49.jpeg

Inner runway with the outer covering of the launch bay.

More pics to come.
 
Last edited:

Sky Seeker

Well Established Member
Here are some pics of the construction of the landing bay.

upload_2015-9-7_22-14-27.jpeg

Inner runway folded and joined to the forward end of the outer covering of the launch bay.

upload_2015-9-7_22-16-51.jpeg

This is sort of hard to see. The tabs of the forward covering were very hard to assemble to the runway (and vice versa). You had an inner set of tabs for the runway and an outer set of tabs for the outer covering. Looks easy until you actually have to assemble it. I actually tore one end off. Fortunately, the upper glue tabs were able to be used to glue the opening in place to the outer covering.

upload_2015-9-7_22-21-11.jpeg

upload_2015-9-7_22-21-37.jpeg

upload_2015-9-7_22-21-55.jpeg

The launch bay just before full assemblage.

upload_2015-9-7_22-22-35.jpeg

The launch bay fully assembled with the connecting struts on top.

At this point I probably could join everything together and say FINISHED...but no. More turrets to add, and greebling.

I did promise Zathros that I would greeble some of the surface features on this model. One thing I have noticed with greebling on this model is that for some of the smaller pieces they have a tendency to blend in. In one of the pics with the bottom turrets the section that the turrets are attached to have been greebled, but you can't see it because it blends in so well with the surrounding environment. I think that when you have a model with mostly shades of gray, black, and white it's easier to hide with the color. It's great for hiding mistakes, but lousy for bringing out surface features, so placing multiple layers on the surface will have to do. That will be featured in future posts.

Sky Seeker
 

Attachments

  • upload_2015-9-7_22-16-31.jpeg
    upload_2015-9-7_22-16-31.jpeg
    154.4 KB · Views: 24
  • upload_2015-9-7_22-20-57.jpeg
    upload_2015-9-7_22-20-57.jpeg
    140 KB · Views: 21
  • upload_2015-9-7_22-21-20.jpeg
    upload_2015-9-7_22-21-20.jpeg
    147.9 KB · Views: 22
Last edited:

Revell-Fan

Co-Administrator
Staff member
Administrator
Moderator
One thing I would change: Make the engines recessed. That would add a 3D effect to them and enhance the impact. Other than that the build is coming along beautifully. :)
 

Sky Seeker

Well Established Member
One thing I would change: Make the engines recessed. That would add a 3D effect to them and enhance the impact. Other than that the build is coming along beautifully. :)

Revell Fan,

That's a great suggestion! :iagree: I think in this model that would be difficult at this stage. Of course I'm open to suggestions as to how to accomplish that. :)vulcan: - with an eyebrow raised)

The ends could be cut out where I have the polychromatic paper. Then a box with an open top can be made about the size of the engine openings. Next, cover the inside surfaces with the polychromatic paper, then join it to a new back engine cover (with appropriate cut outs) that covers the entire back end along with the current back end engine cover. Hmmm.. that could be do-able.

Turrets and greebling take priority first before I start performing surgery like that.

Sky Seeker
 

zathros

*****SENIOR ADMINISTRATOR*****
Staff member
Administrator
Moderator
If it is too hard, extend the end out. I'm sure no one is going to your house with a measuring tape, and the effect would be the same. :)
 

Sky Seeker

Well Established Member
If it is too hard, extend the end out. I'm sure no one is going to your house with a measuring tape, and the effect would be the same. :)

You'd be surprised...

I think it would be easier to cut the back in certain sections and glue new back engine sections than to extend the length especially after greebling and adding some turrets. I'll see what happens after I'm done with the other stuff.

BTW the layered greebling is coming out pretty nice. I'll send out some pics when I have some of the more interesting sections done.

Sky Seeker
 
Last edited:
Top