Battlestar Galactica models?

Status
Not open for further replies.

Stev0

Active Member
Jan 30, 2006
626
1
36
Seems to go together rather well.

I ran into an acquaintance of mine yesterday. A fellow who used to have a local hobby shop and now makes living doing what some of us do for a hobby

http://www.nostromobuilders.com/Battlestar RA/battlestar_RA.htm

Here is a page from his site where he likes to build in plastic like we do in card... but the process for creation is much the same.

Perhaps you can get an idea for formers in the way he does.
 

Gearz

Member
Mar 13, 2006
258
17
16
OZ
WoooHooo!... thanks for the Beta pix guys, first time I've seen her nose to tail.! looks good so far.

Doooh! .. after reading your comments, I've just realised I neglected to add the flaps for the engine inserts! Though, that wouldn't account for the size problems?
After looking at the pix of the engine, the size difference doesn't look to dramatic, I'm going to rework the engine module somewhat, I'm pretty sure I'll be able to re position the flaps/folds to correct that. Thanks for pointing it out. Question ~ the centre smaller engine insert had flaps, was it to small as well? ( looked reasonable from the pix ?)

Doc after you mentioned the Bridge V2 insert was a little to small, I assembled just the two parts and mine was to big, mmm.. worrying.. probably card thickness. The new bridge insert does look good, so I hope there's a workaround.. ?? perhaps an extra "check fit" step in the A/sequence and more clearly defined cut line. ~ cut small and work up to fit.

Bracing ~ Yep the model definitely needs some bracing, in hindsight the ones I've included in V2 were pitiful = discard them. So something better is next on the list. Glad the tabs are working so far, I guess the 'ridges' look hideous on finer models, fortunately spaceships can get away with it ~ plating.

Thanks for the link Stev0.. wooow that's a BIG model!!! wish I had a job like that. And yep! it has given me a better idea as to bracing, Like the way he's built the Bridge rear bulkhead/neck as well, I think can feel a re-think coming on there.. Have to mention, his Nostromo looks Excellent!

Progress ~ Creating detail and brace for bridge mod, 50% done. Texturing bridge 20% ~ see below..

Correction/Apology ~ after banging on Re META and its lack of texture control... I've discovered that it actually does have it! = one of the drawbacks of using a program that's user guide is in Japanese!! Just in case someone hasn't discovered it..

[File] ~ uncheck [Basic mode] and [UV] + [Map] tools will appear on the [Command] menu.

Yep..' Holly Embarrassment Batman!'
 

doc_harvey

Member
Mar 14, 2005
123
0
16
57
Minneapolis, MN
virb.com
2nd build done!

Just wrapped up the second build...she looks pretty tight.....colored edges, no glue marks and all the seams are tight. The only "problem" I had this time was that the center spar that runs port to starboard (underneath) was too short (?). It's not very noticable...wanted to send pics, but the damn camera battery is dead....Thanks for the new name plates, Gearz....me wife christened the second build as the "Solaria" (I swear I don't know why she puts up with me!)

BTW, Gearz....I don't think it was me who said that the new bridge inserts were too small...I haven't built the latest bridge version yet. I bought some medium gray card stock today (thought I'd try that instead of white card stock to see if there is a big difference or not) and I'll give her a go this weekend.

P.S. Thanks for the new nameplates!
 

sjsquirrel

Member
Feb 9, 2006
541
22
18
64
British Columbia, Canada
stevebondy.ca
Beta 1 complete & comments

Hey Gearz and gang,

I got my build finished. Here's a shot of her next to my plastic kit for comparison.

BSGPaperAndPlastic01-sm.jpg


Some of my comments may be repeats but...

I'll second Doc and vote for bigger. The size you've made the bridge section for beta 2 looks about right - I'll let you know when I finish it. As I mentioned in a previous post the tabs work very well - quite pleased.

At the very front of the ship I'd move the tabs to the bottom section - that way when you build it the front folds down over them and creates a more seamless appearance.

As you know already, the ship needs some reinforcement. In both the front and rear (engine) sections my main difficulty was holding the shape - something to hold the shape and stiffen it is all that's needed. I thought that what you put out for the second bridge beta was on the right track. I'll try it anyway and let you know.

At the rear of the bridge section the tabs should be on the sides, not the back. This would make assembly easier. There are/were also tabs at the rear of both the bottom and back surfaces so one set of tabs had to be clipped.

The mounting arms for the landing bays appeared on page four. Move them back so they appear with the engines. It fits the build sequence better. I think the arms also need more solid surfaces on the ends that attach to the landing bays. The tabs alone don't connect the arm solidly - you have to be careful to edge glue the front and rear sides of the arm also.

On the landing bays there is a line down the middle of the bottom surface. I scored it assuming it had to be folded but it doesn't. In the final version I'd remove that line from the pattern.

I had the most trouble assembling the engine section. Again, needs something to hold the shape of the sides and stiffen them during assembly.

Putting the paper model next to the plastic one two things stand out.

First, all sections of the plastic model seem slightly wider and squatter - i.e. keep the height the same but make the width (and length?) larger. This is particularly noticeable in the landing bays and bridge sections.

Second, on my build the engine section angles up slightly from the body. On the plastic kit it parallels the body - i.e. the upper surface of the engine section is parallel to the upper surface of the central body, although it is higher than the central body. If that doesn't make sense I'll email you a picture.

Also as mentioned previously the engine inserts seemed a bit small.

I don't know what you have for reference material but I'll gladly send you as many photos of the plastic kit as you can stand, er, I mean, as many as you'd like :wink:.

It may be a week or so but Ill post more comments when I finish your bridge beta 2.

TTFN

SJ
 

doc_harvey

Member
Mar 14, 2005
123
0
16
57
Minneapolis, MN
virb.com
2nd build pics

No prob's this time exceptforthe center spar underneath....
 

Attachments

  • DSCN0214.JPG
    DSCN0214.JPG
    58.2 KB · Views: 227
  • DSCN0215.JPG
    DSCN0215.JPG
    56.3 KB · Views: 143
  • DSCN0216.JPG
    DSCN0216.JPG
    56.8 KB · Views: 139
  • DSCN0218.JPG
    DSCN0218.JPG
    26.2 KB · Views: 144
  • DSCN0219.JPG
    DSCN0219.JPG
    26.3 KB · Views: 179

Gearz

Member
Mar 13, 2006
258
17
16
OZ
Doc.. Excellent!! You'll going to go from no Galactica's to a full fleet :grin: ~ and you wont need any stinking assembly guide to build her! With you guys assisting, V3 may be a full dress rehearsal, a first for me!.. Sorry must have got my wires crossed there somewhere about the bridge inserts. Yep the braces were next to useless.. sorry bout' that, see below for an update. . Solaria ! I like that name to, a few of the others sound dumb! just on the names, like the variations on the model, there seems to be several versions of the '12' that may or may not be cannon.? seems the series crew came up with 5 original names, but their not on other lists? Can anyone confirm THE definitive list of names?


OK , since you were the instigator of this model, here's some stuff for you comment/decision.

Firstly.. this is where I'm up to with the texturing. Its been a VERTICAL learning curve since I've discovered the texture tools in META, so if they look on the sad side don't be disappointed, hopefully they'll improve a bit before the final release. Probably raise a few eye brows here, but I've gone for a 'generic' grey plating tex, I played with a few others but they all looked to ..plastic. The 'sides' are a bit of a worry, the tex's are just screen caps from for a reference pic. So.. what do you recon? persevere with them ~ clean up/ improve OR just revert to the generic grey?


tex1.jpg


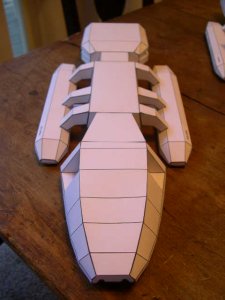
Here's the detail stage (highlighted in blue so you can distinguish them). They will be separate textured parts like ..er.. plating glued to surface, I've used this method to great effect on other Spacecraft models, BUT it ramps up the Dev and build time ~ requires a bunch of extra numbering / paper etc etc.... A lot of experienced modellers can do this themselves + extra.. though, I'd like to give novices a reasonable model without having to scratch their heads.. The sides of the Galactica are pretty 'gnarly' ( IMO.. makes it look a lot smaller...) So what's your opinion? keep it very basic = perhaps one or two detail bits per part, go the hard yards and make lotz, OR dice the detail all together?


tex2.jpg


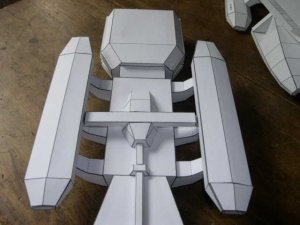
BRACING .. Both you and Steve recon bigger is better.. pretty sure I can ramp it up a few more percent and still keep you 'letter' guys from forming a posse, obviously that'll make bracing essential. This is a cap of the 'NEW IMPROVED brace for the bridge. It'll serve a multi purpose in retaining the .. 'trench' shape in the bridge underside. After seeing StevO's mates work ~ I've reworked it somewhat, with an extra part, and moved the 'Neck' to the Bridge module ~ supports the rear bulkhead and brace.


brace3.jpg


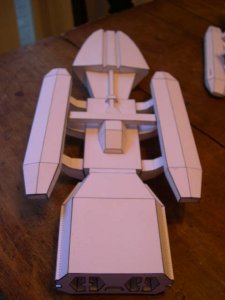
Steve !!!! Great reference shot ! .. I was going to scale it up to the max but after seeing it against the kit, as you've said, V2 must be close.

Flaps ~ Yep V1 was done on the fly so have to apologise there ~ time waster.. V2 has several flap changes.. Normally I like to keep flaps on critical shapes = the front and rear sections of the bridge. There's a lot of reasons why I do them that way, mainly for novices ( yep ! noted your ease of construction point ) the sequence has changed a little, so hopefully they'll work this time. Having said that the flaps on the rear have to stay, though I concur with your point re the nose, so I've moved them to the bottom!.

LB arms ~ That's what I needed to know..! By solid surfaces, would you say completely enclosing the LB end of the arms, or Larger flaps on ALL of the edges? + LB Line removed ! + parts lay out ~ I'll try for a reasonable layout, though, page space/ number of pages, is a limiting factor.

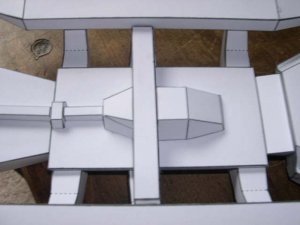
Engines ~ Yep retaining shape looks like a problem. I think it'll require a considerable rework. Noted angle problem ~ a brace or spar may help there....

Beta V model ~ I can see your point re ratio's. I've 'flattened the V2 bridge by 10 / 15 percent, and I'll do the same for the other sections as well.

There's probably a point I've missed responding to there but I have them all noted, we can work through them as we come to them. Thanks for the offer of ref mat! I have enough reference pix, what I can't get is stuff like you guys have posted ~ beta build pix, ref shots against the model + your comments and suggestions etc..so that's what I need the most!

btw.. If you have the op any future beta pix with the Model in shot as reference, would be 'MOST EXCELLENT!' also times not a problem, its going to take a while for me to ramp up my tex skills anyway.

Thanks guys ! by time we're done, no Cylon will dare show his 'little red glowing eye' again!

Oh yeah.. Doc.. do you want a base to mount the Gal on? if so what ideas do you have?
 

doc_harvey

Member
Mar 14, 2005
123
0
16
57
Minneapolis, MN
virb.com
Looks awesome!

I really like the textures....I really wouldn't worry too much about "detailed" texture (at the scale she's being built)...hmmm....a base would be cool...I think the base that Aaron Murphy designed for his viper at LHVCC website would be a good enough base

http://jleslie48.com/

And although you have put an enormous amount of time into this dev already, I think that it's important to remeber that as long as you don't grow tired of it, then there is no such thing as a finished product....I'll build as many versions as you make! Hell...I'd even try to scrape some money together to send you if it would help in the continued R&D!

Really looking forward to the next version...I haven't had alot of free time lately to work on the second "bridge" section that you sent, but I should be able to work on it today.
 
S

sdk2knbk

Gearz, first, Thank You! (One less model on my own design list that I have to do). My copy of the the V1 beta is coming along nicely as well. My suggestion for the engine module reinforcement would be to seperate the module into 2 sections, then add a bulkhead at the front of the after part. The shape will hold the "trench" in shape at the transition point where everyone's builds seem to be spreading out. That's how I held the shape of the first version of my Eagle's nosecone, and it worked well there. Has anyone else mentioned the lack of tabs on the engine inserts? I like the change you made in the underside of the bridge module.

Scott K
 

sjsquirrel

Member
Feb 9, 2006
541
22
18
64
British Columbia, Canada
stevebondy.ca
Textures & Engine reinforcement

Gearz,

I like what your doing with the textures, but it would be easy to overdo it. The images you posted with the blue highlighting indicate a number of small items. I would focus on the larger pieces that give the ship 'depth', and leave out the little tiny ones.

Given my way on the LB arms I'd go for completely enclosing the end. For the engine reinforcement I'll leave it to your experience regarding a "considerable rework", but I think simple inserts would go a long way to solving the problems.

I'll reprint the page and fiddle with it a bit.

Whenever I build a section for you I'll certainly send shots with the plastic kit for comparison.

Cheers,

Steve
 

Gearz

Member
Mar 13, 2006
258
17
16
OZ
Hey doc.. yep still underway, just got side tracked playing with META.. I agree with you and Steve re- the detail, its taking ages to do and it'll make the assemble overly complex. I was trying to compensate for the lack of texture detail. I've been doing a crash LIY course in texturing = ('YES.. you can have your law degree in SIX months!!!' ) so that's chewed up a bit of time.

Just about finished V3/final of the Bridge module, incorporating most of the suggestions. I'd like the textures finished before hand, and make the assembly guide for it as well ~ so we can put it to bed and move on.. Strayed away from the 'traditional' with one part, but we'll see how its builds ~ should be ready early next week.

?If its do-able, it would speed up the process if I could just post the PEP .pdo files for test building? no matter if not, its just the scales might be wonky between sections if you want to use this V as the finished goods etc ~ bitmaps print smaller? = I think its the way I convert them that's causing the discrepancy.

Agree with you Steve re the LB ~ closing them in now.. doing the modification to the arms you suggested, plus added 10% to the width .. it looks better!. Still trying to visualise some sort of brace for the main hull. I guess the for and aft set of arms have the bulkheads to support them, more concerned with the centre set. Just off the top of my head, the AS might be the ticket to avoid buckling? ~ main hull ~ for/aft arms ~ LB's ~ Centre Arms = CA's lightly placed in position as last step? probably wishful thinking.

Scott (sdk2knbk) good thinking re Engine module, Thanks! its given my few new ideas. If we have to add extra braces/bulkheads so be it, thought I really like your 'separating' line of thought.
 

sjsquirrel

Member
Feb 9, 2006
541
22
18
64
British Columbia, Canada
stevebondy.ca
Buckling?

Gearz,

If I follow you there you were concerned about buckling of the landing bays?

When I built it I did similar to what you describe - made the main hull and landing bays, then attached the LB arms to the LB first, then applied glue and attached all three arms to the hull at once. Worked fine for me.

Steve
 

Gearz

Member
Mar 13, 2006
258
17
16
OZ
Hu HU HUU!... note to self - NEVER touch an un-textured model again!

Ok good news, I think I'm about to break the texture barrier! I've found a work-around for the detail issue, by using the ships schematic's detail lines and a higher poly version of the Galactica ~ to generate the textures. Its slow going but the little bugger's not going to beat me. So far ~ I've got V3/final of the bridge done more or less, I'll post it once I can figure out which version file I was working on last ( multiples of multiples thanks to the &%#$@# textures).

Sorry.. got my wires crossed again. Just so I'm on the right bus ~ The main MID hull 'box' was OK = no brace required?

Also If you've had a chance to assemble it Steve, was the V2 of the bridge in the 'right' Scale ~ compared to the model you have? we could ramp it up another 10-15 % from V2bridge, before part size becomes an issue.

I've re worked the Arms but the mid hull section is in a mess ~ half textured bits. This is just V2 of the LB's to address the brace issue. Mmmm... This V of the LB's isn't going to be to everyone's taste. Not that either of you need it, but there's a gfx of how its intended to be assembled. Even if you wouldn't normally assemble this form in the suggested sequence, I'd value your opinion trying it out. I've used something similar on other models to reasonable effect that had long joins and ambiguous shape (when textured). Its probably a bit of over kill, just trying to Dev her with novice CM'ers in mind ~ forces the correct shape etc, and It will make the form very resilient ( for all those rough landings in the lounge room!)

Question on this version? The flaps for the small entry/exit panel of the 'caps', are positioned for neatness. ? as they are, any internal recess for the LB's won't be possible. Interested to know if either of you recon its worth making? ~ to small? or just a texture to represent the internal areas.

Gal_LBv2.zip

1.pdo + 1.gif

oopps.. forgot to mention, tried to make it a snug fit, the brace shouldn't require gluing! just slide home/into position etc.. ? unless size is a problem using thinner card...
 

Gearz

Member
Mar 13, 2006
258
17
16
OZ
I've learnt a lot Dev'ing this model Doc, of the long list, one has to be get your facts/specs and reference material straight before you start. Guess I've started in the middle and tried to work to both ends of the project = Dumb! As Steve has pointed out the mesh/beta has several 'cannon' flaws, I was horrified when I compared the mesh engine module closely to the reference pics I have ~ its not even close ~ size ~ position etc Strangely, there seems to be several versions of the model, all minor variations but different non the less....??? anyway I'm sticking to some shots I've collected of the original studio model. errr... where was I going with this........Oh yeah the engine module.

I need a higher res schematic!! The one I have is 570 x 510 and a bit on the grainy side. Any chance we can get our hands on a larger/clearer version?
 

doc_harvey

Member
Mar 14, 2005
123
0
16
57
Minneapolis, MN
virb.com
LB's

I'm thinking of either shortening the interal brace you made for the LB's so I can cut out the openings and put a small recessed box made from black constrution paper inside each end (give them some 3-D detail) OR, omtting the brace alltogether and making an open-ended rectangular box that travels the length of the LB's so you can see all the wat doen the length of them...whatcha think?
 

doc_harvey

Member
Mar 14, 2005
123
0
16
57
Minneapolis, MN
virb.com
BTW...I have some pretty detailed pics of the Galactica (like Coby-Wan's schematics from Starshipmodeler.com) that I can send you for higher res pics of the engine module...interested?
 

Gearz

Member
Mar 13, 2006
258
17
16
OZ
Oh boy we really started off behind the curve with this low poly mesh! I thought your idea of the 'through' tube had merit Doc, so I did a bit fiddling to make a few patterns ~ Bad Karma!

The 'entry/exit' bays are different shapes and out of position ( relative to each other), checked the high detail mesh, did a bit more research = horrible realisation that the forward end of the Gal's LB's must have been blocked off !!! From what I can gather, the Vipers must have been launched ? elsewhere/other ways? Close inspection to some of the reference pix I have, seems to confirm it.... I do agree that a recess of some sort would be a nice touch, so I'll make one for the rear end..

Having shot that one in the foot, I still think it was an interesting idea, probably won't include it in the final V, but heres a pdo of the LB with a tube + three braces? with the 'tube' position marked on them (relative to the rear port).. Same scale as all V2 modules, its a bit add hock, guess the braces could be 'slid' over the 'tube' ??? also, not sure how the front end can be terminated, its just the correct length.. you'll have to experiment, at least its a pattern to start with etc.

Gal Alternate LB

Re your offer of extra reference material.. YES please. I thought I had enough... Ho Ho, I've got plenty of pix of models (original and otherwise) but I need MORE = Any schematic, 3 / 5 view type, high rez pix you have would be most appreciated. Email
Thanks Doc
 
Status
Not open for further replies.