Barney & Smith Boxcar

nkp174

Active Member
Oct 10, 2006
1,455
0
36
41
Cincinnati, O.
I haven't updated my passenger car thread this week...because I've switched back to my Barney & Smith Boxcar. Three weeks ago my copy of Ron Rudnick's DSP&P modeler's guide arrived (30+ pages of drawings and explanations for freight cars!) I immediately started a B&S boxcar for various reasons...including that my wife's family lives in Dayton...which once was home to the Barney & Smith Car Co. I worked on this car for 5 evenings/weekend days...and then I switched to my passenger car project while waiting for super glue...I decided on tuesday night of this week that I could find a way around super glue...and her she is...

The South Park's first cars were built by the Hallack Brothers in Denver...possibly from a Jackson & Sharp kit...this included 5 boxcars...500-504. 505-511 were occupied by the first Tiffany Reefers...the second batch of Tiffany's are available commercially in every scale...HOn3, Sn3, On3, 1:24, 1:22.5, 1:20.3, maybe Nn3, etc...they are probably the most famous of all narrow gauge cars...back to the story...the next known set of cars were 25 cars...some built by Barney & Smith...so by the South Park using B&S parts. This was 1878. These cars were 26' long, 7'6" wide, and had a capacity of 12tons. They rode on swing beam trucks. They were probably number 515ish to 529ish
Special_m00241.jpg


Commercially, these have never been offered. Most of the hardware can be purchased from Coronado Scale Models & Grandt Line. The proper trucks and couplers are only available from Coronado. The only commercial parts that I intend to use are NBW castings, brake gear (maybe), and couplers (the proper link & pin). I will be dressing it for 1884 (near the end of its life)...so it will have Westinghouse air brakes as the South Park converted in 1883.

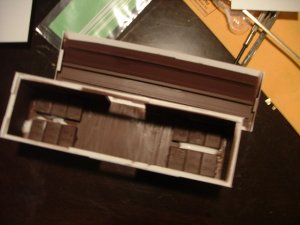
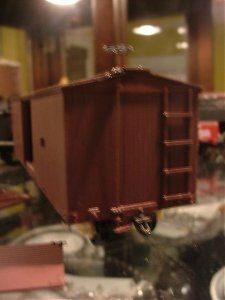
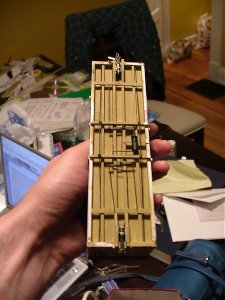
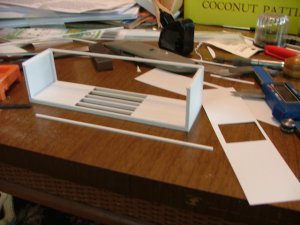
First I built the underframe...and then I built some stiffeners. to support the sides. I used plain styrene sheets for the the flooring...but leaving a hole in the center. I glued them in early to keep the frame straight...and I left the hole to detail the visible portion of the interior.

The sides are from plain scribed siding which I cut on a paper cutter.

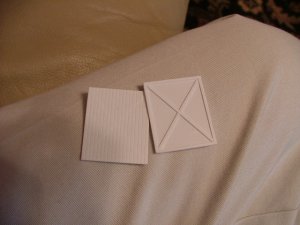
I then added 1x12's to fill the gap in the center of the car that was visible from the door...and scraps to fill the rest of the hole. I notched the center of each 1x12 and applied a layer of 1x6s to make it sort of look like ship lap flooring. I also added so scribed siding to the interior to give the appearance of a finished car (this was a mistake...it should be framing...not siding...but I was feeling lazy...and I was watching football).

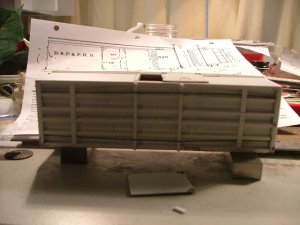
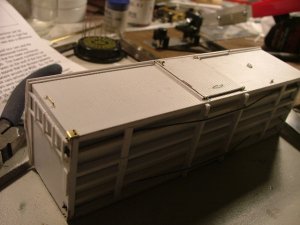
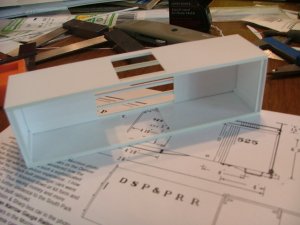
I then added the fascia boards to the sides and but out the fascia for the ends. I glued guide blocks to the end fascia boards...and attached some lengthwise roof supports...in part to allow me to remove the roof during construction.

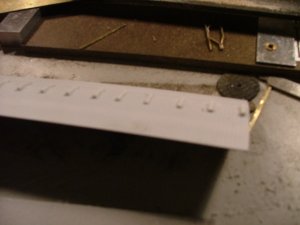
Next I built the doors using 1" thick scribed siding and 1x2 or 3 bracing.

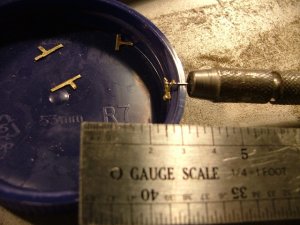
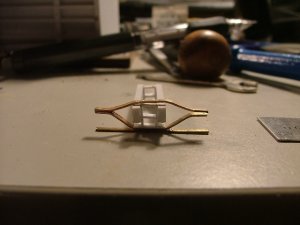
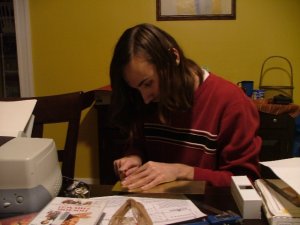
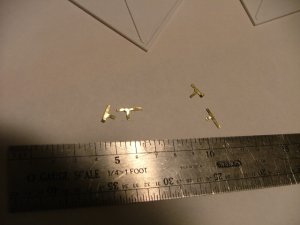
I then decided to try my hand...with inspiration from Bernard's awesome brass hardware...to build some of my own hardware. I cut out the four door hangers from 0.005" thick brass. (yes, I am using a saw on our dining room table...and the wifey took the photo). As you can see...they are tiny.
 

Attachments

  • 1.JPG
    1.JPG
    120 KB · Views: 15
  • 2.JPG
    2.JPG
    113.8 KB · Views: 16
  • 3.JPG
    3.JPG
    141.2 KB · Views: 15
  • 4.JPG
    4.JPG
    114.6 KB · Views: 13
  • 5.JPG
    5.JPG
    116.4 KB · Views: 16
  • 6.JPG
    6.JPG
    117.9 KB · Views: 14

nkp174

Active Member
Oct 10, 2006
1,455
0
36
41
Cincinnati, O.
I took several days off and then resumed work on my passenger car as I felt that the brass door hangers would need super glue to be attached...and the wife won't dock my hobby budget (which is currently suspended for $360 worth of motive power goodies on a pre-christmas gift money loan) if she gets it from her graphic designer supply store...my waycar is awaiting that same super glue...hopefully this week...

On tuesday I decided that I'd just drill holes in my hangers and nail them to the doors using NBW casting like Bernard does with his hardware...then I'd have a styrene-styrene joint to cement. But first I cut and formed a piece of scribed siding to serve as the roof (I was going to do board by board...but I don't have the budget...and I did have scribed siding).

I then harvested 3oz of lead from my 27' box car which I mistakenly doubled the weight on by accident...the board by board roof of that car is now just a bunch of boards again...but I needed to redo it since the plans I used I've learned had some mistakes wall1

The 3oz...should be enough to get the car up to the appropriate weight...around 6oz. I glued them in using white craft glue (since I didn't have super glue). I then air brushed the interior tuscan red...after a lazy attempt at brush painting it.

I then moved onto the roof...and glued 9" long pieces of 2x4 (i think) along each side of the peak of the roof. After they'd dried...I filed them down flat with the peak of the roof...and realized that it should have been 12" wide with two 6" boards...not 18" wide wall1 I suspect this had something to due with either the later cars in my china cabinet or from looking at the wrong plans. Oh well...it has three 6" boards now.

As you can see...a #78 drill (or was it #79?) had no problem cutting through 0.005" brass...although I quickly discovered that I needed to use a nail as a center punch to have control over where the hole was located...as my real center punch is too large for 0.040 wide parts. I the placed them on the doors, drilled through the doors, glued in the NBWs, and added music wire door handles.

Since the roof was still removable...which was helpful while working on it...it was easy to work on the underframe. I added 0.025" music wire truss rods which run the length of the car. I added big NBW castings to provide the ends of the truss rods (the DSP&P did not use turnbuckles on freight cars...so the ends were the only way to tighten them). Originally I was going to just make my on nuts & washers to add to the trussrods...but I decided to be lazy...since the 25yr old package (older than me!) was sitting in my parts box.

Last night I formed the four corner pockets. Rudnick's guide didn't have them...actually implied that they didn't have them...but I could sort of make them out in a picture...so I added them anyways (but did they have push pull pockets :confused: 
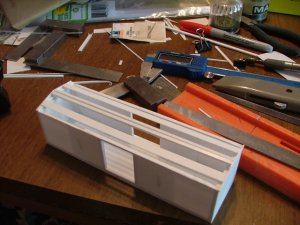
) I did the same drill and NBW nail technique as I did with the door hangers to mount them.

Today I glued the roof on. I then built the end ladders...a bottom layer of 1x2...a composite layer of 1x2 steps and frame...and a layer of 1x2 steps (I didn't have 2x2s for the steps...and I've already mentioned my spending freeze). I also formed the only grab irons on the car (one per side) from 0.015" brass wire and 0.010x0.040 styrene which filled to resemble the round ends were the irons attach to the car. I also added the tops of the coupler pockets...gave them a grain texture...and drilled holes at one end for a possible addition of the truss rods which transfer the coupler loading to around the trucks...although I think I'll wait to add those. I also built the door stops and I've assembled all 6 door guides from (18) 1"x2"x4" pieces of styrene. Three of these have been installed...the other three will be drying over night.

I think I might be painting tomorrow...I'm going to wait to finish the underframe and the brake rod/wheel later. I need a Tuscan red box car now!
 

Attachments

  • 7.JPG
    7.JPG
    110.4 KB · Views: 14
  • 8.JPG
    8.JPG
    110.1 KB · Views: 13
  • 9.JPG
    9.JPG
    105.5 KB · Views: 13
  • 10.JPG
    10.JPG
    122 KB · Views: 14
  • 11.JPG
    11.JPG
    114.1 KB · Views: 15
  • 12.JPG
    12.JPG
    121 KB · Views: 10

nkp174

Active Member
Oct 10, 2006
1,455
0
36
41
Cincinnati, O.
Lastly...there is another project which actually precedes this current flurry of working on this car...or maybe also occurred this week...

I mentioned that the only commercial parts will be couplers, NBWs, and brake stuff...maybe...I failed to mention wheelsets.

But the trucks will be from scratch!

I don't really feel like paying $16 for the proper trucks (not including the wheels!)...and I don't want to have the wrong trucks. Further...I like sprung trucks...so I began to research how to build them myself! And I can...for approximately $0.25 a piece or so. I studied pictures of commercially produced models...but couldn't quite figure them out...until I found a website where a new swing beam truck was being built...a variety which is accurate for some DSP&P cars (although not this one)...since their 1:1 scale truck is fully functional...I was then able to draw my own plans for how to build my own sprung trucks! This is also important in that I need to learn how to produce passenger car trucks for my paycar.

The picture below is of my exploratory prototype. It consists of the three pieces of 0.020 brass which serve as the irons...(2) 4x8 beams which serve as the truck beams...and the webbing which serves as the spacer...made from 6 pieces of 1x6 styrene. For the production model...I haven't decided if I'll use 3 pieces of brass for each one (and I won't solder them together as I did with these)...or if I'll use a single piece resin casting made from a brass & styrene master of the journal boxes and side frames...which would then be "bolted" to the web spacer and the 4x8s...regardless I'll be "bolting" things together. I'll also be building the web out of 1x3s instead of 1x6s.

The spring sandwich will then hang in between the 4x8s and the top of the sandwich is what attaches to the freight car...hmm...I've got to think about how this will work...as I'll need to attach the trucks to the car unlike on the prototype.

Here's a link to the new swing beam truck...http://www.spcrr.org/NARFGrantWheels.html
So cool :cool:
 

Attachments

  • 14.JPG
    14.JPG
    115.3 KB · Views: 18
nkp174 ... what can I say?
Great, greater, most great :thumb::thumb::thumb: !!!

I'm extrem surprised what for fine modelss are built in last time, all in highest quality. But this is the coronation - scratch built trucks.
Wish you good success for next steps!

Bernhard
 

nkp174

Active Member
Oct 10, 2006
1,455
0
36
41
Cincinnati, O.
Bernard,
I made the mistake of looking at your gallery again...and now I'm having second thoughts about air brushing today. I'm thinking about making some of the brake hardware.

I think I'll just paint the sides, ends, and roof today...and then either work on the trucks or switch back to the passenger car. Perhaps the box car will look nice as it temporarily sits on either Colorado & Southern tender trucks...or Bettendorf trucks which weren't introduced until 20yrs after the B&S cars met their demise.

Michael
 

MilesWestern

Active Member
Sep 20, 2005
1,800
0
36
34
CA
protopaintwest.googlepages.com
This is MOST EXCELLENT!!! :thumb: You should really enter this in an NMRA contest, I'd be willing to bet you'd take first up to at least the Regionals, if not the nationals, if you weather it a smidge. Wow.

EDIT: Those scratchbuilt trucks blow me away, insanely good!
 

nkp174

Active Member
Oct 10, 2006
1,455
0
36
41
Cincinnati, O.
Thank you for the compliments. Most of my efforts have been inspired by a combination of desiring to save money...and Bernard's awesome work.

I'm trying to decide if I include the latest update to the trucks in this thread...or in a new thread. The master still has another 7hrs to go in its mold...but I've noticed that my future Colorado Central cars will need a different set of journal boxes & side frames...as they are a bit smaller. The master that's in the mold right now is correct for any of the three varieties of trucks used on the South Park. I'm doing a little research so that I can come up with a design and build my CC trucks.

The Colorado Central was the Clear Creek Canyon line of the Colorado & Southern...in the early days....she became a sister road to the DSP&P after the UP took over both of them...with several designs being common such as having identical Brooks & Cooke moguls, similar waycars, and similar stockcars. The roads interchanged a lot...as there are numerous pictures of CC equipment on the DSP&P and DSP&P equipment on the CC (including non-revenue cars).
 

MilesWestern

Active Member
Sep 20, 2005
1,800
0
36
34
CA
protopaintwest.googlepages.com
Please post more progress here, as it's related to this boxcar, or post it in another thread and provide a link.

BTW did you do that insanely realistic colorization of that old D&SP glass-plate slide? It looks like I could be standing there.
 

nkp174

Active Member
Oct 10, 2006
1,455
0
36
41
Cincinnati, O.
Nope, that's from narrowgauge.org It was the best picture of one of these cars that was available on the internet...although I do a few decent pictures in books.

I'll probably create a new trucks thread...and then include all future truck things in their...but add a link in here. Only one of the three variations on the truck will be appropriate for this car.

Here's the link: http://forum.zealot.com/t153551/
 

steamhead

Active Member
Apr 16, 2005
2,360
0
36
75
Brownsville, TX
Terrific work NK..!!! Between you and Bernard you keep us drooling and waiting to see what your next project will be..I can't wait o see that baby painted and ready to roll..!!
 

nkp174

Active Member
Oct 10, 2006
1,455
0
36
41
Cincinnati, O.
I haven't updated this for a while...but it is close to complete.
The remaining steps:

1) Re-install the doors
2) Letter the car
3) add trucks, brake hangers/beams, and air hoses
4) weather

I've added functioning Link & Pin couplers...with working draft gear.
I've also added completely scratch built brake rigging & hardware...aside from a Trout Creek brake wheel, ratchet & pawl.

This car, the 27' Tiffany, and the 27' UP built boxcar all have identical brake rigging. The other cars under construction used either a different or unknown configuration (the B&S car's configuration I've approximated as being the same...it's actually unkown).
 

Attachments

  • B end.jpg
    B end.jpg
    73.4 KB · Views: 18
  • brake rigging.jpg
    brake rigging.jpg
    100.8 KB · Views: 14