

I'm gonna post this on the various forums since everyone is split up for the Holidays. I have about 15 turnouts (Atlas remote #6) to ballast on my new extension to my layout and I'm not sure about how to go about doing them. Any helpful hints would be appreciated. Thanks in advance.
Ballasting Turnouts
- Thread starter Bama Red
- Start date
You are using an out of date browser. It may not display this or other websites correctly.
You should upgrade or use an alternative browser.
You should upgrade or use an alternative browser.
By far the easiest way that I have found IMHO to ballast turnout is to have them ballasted before installation. I usually take electrical tape (something really tacky) and cut strips to put under the turnout (except the switch rod). Pour on some ballast and press it in with your finger. Turn the turnout over and dump the excess ballast and there you go one ballasted turnout.
Thanks to all! I'm gonna try several different methods that have been suggested on this and other forums and see what works best for me.
I have found that turnouts and ballast don't like each other so do it very carefully and keep the ballast away from any moving parts. It doesn't look so good but the turnouts work without difficulty.
From my experience (for what it's worth):-
Do and Don'ts of ballasting turnouts:-
Don't -
* Pour ballast all over the turnout and expect to sweep away the surplus as you would with normal track. You will end up with particles between the blades that are an absolute nightmare to completely remove.
Do -
* Treat the gap between each sleeper (tie) as a separate zone to be carefully filled to sleeper height with ballast using a controlled "trickle" method (my method explained below). Once each "gap" has been carefully filled with ballast the finished result looks like a turnout completely bedded in ballast (photo of examples follow).
* Keep moving the point blades from time to time as the wet ballast & glue is drying (just in case capillary action has drawn some glue under the blades).
Trickle ballast dispenser
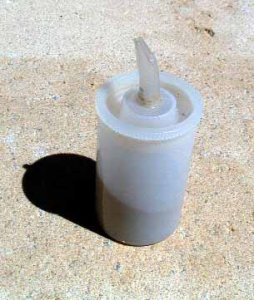
I made myself a "trickle dispenser" to dispense ballast just a few (fine) grains at a time. I used an old 35mm film cannister and modified the lid by drilling a whole through it and gluing a tapered super-glue nozzle (Testors) on top which would only allow a few grains through at a time. I found the nozzle quickly became clogged. The solution was to cut a slot along the "top" surface of the nozzle so as to form a U shaped channel out of it. The grains of ballast flow perfectly through this channel, just a few at a time.
Here's a photo of my cheap, home-made dispenser:-
Do and Don'ts of ballasting turnouts:-
Don't -
* Pour ballast all over the turnout and expect to sweep away the surplus as you would with normal track. You will end up with particles between the blades that are an absolute nightmare to completely remove.
Do -
* Treat the gap between each sleeper (tie) as a separate zone to be carefully filled to sleeper height with ballast using a controlled "trickle" method (my method explained below). Once each "gap" has been carefully filled with ballast the finished result looks like a turnout completely bedded in ballast (photo of examples follow).
* Keep moving the point blades from time to time as the wet ballast & glue is drying (just in case capillary action has drawn some glue under the blades).
Trickle ballast dispenser
I made myself a "trickle dispenser" to dispense ballast just a few (fine) grains at a time. I used an old 35mm film cannister and modified the lid by drilling a whole through it and gluing a tapered super-glue nozzle (Testors) on top which would only allow a few grains through at a time. I found the nozzle quickly became clogged. The solution was to cut a slot along the "top" surface of the nozzle so as to form a U shaped channel out of it. The grains of ballast flow perfectly through this channel, just a few at a time.
Here's a photo of my cheap, home-made dispenser:-
Attachments
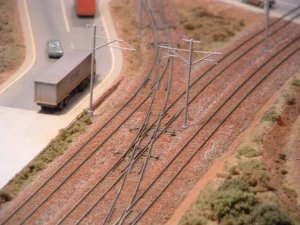
Here's a photo of an expensive single-slip Peco turnout that was a particular challenge to ballast because of the numerous moving blades. I was anxious not to wreck my $65 turnout so I judiciously ballasted it using the "trickle" method described above.
Each "gap" between the sleepers was treated as a separate mini-project and carefully filled to sleeper height with Woodlands Scenics fine ballast. Once completed the turnout ballast blended in perfectly with the surrounding mainline ballast.
You can judge for yourself:-
Each "gap" between the sleepers was treated as a separate mini-project and carefully filled to sleeper height with Woodlands Scenics fine ballast. Once completed the turnout ballast blended in perfectly with the surrounding mainline ballast.
You can judge for yourself:-
Attachments
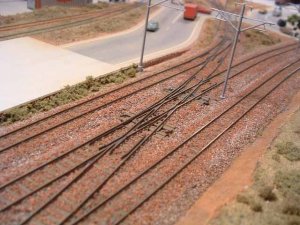
Here's a closer view.
Really, the only danger areas are the small areas under the moving blades and the area around the throw-bar. The remainder of the turnout can be ballasted without too much concern.
Here's a postscript in regard to this particular turnout:-
Just this week one of the two plastic throwbars broke (after being in service for more than two years!). I am still puzzling about how to fix such a problem on a turnout which is firmly glued down with ballast and linked to two point motors beneath the roadbed!!! Unfortunately, it is in a vital and heavily travelled location, so cannot be ignored for too long...
Attachments
Very Nice work Gavin.
I use a really unusual method of ballasting track, that works especially well for yard areas. Tile grout, mixed with a 30% fine sand ballast, is mixed into a paste. I spread this with a rubber trowel and use a gloved finger to push it and spread it around the ties. (Trust me use a glove, I rubbed my index finger raw the first time I did it.) Once dry, a forcefull rubbing action will loosen up anything you don't like. I use a jewelers screwdriver to clean the flange ways, and then go over the whole area with a shop vac to clean up the debris.

I use a really unusual method of ballasting track, that works especially well for yard areas. Tile grout, mixed with a 30% fine sand ballast, is mixed into a paste. I spread this with a rubber trowel and use a gloved finger to push it and spread it around the ties. (Trust me use a glove, I rubbed my index finger raw the first time I did it.) Once dry, a forcefull rubbing action will loosen up anything you don't like. I use a jewelers screwdriver to clean the flange ways, and then go over the whole area with a shop vac to clean up the debris.
Excellent!
Excellent work Gavin, the turnouts really combine with everything else. This thread gave me courage (and ideas) to ballast my own turnouts, thanks a lot.
Dan, your yard area is very realistic, I love it.
Excellent work Gavin, the turnouts really combine with everything else. This thread gave me courage (and ideas) to ballast my own turnouts, thanks a lot.
Dan, your yard area is very realistic, I love it.
fifer
Active Member
More Suggestions
I really like Gavins technique and his dispenser is really cool.
I would like to ad that the best way I have found to keep the glues capilary action from sticking everything is to apply drops of Rail Zip in each of the points , their pivots and the base of the throw bar.
Once the gentle ballasting is done ,clean the rail heads and area with a vacuum and then a small cloth with alcohol in the point area.
I have done about 150 Peco turnouts this way and never lost one.
Mike
PS ,do not let your Ambroid liquid glue turn over on them though.
They turn to cookie dough.
Originally posted by Dan Crowley
Very Nice work Gavin.
I use a really unusual method of ballasting track, that works especially well for yard areas. Tile grout, mixed with a 30% fine sand ballast, is mixed into a paste.
Dan, I really like your tile grout idea.
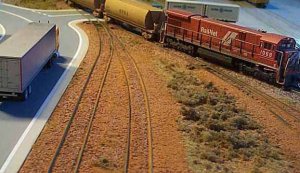
I wish I'd thought of that when I was ballasting my container terminal entrance area. I wanted to represent secondary, "buried" track covered in dirt. Often, here in Australia, all you can see of the track is the railheads running through dirt or gravel.
I ended up opting for "gravel" as I couldn't think of anything to represent the compacted dirt found around terminals, yards etc.
Tile grout would have been the solution I think.
Attachments
fifer
Active Member
Originally posted by Gavin Miller
Dan, I really like your tile grout idea.
I wish I'd thought of that when I was ballasting my container terminal entrance area. I wanted to represent secondary, "buried" track covered in dirt. Often, here in Australia, all you can see of the track is the railheads running through dirt or gravel.
I ended up opting for "gravel" as I couldn't think of anything to represent the compacted dirt found around terminals, yards etc.
Tile grout would have been the solution I think.
This is exactly what you want. Most Loco yards have little but the rails showing and that is what I was trying to capture. I strongly endorse tile grout for this purpose. It is extremely cheap as well.