

Atlas Scenic & Relaxed Plan
- Thread starter Palmisano
- Start date
You are using an out of date browser. It may not display this or other websites correctly.
You should upgrade or use an alternative browser.
You should upgrade or use an alternative browser.
I'm quite fond of that one too. If I ever stop building N-trak modules and start an actual layout, I'll probably do a modified version of that. :thumb:
Chessie6459
Gauge Oldtimer
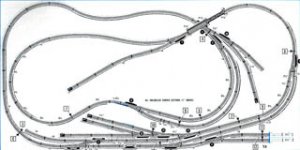
Scenic & Relaxed
I'm not sure yet about a staging yard. I know on a layout this small it would help. I was thinking of using the track at the lower right that goes off the table as a lead to an off table stub end staging yard possibly. First I have to get the main part running and see how operations go. I've already laid track and roughed in basic scenery contours. Some tracks were eliminated from the published plan to make more room for believable structures since I'm leaning more towards industrial than rural scenery. But I think I'll be able to have a long train out on the mainline while a shorter local goes around switching and trying to stay out of the way of the longer train. Since it's a twice around plan at least it'll seem a little longer.
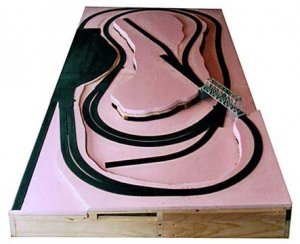
First photo was right after laying woodland scenics foam roadbed. Very easy to work with. I had to lay the track under the bridge location before permanently installing the bridge.
I'm not sure yet about a staging yard. I know on a layout this small it would help. I was thinking of using the track at the lower right that goes off the table as a lead to an off table stub end staging yard possibly. First I have to get the main part running and see how operations go. I've already laid track and roughed in basic scenery contours. Some tracks were eliminated from the published plan to make more room for believable structures since I'm leaning more towards industrial than rural scenery. But I think I'll be able to have a long train out on the mainline while a shorter local goes around switching and trying to stay out of the way of the longer train. Since it's a twice around plan at least it'll seem a little longer.
First photo was right after laying woodland scenics foam roadbed. Very easy to work with. I had to lay the track under the bridge location before permanently installing the bridge.
Attachments
Palmisano, if you have any more pictures to post I'd sure like to see them. Have always liked this plan and have considered using it for an extension of my present layout. Yours is looking real good.
Jack
Jack
I built one from this plan several years ago. My favorite part was the sweeping curves next to the river(or lake, if you prefer). Looks like yours is off to a good start.
Nice layout
Hi,
I also researched the Scenic and Relaxed. I actually started making it, until someone at our club sold their home layout to me. One day when have the space, I'll join the 2.....
Anyway, a really really nice example of this layout:
http://members.aol.com/vollmerdp/myhomepage/Trains/DavePRRmain.htm
Cheers
Bridge Clearance
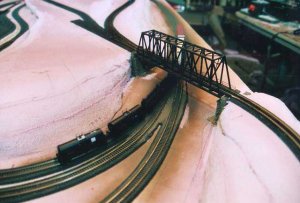
Thanks for the nice comments. I did change the outer sweeping curve into a wide arc instead of another S curve. The most time consuming thing about this plan so far has been altering the grades. I found the 1 1/2" clearance at the bridge that Atlas specified in the plans was too low if you wanted to use a real bridge that hangs below track level somewhat. I used the Kato Unitrack bridge with pretty heavy modifications. It was about the only single-track through truss bridge I could find in N scale.
I had to increase the clearance to 2" which through the whole thing off so I basically had to re-engineer the whole thing. The 1 1/2" clearence is ok if you are using Atlas flat-bottomed bridges and are running older lower equipment. I wanted a more impressive bridge and am running modern equipment so it had to be raised. Something to watch for if anyone ever builds this plan.
This is a nice track plan, are there any resources for it online...or do you have to buy it from Atlas?
Your "terraforming" is looking pretty good too! :thumb:
Your "terraforming" is looking pretty good too! :thumb:
Chessie6459
Gauge Oldtimer
I ran into the same problem. Like you, I wanted to use the Kato bridge, but ended up settling for the Atlas bridges instead. Yours looks much better.Palmisano said:I found the 1 1/2" clearance at the bridge that Atlas specified in the plans was too low if you wanted to use a real bridge that hangs below track level somewhat.
I had thought about doing this layout, just like so many other plans also. but i finaly decided to go with this plan also. The start of yours really looks great.
I wil be building it on the 2" foam board. Buiding it 4'x8', giving me some extra room for more scenery. I will using flex track for most, if not all my track.
After you laid your foam board, did you trace the track in place, or did you use templates.
I am not sure on how to prep my foam, of placement of the track and roadbed. Like i mentioned above i will be using mostly or all flex track.
I never like this plan on paper..Now seeing what it looks like when partly built I think it will be a nice layout even though it is limited operational wise..
CAS, yeah, building it larger will definitely give you more room. The biggest thing to do with all that extra space is to broaden the curves and ease the gradients. I thought about changing the size but I really wanted something really small to experiment with as I haven't built a model railroad since high school.
First I built the framing from 1x4. I used really nice grade lumber not because it needed to look good, but because I wanted it to be straight. Then I took my sheet of 3/4 inch foam and laminated it to the plywood using PL multi-purpose construction adhesive that came in a big gallon paint can. You have to use a grooved plastic spreader thingie. It worked great I couldn't pull them apart if I tried.
I drew the complete plan right on the foam with a fine blue marker. Take your time here. I bought one each of the turnouts I was using and made photocopies of them to use as templates I used a long straightedge and a simple tramel (home depot or rockler woodworking has the kind you can clip onto a long board or peice of metal) to draw the curves. Then I marked the cut lines with a red marker and went to town with the jigsaw. You may not be able to reach through both the foam and plywood at the same time with a normal length blade if you use 2" foam. You could still do it separately. Cut the foam first, then reach through the crack and transfer the cut line to the playwood. Then laminate the two after the ply is cut.
***Oh yeah, prepping the foam. Make sure to peel off the thin clear plastic protective layer of the foam before gluing it down. I learned the hard way that nothing will stick to it.
Darn, this would have been a great plan to use too (although maybe modified too as you have done), if I had seen it earlier. My own 5' x 2.5' layout is based on the Gorre and Daphetid layout. It's a twice around too, so makes for a nice extended run (especially since almost half of the loop is in tunnels).
Looks like it's coming along fine. I can see lots of potential for some wonderful scenery, especially around the bridge area.
Keep posting photos of your progress.
Looks like it's coming along fine. I can see lots of potential for some wonderful scenery, especially around the bridge area.
Keep posting photos of your progress.
Thanks Palmisano for the tips. I wasn't to sure on how or where to start with the track arrangement.
I to havn't had a layout since H.S., and that was a small HO layout. I have the space for a larger layout, but i want to start small. With this small layout, hopefully get some expereince of laying track, scenery, balasting the track, and the many more asspects of model RR.
Just had ordered the last of right hand turnouts needed for the plan. When they arrive, i will be able to start on my layout.
Oh yea, i will be adding a right hand turnout on the left side on the top plan, it will lead to a engine facilty that will be about 2' wide, and 3-4' long.
Thanks again, and keep up the good work.