An opinion needed if you would be so kind.

TrainNut

Ditat Deus
Sep 15, 2004
1,731
0
36
54
AZ
Hey all, normally I'm an N scale kinda guy but today my question before you deals with HO. I've got an old, brass, United, HO 2-6-6-2 that I would like to convert to DCC with a digitrax sound card so that I can run it on the club layout. How old you ask? I don't know... I have been in possession of it since '94 when I got it on consignment from a hobby shop in Tucson, AZ. Since I'm kinda new to this whole DCC thing, would it be worth my time to try and convert this thing from DC to DCC or am I going to run into problems I have not been exposed to as of yet? My LHS tells me that it should be as easy as tapping into the motor circuit, placing the board and speaker in the tender and I should be good to go. Is it really that easy? Please check out the photos...
Any and all feedback would be greatly appreciated. Thanks.
Oh, last question... if all goes well and I get the sound card installed, will it still work correctly on DC as well? It should right?
 

Attachments

  • DCP_3908.jpg
    DCP_3908.jpg
    59.1 KB · Views: 150
  • DCP_3909.jpg
    DCP_3909.jpg
    63.7 KB · Views: 149
  • DCP_3910.jpg
    DCP_3910.jpg
    63.6 KB · Views: 152

Gary Pfeil

Active Member
May 7, 2001
2,510
0
36
Boonton NJ
Visit site
The motor needs to be electrically isolated from the frame, it is probably held in place with a screw from below. Replace that screw with a nylon one, and use electrical tape or something similar to insolate from the frame. Check its current draw, it may be too high for most decoders. I am not up to date with all the sound decoder ratings anymore. If the current is too high, you could replace the motor. Or, use a seperate decoder for drive and sound. Drive only decoders are available in high power ratings. And Digitrax makes sound only decoders. As far as operating on DC, it will depend on the decder you select. I have no knowledge of any sound decoders other than Digitrax, and with them, only the Tsunami allows running on DC.
 

MasonJar

It's not rocket surgery
Oct 31, 2002
5,362
0
36
Ottawa, Canada
Visit site
What Gary said...!

If any part of the frame is used to conduct electricity to the motor, you will have to rewire the loco. How much depends in part on how it is wired now. It can be as easy as a few solder joints, or you may have to take it all apart... :rolleyes:

To me, the motor looks as if it is in contact with the frame at the back where what appears to be a screw (probably) runs right through to the frame.

You may want to rewire it anyway, in order to have a neater arrangement for the decoder/sound decoder to go into the tender.

If you don't feel like taking this on yourself, there are shops like Tony's Train Exchange, or Litchfield Station that would do this for you. Or you might check with the local clubs and/or hobby shop(s).

Andrew
 

Russ Bellinis

Active Member
Feb 13, 2003
4,501
0
36
78
Lakewood, Ca.
Visit site
It may be easier than you think. It looks like both brushes are hardwired to the right and left drivers. Try cutting the two wires to the brushes, but keep track of which is which. Then use a V-O-M to check continuity between the motor brushes and frame. If the brushes are isolated from the frame, you can wire the power pick up for the decoder to the two wires coming off the drivers. Wire the output of the decoder to the two wires at the brushes, and wire your sound according to the decoder instructions and you should be good to go. By the way, you don't show the tender for it. If the tender is not part of the electrical system for this locomotive, you can improve the operation of it by putting electrical pick up on the trucks. Use one truck for pick up on the right side and the other on the left side. Join the new pick up wires to the appropriate wire from the right and left side drivers of the locomotive.
 

pgandw

Active Member
Jul 9, 2005
1,002
0
36
Electrically isolating the motor from the frame is required as Gary said. But that includes the gearbox. In addition to the motor mount isolation (all mounts!), you will need a non-metallic universal joint of some sort between motor and gear box - surgical tubing or model airplane fuel hose is commonly used.

Since you are considering sound, and operating on a club layout where cleanliness of the track may be a problem, I would certainly consider adding pickups to the insulated drivers and tender wheels. These pickups would have to be insulated from both the engine and tender frames. As it stands right now, your engine picks up power from one rail through the non-insulated wheels and frame, and your tender non-insulated wheels and frame pick up power from the other rail.

Finally, for better sound, build a speaker enclosure so that the sound is only fired in one direction.

For Russ, it looks like the wires going forward from the brushes are for the headlight. No imports I know of made during the timeframe of this one (1980 at the latest?) insulated motors from the frames. The open frame motor, non-skewed armature, and lack of flywheel all confirm the standard older import technology. And I don't remember when PFM stopped importing United, but believe it was late '70s or early '80s.

my thoughts, your choices
 

TrainNut

Ditat Deus
Sep 15, 2004
1,731
0
36
54
AZ
Well first of all, I don't have a very good history of being patient, second while I was pretty good at electronics when I was younger, I seem to have lost the touch, and third, if it's not easy, I'll probably screw it up leaving me worse off than before I started. I'm doing good just to have gotten the boiler/cab assembly detached from the running gear/frame.
Gary Pfeil said:
The motor needs to be electrically isolated from the frame, it is probably held in place with a screw from below. Replace that screw with a nylon one, and use electrical tape or something similar to insolate from the frame. Check its current draw, it may be too high for most decoders.
This is way more than I wanted to get into. It does appear as if the motor is part of the frame.
MasonJar said:
If you don't feel like taking this on yourself, there are shops like Tony's Train Exchange, or Litchfield Station that would do this for you.Andrew
I've been to Litchfield Station (his winter location is somewhat close to me). He's booked out 6-8 months. Though it will probably be even longer by the time I were to finally get this figured out on my own. I will take it out to the club though and see if someone can look at it and possibly help me or tell me not to waste my time.
Russ Bellinis said:
By the way, you don't show the tender for it. If the tender is not part of the electrical system for this locomotive, you can improve the operation of it by putting electrical pick up on the trucks. Use one truck for pick up on the right side and the other on the left side. Join the new pick up wires to the appropriate wire from the right and left side drivers of the locomotive.
Sorry, I did not think that was relevant but indeed it sure is. both trucks of the tender are wired as pickups transferring the circuit through the drawbar which then is screwed into the bottom of the frame, isolated, and run via a big black wire to the top of the motor.
pgandw said:
Since you are considering sound, and operating on a club layout where cleanliness of the track may be a problem, I would certainly consider adding pickups to the insulated drivers and tender wheels. These pickups would have to be insulated from both the engine and tender frames. As it stands right now, your engine picks up power from one rail through the non-insulated wheels and frame, and your tender non-insulated wheels and frame pick up power from the other rail.
Since the tender is brass and the wire coming from the pickups on the bottom are soldered directly to the bottom of the tender, this would seem to pose a problem.

pgandw said:
For Russ, it looks like the wires going forward from the brushes are for the headlight.
Indeed you are correct. At first I thought they were wired into the front set of trucks but upon closer inspection, yep, they go to the headlight.:eek:ops:
I think bottom line here is I would be getting into this way deeper than I feel comfortable. There is a lot of stuff I would have to learn on the fly, some high dollar electronics at stake, and a favorite brass engine I don't really want to screw up. I thank you all for your comments and have learned a lot from you insight. I still would like to do something like this but I think I should find something newer (made of more plastic) and with less value to "experiment" upon. Maybe someday, but for now, I guess it shall remain DC.
 

pgandw

Active Member
Jul 9, 2005
1,002
0
36
TrainNut

Go for it. It's a beautiful locomotive, worthy of your efforts. Just be patient, like you are laying or fussing with track to eliminate derailments. The remaining work is no more difficult than the disassembly or trackwork - just more of it.

Before beginning, buy your decoder and speaker(s) of choice. Decide whether or not to keep the existing motor (it's easy to change out if you want to and the folks at NWSL will certainly help you make a good replacement selection), and whether or not you are going to add pickups. Tomar makes some nice pickup kits. Neither is necessary for the DCC conversion.

You will need some model aircraft fuel hose for connecting the motor shaft to the gear box. Epoxy cement and the heat resistant tape sold by the DCC houses, some RTV, plastic screws, some flexible 26-30 gauge wire, and a suitable sheet material for the speaker enclosure pretty much complete the materials list (these items and a willing attitude to learn new skills).

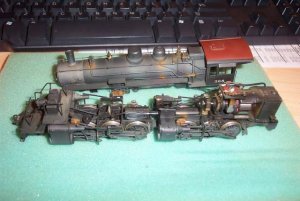
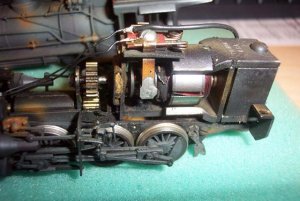
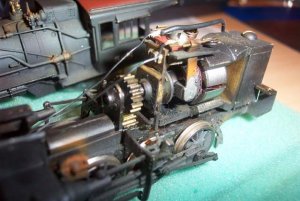
I can't tell for sure from the photos, but it looks like the top spur gear is mounted directly on the motor shaft. If so, that electrical connection has to be broken. The shaft has to be cut with a Dremel and an extra bearing and support added for the gear shaft. The fuel hose is cut to use as a joint between the motor and gear shafts. The motor is mounted on top of a piece of the heat-resistant tape (or RTV) to isolate it from the frame. A plastic screw replaces the metal one used to adjust the motor. Now you have completed the most difficult task of the conversion.

Next, decide whether you are going to install the decoder in the engine or tender.

If the decoder is installed in the engine (probably easier), the motor wires go from the decoder to the motor brushes or terminals. The lighting wires are run to the decoder instead of the motor brushes. One track wire goes from the decoder to the engine frame, the other goes to the wire from the tender drawbar. The speaker wires go separately to the speaker(s) in the tender. That's it for wiring unless you add pickups.

The speaker (assuming the speaker frame is grounded) must be insulated from the tender frame and shell. Use RTV or tape to mount. I recently saw an article on using PVC pipe for a speaker enclosure. The speaker enclosure ideally prevents the speaker vibrations (means close to air-tight) from escaping out the back as lost energy. If reflected back towards the speaker, the vibrations will reinforce at the resonant frequencies of the enclosure cavity - bigger cavity (within reason) means more bass. Drill some holes where you want the sound to come out - either through the coal load or out the bottom of the tender.

Wasn't so bad after all.

If you decide to add pickups, they must wipe against the wheel tread or wheel back. On one side, the tender wheels will be insulated at the hub. The pickup fastening and wiring points must be insulated from the tender - that's where stryene pads, epoxy cement, and platic screws come in handy. Another wire is run from the tender to the engine, and joins the wire from the engine frame to the decoder track input. Similar situation if you decide to add wipers on the insulated drivers. Just check the insulated drivers carefully - many are insulated between the driver rim and center, and not at the axle like the tender wheels.

Now your beautiful brass responds smoothly to your every DCC command and talks back to you with the sound of steam. It was worth it!
 

TrainNut

Ditat Deus
Sep 15, 2004
1,731
0
36
54
AZ
Allright, you got me convinced. I'm going to give it a try. I got to looking at the NWSL site and got totally sidetracked for a while on all the neat stuff there. I warn you though this could take a while.... 'specially since I think I am going to try and upgrade to a can motor also. The way I figure it, the engine doesn't ever do anything but sit in a box anyways and even if I screw it up, it will still look just as purty if I have to put it back in the box or even up on a display shelf. Sooo, here we goooooooo....