Z
2001 ASO USSC Discovery One
- Thread starter DanBKing
- Start date
You are using an out of date browser. It may not display this or other websites correctly.
You should upgrade or use an alternative browser.
You should upgrade or use an alternative browser.
The amount of work, effort, and energy that you are putting intro this model is OUTSTANDING!!!
All of the fine detail that you have added is really paying off in how SIMPLY AMAZING this model is turning out.
Keep up the GREAT work!!!
All of the fine detail that you have added is really paying off in how SIMPLY AMAZING this model is turning out.
Keep up the GREAT work!!!
THIS THREAD IS NOT DEAD! :Nonoooo:
After over two years hiatus, I will be reviving this thread with an update, VERY soon....

After over two years hiatus, I will be reviving this thread with an update, VERY soon....
THE DC
Highly Esteemed Member
So, as promised, I'm back.
This thread has, and must be, resurrected! :nailbiting:
Waaaay back on 15th May 2012 when I started this thread, I promised to finish the model...
It's not finished yet .........:meh:
Poor ole' Discovery has been sitting forlorn and depressed, under dust protective wraps .....
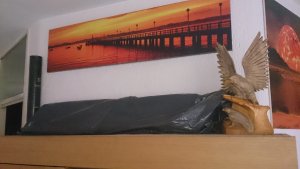
But, I've been working on it !
As a reminder, this is what I am working for ....... A smooth ball.....

I said "BALLS!" to my original build of the spherical command sphere, and started again.
I wanted a smooth ball, at least...:angelic:
I wanted something a lot better than what was before.......
The 'Stepped' effect of the parts just did not work for me........ (But, maybe that was just my crappy building skills way back then ......:yuck

I wanted to keep the darker recessed bands stepped lower in level to the main body shell panels, but that took some serious planning, working with @uhu02 ring design of the sphere.
It took three printed copies to get it right .......
I think it is right. But, it isn't finished yet........
See what you think.....
I did not modify the printed ring structure for the command sphere, except to remove the tabs.
In removing the tabs, you are left with a thick black line around all the parts. Removing this black line was important to achieve a seamless/smooth ball.
All the parts for the lower half of the ball were rough cut....
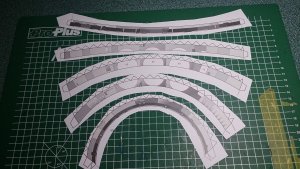
Close trimmed....
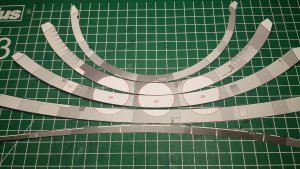
And methodically, using extremely sharp scissors, the black line was trimmed away from each part....
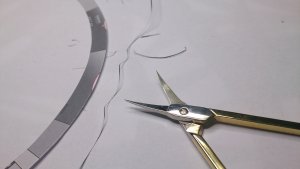
Getting this part of the whole process accurate and correct is crucial to the end result.
Trim to pixel level with your scissors...
The piece on the right is un-trimmed of the black line, the others are in various stages of trimming.....
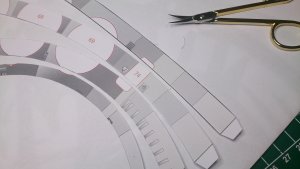
Once all the pieces are trimmed to perfection(!) I then used the printed texture lines as a guide to tack each strip roughly in place...
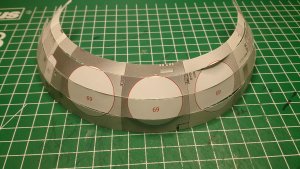
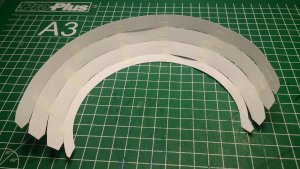
Long ago, in this thread, @zathros gave me the right idea; Water shaping.......
And that is where the fun begins.....
As seen earlier in the thread, I purchased various plastic Christmas ball type decorations that I could possibly use as a form, to form the shape of things to come.....
As it turned out, the internal diameter/circumference of one of the plastic balls, matched the external diameter/circumference of the model command module almost perfectly.....!!
One thing I can say I have learned with this project, is there are endless items around the house that can help you in paper modelling.
And these worked for me ....... The afore-mentioned half of a Xmas ball decoration, and a semi-inflated kids plastic ball.....
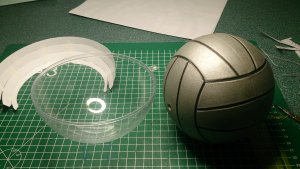
I lightly dampened the back of the tacked together ring structure with a bit of water, applied with a damp cloth. This was then placed into the half of the plastic ball shell. The toy ball was then placed into plastic shell and pressed down with force.
This pic gives you the idea.....
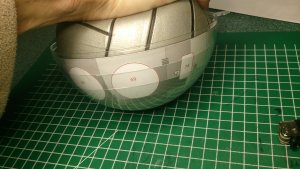
Once I was happy that everything was sitting correctly, I applied a heavy weight to replace my hand, and left it all to dry over night.....
See you all in the morning!!!


Time to change things.......!
This thread has, and must be, resurrected! :nailbiting:
Waaaay back on 15th May 2012 when I started this thread, I promised to finish the model...
It's not finished yet .........:meh:
Poor ole' Discovery has been sitting forlorn and depressed, under dust protective wraps .....

But, I've been working on it !
As a reminder, this is what I am working for ....... A smooth ball.....

I said "BALLS!" to my original build of the spherical command sphere, and started again.
I wanted a smooth ball, at least...:angelic:
I wanted something a lot better than what was before.......
The 'Stepped' effect of the parts just did not work for me........ (But, maybe that was just my crappy building skills way back then ......:yuck
I wanted to keep the darker recessed bands stepped lower in level to the main body shell panels, but that took some serious planning, working with @uhu02 ring design of the sphere.
It took three printed copies to get it right .......
I think it is right. But, it isn't finished yet........
See what you think.....
I did not modify the printed ring structure for the command sphere, except to remove the tabs.
In removing the tabs, you are left with a thick black line around all the parts. Removing this black line was important to achieve a seamless/smooth ball.
All the parts for the lower half of the ball were rough cut....

Close trimmed....

And methodically, using extremely sharp scissors, the black line was trimmed away from each part....

Getting this part of the whole process accurate and correct is crucial to the end result.
Trim to pixel level with your scissors...
The piece on the right is un-trimmed of the black line, the others are in various stages of trimming.....

Once all the pieces are trimmed to perfection(!) I then used the printed texture lines as a guide to tack each strip roughly in place...


Long ago, in this thread, @zathros gave me the right idea; Water shaping.......
And that is where the fun begins.....
As seen earlier in the thread, I purchased various plastic Christmas ball type decorations that I could possibly use as a form, to form the shape of things to come.....
As it turned out, the internal diameter/circumference of one of the plastic balls, matched the external diameter/circumference of the model command module almost perfectly.....!!
One thing I can say I have learned with this project, is there are endless items around the house that can help you in paper modelling.
And these worked for me ....... The afore-mentioned half of a Xmas ball decoration, and a semi-inflated kids plastic ball.....

I lightly dampened the back of the tacked together ring structure with a bit of water, applied with a damp cloth. This was then placed into the half of the plastic ball shell. The toy ball was then placed into plastic shell and pressed down with force.
This pic gives you the idea.....

Once I was happy that everything was sitting correctly, I applied a heavy weight to replace my hand, and left it all to dry over night.....
See you all in the morning!!!
Time to change things.......!
Last edited:
Time to change things.......!
Good to see you back at it Dan... Good Luck!thumbsup
I'm still stuck how you modified the nozzle, I wouldn't have, and bet no one would have noticed. You would have though. You are abetter man than I.
I wouldnt go that far Z. It was just a case of not reading the instructions properly in the first place!!
I managed to remove the incorrect nozzels without damage to the rest of the assembly.
I then made new ones of the correct length and attached these.
Problem solved.
Over the last few days, since my last post, I have been cutting out and trimming all the parts required for the command sphere. Trimming off the tabs and all traces of the black line surrounding the parts has taken a lot of time and eye strain.
Also, all the parts have been 'water shaped' as outlined earlier. When dampened and placed into the plastic half ball, the semi inflated plastic kids ball is pressed down into the shell with force. This causes the kids ball to expand outwards, compressing the paper part against the plastic 'half a ball' shell . I placed a very heavy weight on this and left it overnight to dry. Once removed from the shell the part now has a curved profile matching the curvature of the shell.
Anybody that may be interested in the concept of water shaping paper should read this excellent info here: http://www.langorigami.com/paper/wetfolding_papers.php
Once all the parts were trimmed and shaped, assembly could begin!
Each hemisphere of the sphere has 4 distinct longitudinal sections divided by darker recessed bands.
These 4 sections are shown here (this photo was taken at Wonderfest 2008, and judging by the texturing on the model, I think this is where UHU02 got his inspiration from.)
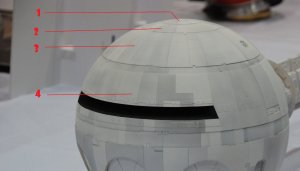
Sections 1 and 2 are made from 1 piece each.
Section 3 is made from two bands joined in the middle.
Section 4 is made up of 4 separate bands.
Sections 1 & 2 are simply two rings. These are joined at the ends and then water shaped. Simple.
As shown earlier, all the parts (bands) of sections 3 & 4 are tacked together roughly and then water shaped.
I was concerned about deforming the surface of the ball by using glue on the backing strips that join the bands together. I had this problem before when I attempted the sphere the first time. As the glue softened the paper, the impressions of the tabs/backing strips showed on the surface. This just would not do, if I wanted a smooth, unblemished ball!
I was sitting at work mulling over how I was going to join the bands without surface marking. I work for one of the largest document archive companies in Europe, and we use barcodes printed on stickers for all containers and documents stored here. The manufacturer of the stickers guarantees that the glue on these stickers will stay stuck for at least 75 years!
BINGO!!! 75 years will outlive me, that's for sure! So, with this in mind, I decided to use thin strips of these stickers to join the bands of each individual section. The stickers stick like $h1t to a blanket and of course no glue is needed. Therefore, no glue, no surface marks!!!
The strips I cut to about 6mm wide x 15mm long. I started joining the bands by first accurately lining up various printed texture lines and sticking a sticker strip behind. Doing it this way ensured that the texture lines lined up across the bands. It was then just a case of filling up the spaces between with strips until all the bands were joined together.
It is important to make sure that the join is as snug and tight together as possible. As you progress you can 'feel' the paper pulling itself into form. It is a case of letting the paper take it's own form without forcing it. Of course, having the parts pre-shaped helps immensely while doing this.
This photo shows the parts for the top 3 sections of the sphere, pre-shaped and joined ready for final assembly.
![DSC_0124[1].JPG DSC_0124[1].JPG](https://www.zealot.com/data/attachments/122/122699-8e1ff2dd21d55cf6cb3b6ae352940432.jpg)
All the notches on the edges of the rings were cut out before assembly. The black bands were cut and trimmed from spare copies of parts sheets. These black bands are to be recessed lower than the main panels.
This pic shows the (almost) complete upper section. I left off the top most part (section 1) for now, as the resulting hole provides an entry point for a finger or thumb when assembling the parts. This I will attach later when the whole hemisphere has been assembled.
The shape and form is looking nice and round and smooth!!!
![DSC_0108[1].JPG DSC_0108[1].JPG](https://www.zealot.com/data/attachments/122/122700-b7b68b41fb1024b5397d5f40a23ebe3c.jpg)
The main section (4) was assembled next, in the same way.
You will notice in the pic above that the join line of section 3 is a bit rough. I overcame this problem by burnishing the join from behind to flatten the join more. This was done by placing the assembled part into the plastic shell that I used for water shaping and using a rounded wooden handle to achieve this. As the plastic shell is clear, you can watch what you are doing and where you are burnishing by looking at the surface of the parts from the outside.
![DSC_0003[1].JPG DSC_0003[1].JPG](https://www.zealot.com/data/attachments/122/122701-63cd17dc762488f9fd2335ca68857747.jpg)
This pic shows the difference between burnished (left) and un-burnished joins (right.)
![DSC_0008[1].jpg DSC_0008[1].jpg](https://www.zealot.com/data/attachments/122/122702-144bf3a6c8d85625f425f836b0289d6f.jpg)
Once I had completed the assembly of section 4 of the upper hemisphere, I used the plastic shell as a support and very carefully cut out the opening for the windows, ensuring that the cut lines were perfectly straight and that all the red print was removed. I also cut out holes for where I am going to add recessed detail to the surface later on.
![DSC_0128[1].JPG DSC_0128[1].JPG](https://www.zealot.com/data/attachments/122/122703-d7d51593f5271ab58cb6a80bff7631ff.jpg)
I then joined section 4 to sections 1,2 & 3 to complete the shell of the upper hemisphere.
This pic shows the 'sticker hell' on the inside of the assembled shell.
![DSC_0141[1].JPG DSC_0141[1].JPG](https://www.zealot.com/data/attachments/122/122704-1c70eb0602d514a945364d65fb09ad27.jpg)
And, ladies and gentlemen (and others,) this is the completed upper hemisphere.
![DSC_0130[1].JPG DSC_0130[1].JPG](https://www.zealot.com/data/attachments/122/122705-955ee122bbbf89b2f3b0d7765412b724.jpg)
![DSC_0133[1].JPG DSC_0133[1].JPG](https://www.zealot.com/data/attachments/122/122706-209f91edd4f548892d22f3eb79ab12fc.jpg)
![DSC_0136[1].JPG DSC_0136[1].JPG](https://www.zealot.com/data/attachments/122/122707-9834a7950f6f1829cb7f493d6d47ac99.jpg)
I am VERY pleased with the end result.
I am now working on the lower hemisphere and will be back over the next day or two with more progress.
Take care and stay tuned!!
Also, all the parts have been 'water shaped' as outlined earlier. When dampened and placed into the plastic half ball, the semi inflated plastic kids ball is pressed down into the shell with force. This causes the kids ball to expand outwards, compressing the paper part against the plastic 'half a ball' shell . I placed a very heavy weight on this and left it overnight to dry. Once removed from the shell the part now has a curved profile matching the curvature of the shell.
Anybody that may be interested in the concept of water shaping paper should read this excellent info here: http://www.langorigami.com/paper/wetfolding_papers.php
Once all the parts were trimmed and shaped, assembly could begin!
Each hemisphere of the sphere has 4 distinct longitudinal sections divided by darker recessed bands.
These 4 sections are shown here (this photo was taken at Wonderfest 2008, and judging by the texturing on the model, I think this is where UHU02 got his inspiration from.)

Sections 1 and 2 are made from 1 piece each.
Section 3 is made from two bands joined in the middle.
Section 4 is made up of 4 separate bands.
Sections 1 & 2 are simply two rings. These are joined at the ends and then water shaped. Simple.
As shown earlier, all the parts (bands) of sections 3 & 4 are tacked together roughly and then water shaped.
I was concerned about deforming the surface of the ball by using glue on the backing strips that join the bands together. I had this problem before when I attempted the sphere the first time. As the glue softened the paper, the impressions of the tabs/backing strips showed on the surface. This just would not do, if I wanted a smooth, unblemished ball!
I was sitting at work mulling over how I was going to join the bands without surface marking. I work for one of the largest document archive companies in Europe, and we use barcodes printed on stickers for all containers and documents stored here. The manufacturer of the stickers guarantees that the glue on these stickers will stay stuck for at least 75 years!
BINGO!!! 75 years will outlive me, that's for sure! So, with this in mind, I decided to use thin strips of these stickers to join the bands of each individual section. The stickers stick like $h1t to a blanket and of course no glue is needed. Therefore, no glue, no surface marks!!!
The strips I cut to about 6mm wide x 15mm long. I started joining the bands by first accurately lining up various printed texture lines and sticking a sticker strip behind. Doing it this way ensured that the texture lines lined up across the bands. It was then just a case of filling up the spaces between with strips until all the bands were joined together.
It is important to make sure that the join is as snug and tight together as possible. As you progress you can 'feel' the paper pulling itself into form. It is a case of letting the paper take it's own form without forcing it. Of course, having the parts pre-shaped helps immensely while doing this.
This photo shows the parts for the top 3 sections of the sphere, pre-shaped and joined ready for final assembly.
![DSC_0124[1].JPG DSC_0124[1].JPG](https://www.zealot.com/data/attachments/122/122699-8e1ff2dd21d55cf6cb3b6ae352940432.jpg)
All the notches on the edges of the rings were cut out before assembly. The black bands were cut and trimmed from spare copies of parts sheets. These black bands are to be recessed lower than the main panels.
This pic shows the (almost) complete upper section. I left off the top most part (section 1) for now, as the resulting hole provides an entry point for a finger or thumb when assembling the parts. This I will attach later when the whole hemisphere has been assembled.
The shape and form is looking nice and round and smooth!!!
![DSC_0108[1].JPG DSC_0108[1].JPG](https://www.zealot.com/data/attachments/122/122700-b7b68b41fb1024b5397d5f40a23ebe3c.jpg)
The main section (4) was assembled next, in the same way.
You will notice in the pic above that the join line of section 3 is a bit rough. I overcame this problem by burnishing the join from behind to flatten the join more. This was done by placing the assembled part into the plastic shell that I used for water shaping and using a rounded wooden handle to achieve this. As the plastic shell is clear, you can watch what you are doing and where you are burnishing by looking at the surface of the parts from the outside.
![DSC_0003[1].JPG DSC_0003[1].JPG](https://www.zealot.com/data/attachments/122/122701-63cd17dc762488f9fd2335ca68857747.jpg)
This pic shows the difference between burnished (left) and un-burnished joins (right.)
![DSC_0008[1].jpg DSC_0008[1].jpg](https://www.zealot.com/data/attachments/122/122702-144bf3a6c8d85625f425f836b0289d6f.jpg)
Once I had completed the assembly of section 4 of the upper hemisphere, I used the plastic shell as a support and very carefully cut out the opening for the windows, ensuring that the cut lines were perfectly straight and that all the red print was removed. I also cut out holes for where I am going to add recessed detail to the surface later on.
![DSC_0128[1].JPG DSC_0128[1].JPG](https://www.zealot.com/data/attachments/122/122703-d7d51593f5271ab58cb6a80bff7631ff.jpg)
I then joined section 4 to sections 1,2 & 3 to complete the shell of the upper hemisphere.
This pic shows the 'sticker hell' on the inside of the assembled shell.
![DSC_0141[1].JPG DSC_0141[1].JPG](https://www.zealot.com/data/attachments/122/122704-1c70eb0602d514a945364d65fb09ad27.jpg)
And, ladies and gentlemen (and others,) this is the completed upper hemisphere.
![DSC_0130[1].JPG DSC_0130[1].JPG](https://www.zealot.com/data/attachments/122/122705-955ee122bbbf89b2f3b0d7765412b724.jpg)
![DSC_0133[1].JPG DSC_0133[1].JPG](https://www.zealot.com/data/attachments/122/122706-209f91edd4f548892d22f3eb79ab12fc.jpg)
![DSC_0136[1].JPG DSC_0136[1].JPG](https://www.zealot.com/data/attachments/122/122707-9834a7950f6f1829cb7f493d6d47ac99.jpg)
I am VERY pleased with the end result.
I am now working on the lower hemisphere and will be back over the next day or two with more progress.
Take care and stay tuned!!
Not only you!I am VERY pleased with the end result.
This technique is very interesting and effective. I think it would be great on all curved surfaces, especially on props like helmets.
Not only you!
This technique is very interesting and effective. I think it would be great on all curved surfaces, especially on props like helmets.
I think it could work for all types of rounded forms. The plastic Xmas decoration balls range from about 5cm up to around 50cm diameter, so that range should be more than enough for a paper modellers needs.
The plastic kids balls can be found all over that can be made to fit the form. As long as the ball is semi-deflated enough and close to the form diameter, the process should work over many applications.
Wow... that technique really worked well for you... and the sticker idea was brilliant. now you just need to set up a company to distribute those sticker to papermodelers 
I especially like the panel lines. It looks real that way!!
Just you wait Z. You ain't seen nothing yet ......


