Prince of Wales 1/200

Longbow

Member
Feb 5, 2014
51
44
18
71
Netherlands
Hi model friends,

Being new on the site, allow me to introduce myself, before posting some photographs of the kit I am working on.
My name is Klaas, I live in Holland. 61 years young :)
I love baseball (Rays fan), reading (mostly history), gliding.

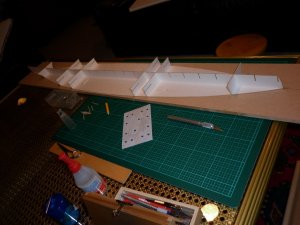
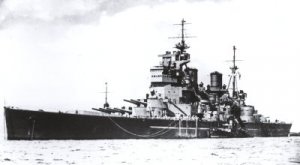
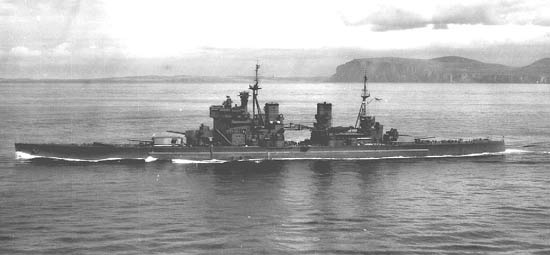
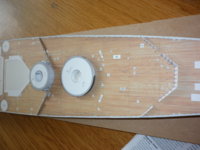
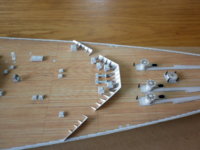
After a long time gathering courage I started two years ago with the 1/200 GPM Prince of Wales.

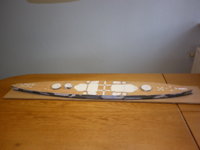
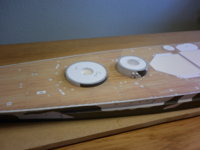
I decided to build the model as a waterline model because of two reasons: the first is that all other models I've seen are full hull models, and secondly my other two ships (the 'De Ruyter' cruiser and 'Schleswig-Holstein') are waterline models.

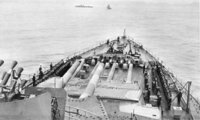
I'm also thinking of placing the ship in the water, will try to create a baseplate that resembles the ship slicing the ocean. Maybe with Japanese bombs missing the ship closeby :)

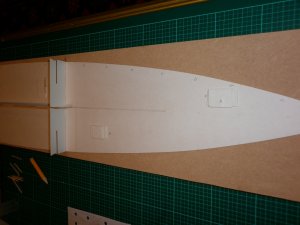
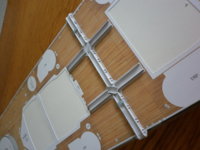
I thought it a good idea to build the ship on a baseplate for rigidity. Slight problem: because I have not decided how to create the 'water' I thought it a good idea that the ship could be removed from the base plate because materials like mache is created using water.
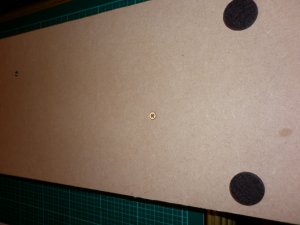
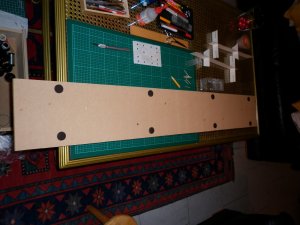
So I decided to screw the ship from below onto the baseplate with small screws. This way I can remove the model easily and simply attach it later on. Hopefully..
 

Attachments

  • P1000150.JPG
    P1000150.JPG
    3.2 MB · Views: 140
  • P1000157.JPG
    P1000157.JPG
    3 MB · Views: 98
  • P1000155.JPG
    P1000155.JPG
    3.1 MB · Views: 105
  • P1000153.JPG
    P1000153.JPG
    3.5 MB · Views: 98
  • hmsprinceofwales.jpg
    hmsprinceofwales.jpg
    15.9 KB · Views: 101
  • Like
Reactions: zathros

Longbow

Member
Feb 5, 2014
51
44
18
71
Netherlands
Next. most trusses are standing now, with one cross connection of the four. To give an idea of it's size: behind it are the De Ruyter cruiser and Schleswig Holstein in 1/250.

P1000159.JPGost trusses are standing now, with one cross connection of the four. To give an idea of it's size: behind it are the De Ruyter cruiser and Schleswig Holstein in 1/250.
 
  • Like
Reactions: Lighter

Longbow

Member
Feb 5, 2014
51
44
18
71
Netherlands
Hi friends,
Added the front and middle deck and the left and right bowplates.
The bowplates needed adjustment; from 1,5 up to 3,5 mm needed to be cut off (from the black waterline side of course :))

In the GPM model the anchor chain drops into into the cabletier through little open holes in the deck; the hawseholes are open too, so the inner sides of the model are visible.
So I added three 'pipes' under the deck for the cabletier and painted them black. Same with the hawseholes. This is a little bit tricky but trial and error solved it.
After this I glued the bowdeck on the model.

Next I will add the stern deck and plates, I expect I will have to adjust them too. Paperfan gave the answer : "The black waterline stripe is afterall not entirely above the water line." Thanks Paperfan

P1000160.JPG P1000161.JPG
 

zathros

*****SENIOR ADMINISTRATOR*****
Staff member
Administrator
Moderator
Apr 5, 2013
13,499
9,551
228
Your model is off to a great start. Wall compound mixture for Sheetrock, with a big sponge, like the ones the sell at Home Depot can make very effective water. While the compound is wet, you take the slightly to moist sponge and shape the compound to for the type of waves you wish. Pulling straight up or at an angle can reproduce wind effects. Whitecaps can be painted on the very sharp ridges. It works really well. You would have to have a shape of your hull to place on the surface for your model. There was many ways you can do that. The Prince of Wales was so overloaded, she often plowed ahead with a very wet forecastle, and sat very low in the water. The placement of the torpedo launchers may have severely weakened the hull. A beautiful ship nonetheless that met such a tragic end. ..............:)
 

Longbow

Member
Feb 5, 2014
51
44
18
71
Netherlands
Thanks Zatros,
Will certainly try your tip :)
I'll enlarge the groundplate too, it's a bit narrow on the sides.
Perfect for the build, but for a better water effect some 5-10 cm's more would be required.
Thanks again :)
 

zathros

*****SENIOR ADMINISTRATOR*****
Staff member
Administrator
Moderator
Apr 5, 2013
13,499
9,551
228
You could always just build a bit more of the hull. I always liked this picture because it shows that even ain a relatively mild seas, her bow is in deep. She was overloaded by the system of government which just kept adding more and more to her. This of course had nothing to do with her sinking, being thought to be a shell that went through an open turret port hitting the ammo magazine. The underwater photos show a hole which looks like the shell went right through. Also notice the phenomena which many diorama builders neglect that these ships can sink into the seas as they sit in the trough of their own bow to stern wave created by the hull speed which is the square root of her Hull multiplied by 1.86 for knots, I believe, in any event, the effect is clearly sen here and was the reason a U.S carrier was grounded in California and large passenger ship. To make the appearance of a ship under way, the hull would have to extend down a bit to create the effect seen in the photo. At rest, she sits low. This last pic being when Pres. Roosevelt was transferred to the ship for a visit and trip in 1940. :)

24027d1296366877-king-george-v-class-battleship-1939-prince-20of-20wales.jpg


bb_hms_prince_of_wales.jpg

Watlanticcharter1.jpg
 
Last edited:
  • Like
Reactions: RonaldoM

Longbow

Member
Feb 5, 2014
51
44
18
71
Netherlands
You could always just build a bit more of the hull. I always liked this picture because it shows that even ain a relatively mild seas, her bow is in deep. She was overloaded by the system of government which just kept adding more and more to her. This of course had nothing to do with her sinking, being thought to be a shell that went through an open turret port hitting the ammo magazine. The underwater photos show a hole which looks like the shell went right through. Also notice the phenomena which many diorama builders neglect that these ships can sink into the seas as the sit in the trough of their own bow to stern wave created by the hull speed which is the square root of her Hull multiplied by 1.86 for knots, I believe, in any event, the effect is clearly sen here and was the reason a U.S carrier was grounded in California and large passenger ship. To make the appearance of a ship under way, the hull would have to extend down a bit to create the effect seen in the photo. At rest, she sits low. This last pic being when Pres. Roosevelt was transferred to the ship for a visit and trip in 1940. :)

24027d1296366877-king-george-v-class-battleship-1939-prince-20of-20wales.jpg


bb_hms_prince_of_wales.jpg

Watlanticcharter1.jpg
Zathros,
When I am ready to create the water I will certainly give your recommendation some thought. Could be a challenge though, never done this before. I like your idea..
I have seen some models that tried to create a bow wave and I never found it convincing.
Trial and error, maybe using clay like play-doh that does not dry very fast, could do it..
I'll process your idea in the background :)
The model will not be ready any time soon so I've got time :)

Thanks !
 

zathros

*****SENIOR ADMINISTRATOR*****
Staff member
Administrator
Moderator
Apr 5, 2013
13,499
9,551
228
I don't know why in the previous post, the 2nd pic did not show, but in that shot, she must have been going quite a bit under her hull speed as you see no trough. So it isn't really necessary, just more dramatic, if you can pull it off. :)
 

Longbow

Member
Feb 5, 2014
51
44
18
71
Netherlands
Next update :
The hull is closed, I started with the basis of the main gun turrets and breakwaters.
 

Attachments

  • P1000164.JPG
    P1000164.JPG
    3.3 MB · Views: 71
  • P1000165.JPG
    P1000165.JPG
    3.3 MB · Views: 73
  • P1000177.JPG
    P1000177.JPG
    3.3 MB · Views: 67
  • Like
Reactions: zathros

zathros

*****SENIOR ADMINISTRATOR*****
Staff member
Administrator
Moderator
Apr 5, 2013
13,499
9,551
228
Anyone building a ship would have to be really brave or foolhardy to show a picture that big. You pulled it off though. Not a seam to be seen!! I love science fiction, but reality based models like this are so refreshing, and I believe pay homage to those brave souls. The Interview with one of the survivors of her destruction brought me to tears. This ship really is being brought forward by your build. I hope many read her history to find out what happened, and understand the tragedy. :)

http://www.telegraph.co.uk/history/...rgotten-heroes-of-Britains-Pearl-Harbour.html


Last edited:

Longbow

Member
Feb 5, 2014
51
44
18
71
Netherlands
I built the 'rails' (?) for the aircraft. I decided to do this now because when the superstructure is built it could be a problem to add it later on.
Went further on the bowdeck, more breakwaters (if that is the correct term for them)
Progress is slow, but sure ... The bigger the model, the more tiny the parts..
 

Attachments

  • P1000174.JPG
    P1000174.JPG
    3.5 MB · Views: 78
  • P1000183.JPG
    P1000183.JPG
    3.2 MB · Views: 72
  • POW bow detail.jpg
    POW bow detail.jpg
    301.5 KB · Views: 67
  • Like
Reactions: zathros

zathros

*****SENIOR ADMINISTRATOR*****
Staff member
Administrator
Moderator
Apr 5, 2013
13,499
9,551
228
The detailing looks great. The ship is just the right size too, for this kind f ships, any bigger, then the detailing becomes almost impossible as each part is a detailed model unto itself. The realism gets hard to maintain. The fore deck looks fantastic, as do the catapult rails. Anytime someone can post such a sharp and large picture, and look that good, well, that says it all. ! :)
 

Longbow

Member
Feb 5, 2014
51
44
18
71
Netherlands
Had to leave the country for some time.
But, I'm backagain :)
Continued with the bowdeck hatches, venting, anchor stuff. Process is slow but sure ! These tiny parts take a lot of time, but they add a lot to the model.
First part of the superstructure added.

P1000182.JPG
 

zathros

*****SENIOR ADMINISTRATOR*****
Staff member
Administrator
Moderator
Apr 5, 2013
13,499
9,551
228
Fantastic detailing. Anytime you can take a picture that close and see now errors says it all. A picture speaks a 1000 words. The bow section has really sprung to life! :)
 

Longbow

Member
Feb 5, 2014
51
44
18
71
Netherlands
Started with the superstructure for the bridge and the hangars. Not everything has been glued yet.

I cut out the rectangular windows and glued plastic from an overhead sheet behind it. I thought that it would look better this way.

The airvent on top of the hangar structure has 90 lamellas. 1,5 mm * 14 mm. Took me three evenings to get it as straight as possible...

It's a major project, but I enjoy it !! Taking my time though
smile.gif


P1000193.JPG P1000194.JPG P1000195.JPG P1000202.JPG
 
  • Like
Reactions: zathros

zathros

*****SENIOR ADMINISTRATOR*****
Staff member
Administrator
Moderator
Apr 5, 2013
13,499
9,551
228
I never saw such detail of the hangers. that was very educational, and a pleasant surprise!! :)
 

Longbow

Member
Feb 5, 2014
51
44
18
71
Netherlands
Started with the pompoms.

For the barrels GPM wants us to wrap tiny pieces of paper around a 0,5 mm metal thread. I tried that but the result was quite unsatifactory.

Then I remembered the wire that I used when soldering electronics.
This wire is 1 mm thick including the isolation, the copper thread inside 0,5 mm. Coming close to the specs from GPM, and the picture of the pompom on the ship.

In order to get the two types of barrels (long and short) the same size I first made a template.
I pierced the gun mainbody with 8 holes,
cut the barrel to the right length, cut the isolation for the mouth of the barrel and slipped that off. Then I cut the length for the base of the barrel, removed the unneede islotaion and pushed the barrelbase to the disered place. Lastly I glued the barrelmouth on its place, leaving 1 mm to the end of the barrel thereby creating an 'open' barrel.
I could not think of a way to make the barrelmouths spherical however. Anybody an idea ?

After completing the pompom I painted the barrels gun metal. Looks ok to me :)PoW pom 2.jpg IMG-20120711-00030.jpg IMG-20120711-00022.jpg IMG-20120711-00024.jpg IMG-20120711-00025.jpg IMG-20120711-00026.jpg IMG-20120711-00028.jpg IMG-20120711-00029.jpg IMG-20120711-00015.jpg IMG-20120711-00033.jpg
 
  • Like
Reactions: zathros

zathros

*****SENIOR ADMINISTRATOR*****
Staff member
Administrator
Moderator
Apr 5, 2013
13,499
9,551
228
You can heat the insulation, use a pen with that type of conical end, and with you heat the insulation, push it onto the pen, let it cool and you will have your shape. Your build is incredible. It makes seeing documentaries of this ship all the much better. I find myself looking for the Hanger doors. That must have been one busy crew!!
 
  • Like
Reactions: setherid