78 Cylon Centurion (adaptation) Build

Dargas

New Member
Jun 19, 2013
10
0
1
Hi everyone. in here I´ll start posting my build of a classic Cylon Centurion with a few design twists.

I´ll comment on those later on but first I have a question as I´ve never worked with paper before for a costume.

I plan on doing a first test of a helmet with bazooka´s plans for the helmet and I plan on doing them with mirrored silver card paper.

Before I do that though, I would like to ask if anyone has ever had any issues with these templates and if so what was it and how you managed about it?

It´s a noobish thing to ask I know but i´m a first timer and I really don´t want to mess it up too much on my first try out.

cheers and thanks!
 

micahrogers

Moderator "Where am I, and how did I get here?"
Staff member
Moderator
Jul 12, 2012
3,773
4,643
113
Shannon GA
I'll be watching your build, I wouldn't do 1/1 armor but still...
 

Revell-Fan

Co-Administrator
Staff member
Administrator
Moderator
Aug 1, 2009
11,589
12,328
228
Vreden
I'm working with silver card now. It is very delicate and has to be dealt with caution, especially when bending. Pre-shape it very gently, apply only light pressure, and repeat the process till you have the desired curve. In additon, I found out that you better use regular glue on coated parts; white glue is more suitable for uncoated paper.

The coat is easily smudged and may oxidate when your fingers are sweaty. I therefore use gloves when I work with big parts. However, special care has to be taken when parts are glued together in order to avoid the glove to be glued to the part as well.

First I would make a half-size mock-up printed on normal card to see how the parts are shaped and assembled. Then I would proceed with the larger one.

The templates can be printed on regular thin paper and then glued to the back of the silver card.

There are some big parts which had to be split into several smaller parts so that they can be printed with a normal printer. I would rejoin these split parts first so that you have one big part instead of many small parts. This would reduce the number of cuts and thus lead to a cleaner result. I don't know if that is practical but it could be worth a try.

In addition, you might consider printing the parts pages on blank sticker paper and stick them to the back of the card. This might speed up the process (no time required for glueing and / or curing).
 

OB10

New Member
Apr 2, 2008
18
0
1
I'm working on my 2nd version of the helmet. The first version I tried using the silver cardstock. I must not have pre-curved the pieces enough before gluing, because the cardstock started to de-laminate. Also, when I got to the pieces that cover the back of the skull, apparently those weren't printed off in the same scale: they were too small to cover the holes. I made the mistake of printing these off from Acrobat, and it automatically "sized to fit" the prints, even all that would have been lost would have been blank paper.

The 2nd version (which I haven't touched in a couple months), I printed each page off full sized with Photoshop (I couldn't get Acrobat to print things full sized). I'm not sure if I should have printed them off at a larger scale, or if I just had some snafu with the assembly (most likely in the cheek area, cuz I did have some problems there), but I can't fit it over my head with the grill in place. At some point (before it looses all shape) I'm going to fiberglass it, then do the whole bondo/sanding thing, then split it down the center, just like the originals.

I guess my suggestion would just be to make sure everything prints off in the same scale. :thumb:

Obi-Bob
 

kevlary

New Member
Mar 20, 2013
63
3
6
Lincolnshire
Bazooka joes are very accurate, i have built his pieces, i think this costume represents a good starting point for card costume modelling as it offers nice clean lines and no complicated geometry and folds. i did do a few alterations on the helmet though just to make the impressions on the back of it deeper, i lined with 2 ply cardboard , an reinforced all the glued joints with strips of card, buy the way one of my gaunlets i have completed , so when your probationary period has expired you should be able to grab and build these goodies in the downloads section, but in the mean time you will have plenty to sink your teeth into with bazooka joes build of the classic armour, if you get stuck on any thing i endeavour to offer my assistance anyway
 

Revell-Fan

Co-Administrator
Staff member
Administrator
Moderator
Aug 1, 2009
11,589
12,328
228
Vreden
I guess my suggestion would just be to make sure everything prints off in the same scale. :thumb:
That is another reason why I would recommend making a quick and dirty test build first.
 

Dargas

New Member
Jun 19, 2013
10
0
1
Just found this very interesting product from a company called "Aclad2". it´s a form of Lacquer Chrome that you can airbrush into pretty much anything with a really reflective silver chrome finish!

If the results are what I see on this Video this is the perfect paint to chrome a cylon without having to spend 700 bucks in plating the armor pieces!

http://www.youtube.com/watch?v=5lYV8usEIyU

the process:

http://www.youtube.com/watch?v=w9VfKbI8f-k

Looks easy and cheap! what do you guys think?
 

micahrogers

Moderator "Where am I, and how did I get here?"
Staff member
Moderator
Jul 12, 2012
3,773
4,643
113
Shannon GA
Alclad II is great stuff and comes in various shades, it is durable and can be used to make many metallic effects. You need to know that it is a solvent based lacquer paint for airbrush only, and is a pretty "hot" mix, by contrast acrylic paints are "cold" chemically.
I've used Alclad II, Testors Metallizers, and SNJ's Spraymetal in my plastic modeling. of the three, Testors is easiest to use but the least durable, SNJs is a happy medium, and Alclad II can be finicky but gives great results.

Hope this helps.
 

Revell-Fan

Co-Administrator
Staff member
Administrator
Moderator
Aug 1, 2009
11,589
12,328
228
Vreden
I've heard of it. It is supposed to be the one and only way to achieve a fine metallic / mirrored surface to almost any material. It is often used by plastic modellers who wish to make their models shine without going the most expensive way of having their piece coated. However, you should take special care when you work with it. It would smell like hell, so you should work in a well-ventilated area and avoid to inhale the fumes, and several thin coats should be better than one thick coat.
 

OB10

New Member
Apr 2, 2008
18
0
1
I've had some of their chrome for a long time, but never used it. I don't recall if it was the Alclad, or another chrome paint that looks fantastic (well, they both do, if I'm thinking of another one as well). Not 100% as good as chroming, but for the price, pretty darn amazing.

And it may be the other paint that I'm thinking of, but a friend who used it (probably the other paint) pointed out to me that it isn't quite as resilient as, say, car paint. Looks fantastic, but it scratches and scuffs easier. Also, (the other paint?) has to have a super smooth surface; if you use filler and sand it, you have to use suuuuuuuper fine sandpaper or jeweler's rouge or something to get everything totally smooth, otherwise the small scratches from sanding show. It won't fill holes and abrasions.

But as I said, I haven't actually used the stuff. :) Seems like it'd be a great thing to check in to.
 

zathros

*****SENIOR ADMINISTRATOR*****
Staff member
Administrator
Moderator
Apr 5, 2013
13,496
9,548
228
You might want to see if there is a way of sealing the finished product as having these kind of chemicals surrounding your head is dangerous, probably carcinogenic. I'd probably stick with the Silver Cardstock for the Helmet and neck. These chemicals have an accumulative effect, be careful with the glues you use too, you'll be breathing in their residue. ZipDry will hold this stuff together easily and is non toxic, heck, you could eat the stuff (not me, you, :) )!!

P.S. If you ever want to reproduce the look of motorcycle engine cases, and wheel hubs, used on many Japanese motorcycles, use High temperature aluminum pain, and after it dries, spray it with a clear coat. Looks like it was "Made in Japan". I did this when I restored my 1975 CB400F the first time. Works like a charm. :)
 

OB10

New Member
Apr 2, 2008
18
0
1
I found mirrored cardstock at a frame store/art store. It is with the matboard. It's not as thick as the matboard, but can be used in conjunction with the regular mats.

Zathros, have you found a clear coat that didn't dull down the chrome paint? The stuff I always found makes it look way more dull.
 

Revell-Fan

Co-Administrator
Staff member
Administrator
Moderator
Aug 1, 2009
11,589
12,328
228
Vreden
Check your local bookstore, office supplier or google for it. But I strongly recommend testing it before ordering / buying a large amount of it. The shine may differ and it is best if you have the chance to see it "in person" first.
 

zathros

*****SENIOR ADMINISTRATOR*****
Staff member
Administrator
Moderator
Apr 5, 2013
13,496
9,548
228
I found mirrored cardstock at a frame store/art store. It is with the matboard. It's not as thick as the matboard, but can be used in conjunction with the regular mats.

Zathros, have you found a clear coat that didn't dull down the chrome paint? The stuff I always found makes it look way more dull.

No, I never did. I was looking for that effect though and was using a satin clear finish. I don't think it is possible to cover that without affecting the Chrome look. :)
 

Millenniumfalsehood

Well-Known Member
Mar 17, 2007
640
123
78
35
Ark City, Kansas
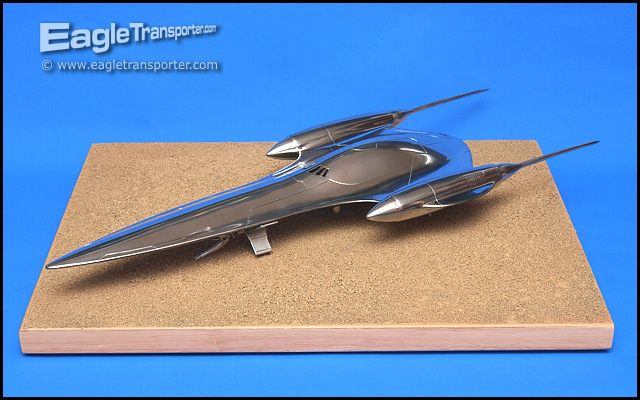
Personally, I'd just as soon build it out of plain paper, putty and smooth it, then paint it with a high-gloss black paint (like Tamiya) and then finish it off with Alclad II Chrome shot through a cheap airbrush. It can be carefully brush-painted, but that's too tedious for me. But it does produce a glossy, mirror finish:

Naboo-Royal_1.jpg


I'd prefer that to having to put up with delicate and tempermental silver cardstock and hope I don't get glue marks, fingerprints, or creases in the surface (t'cha, right; I can't even manage that with a 21 inch model. How could I do that with a full-size costume?).
 

Dargas

New Member
Jun 19, 2013
10
0
1
Agreed Millenium dude... I´m making the parts from cardboard (a friend of mine and me started on our helmets this week) and as soon as the helmet is done I'll resin the inside, let dry, resin the outside, let dry, reinforce the inside with fiberglass... then Bondo and sand the crap out of it and the assemble the eye scanner, horseshoe and grill to the main bucket.

the papercraft parts is just the start.