

Rolling small tubes and gun barrels can be one of the most frustrating tasks in paper modeling, especially ship-building, where there are gun barrels and masts all over the place. I found a way to take some of the pain out of it, at least for me.
I’m building GPM’s Bismarck in 1/200 scale. The gun barrels are printed on cardstock, about 60-pound. Rolling them was giving me fits. Here’s how I solved that:
I used Adobe Photoshop® but almost any graphics program should work.
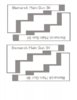
I redrew the barrels in Photoshop using one of the kit barrels as a pattern. After all, they are just a bunch of rectangles. I had to do some color adjustment by trial and error, but redrawing took only 10-15 minutes.
Once I had the barrel redrawn, I used PhotoShop to stretch it to three times its width, stretching it in the same direction as I would be rolling it. I trimmed about an inch off the breech end to keep the diameter from getting too large, and to save ink I removed much of the grey area that would end up inside the roll. Then I copied and pasted it, putting four barrels on a letter-size sheet (8.5"x11").
I printed the sheets on bright white 24-pound letter paper, a little heavier than what the GPM kit’s instruction sheets are printed on. If you use 20-pound copier paper, you might need to stretch the original a bit more or use a slightly larger-diameter rod for the final roll.
I cut them out, touched up the edges with a marker (black) and a watercolor pencil (grey), and began rolling each barrel.
Roll #1, I rolled it on a ¼-inch dowel, unrolled it and,
Roll #2, 1/16-inch brass rod, and then,
Roll #3, 1/32-inch brass rod.
Roll #3 gave me close to the finished diameter I wanted, but I rolled and unrolled each barrel several more times before gluing it. Each time, the roll got tighter and easier to handle.
When I was satisfied with the tightness and diameter (after 5 or 6 rolls on #3), I carefully glued the breech end of the barrel first. This is the thickest part of the barrel and the easiest to glue. It also stabilizes the rest of the barrel and makes it easier to handle the narrower sections.
Next, I glued the muzzle section of the barrel. I used a pin to apply Tacky Glue to the part, and a gentle twisting motion to tighten up the muzzle. Then I glued the two sections in between.
Finally, I touched up the muzzle with my grey watercolor pencil.
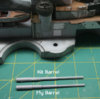
Comparing my barrels with the kit’s barrels, mine are smoother, with less conspicuous joints, and they are a little stiffer. And I can print and roll as many as I have to until I get four matched pairs.
Do my barrels match the exact diameter of the kit barrels? Who knows? They look about the same, and they look consistent with the scale drawings and kit photos. And they are clean, straight, well-matched, and easy to make.
--David
I’m building GPM’s Bismarck in 1/200 scale. The gun barrels are printed on cardstock, about 60-pound. Rolling them was giving me fits. Here’s how I solved that:
I used Adobe Photoshop® but almost any graphics program should work.
I redrew the barrels in Photoshop using one of the kit barrels as a pattern. After all, they are just a bunch of rectangles. I had to do some color adjustment by trial and error, but redrawing took only 10-15 minutes.
Once I had the barrel redrawn, I used PhotoShop to stretch it to three times its width, stretching it in the same direction as I would be rolling it. I trimmed about an inch off the breech end to keep the diameter from getting too large, and to save ink I removed much of the grey area that would end up inside the roll. Then I copied and pasted it, putting four barrels on a letter-size sheet (8.5"x11").
I printed the sheets on bright white 24-pound letter paper, a little heavier than what the GPM kit’s instruction sheets are printed on. If you use 20-pound copier paper, you might need to stretch the original a bit more or use a slightly larger-diameter rod for the final roll.
I cut them out, touched up the edges with a marker (black) and a watercolor pencil (grey), and began rolling each barrel.
Roll #1, I rolled it on a ¼-inch dowel, unrolled it and,
Roll #2, 1/16-inch brass rod, and then,
Roll #3, 1/32-inch brass rod.
Roll #3 gave me close to the finished diameter I wanted, but I rolled and unrolled each barrel several more times before gluing it. Each time, the roll got tighter and easier to handle.
When I was satisfied with the tightness and diameter (after 5 or 6 rolls on #3), I carefully glued the breech end of the barrel first. This is the thickest part of the barrel and the easiest to glue. It also stabilizes the rest of the barrel and makes it easier to handle the narrower sections.
Next, I glued the muzzle section of the barrel. I used a pin to apply Tacky Glue to the part, and a gentle twisting motion to tighten up the muzzle. Then I glued the two sections in between.
Finally, I touched up the muzzle with my grey watercolor pencil.
Comparing my barrels with the kit’s barrels, mine are smoother, with less conspicuous joints, and they are a little stiffer. And I can print and roll as many as I have to until I get four matched pairs.
Do my barrels match the exact diameter of the kit barrels? Who knows? They look about the same, and they look consistent with the scale drawings and kit photos. And they are clean, straight, well-matched, and easy to make.
--David
")