Making a Canopy

Experimental Designs

Papercraft Visionary
Sep 4, 2011
133
0
16
36
West Columbia, SC
I've been working on a method of creating transparent canopies for aircraft by melting clear plastic bags on a mold and installing them on my model. I've built a 1:87th scale of a German Heinkel HE 111 WWII Bomber and I've been trying out methods of making the bullet shaped canopy around the cockpit instead of painting one on there like I have done with many models in the past.

So far the melting clear plastic bags has been moderately successful with a lot of trial and error. Anyone have a better idea for this?
 

Rhaven Blaack

!!!THE MAN BEHIND THE CURTAIN!!!
Staff member
Administrator
Moderator
Jun 12, 2009
12,492
9,853
228
Oregon
www.deviantart.com
When you mentioned "clear plastic bags". What kind of clear plastic bags are you referring to? Can you post a photo of one of the bags that you use?

I too have been experimenting with using the thin (but stiff) clear plastic packaging that is used for most gift boxes for such. I have not done too many, as I do not have much plastic to spare.
 

Wojtee

Member
Jun 8, 2008
151
0
16
Prague, CZ
There are also clear plastic sheets used in book binding, and some remember similar sheets for overhead projectors (anyone still uses these?). I have not tried the soda bottles, but it has to work, too.
 

Experimental Designs

Papercraft Visionary
Sep 4, 2011
133
0
16
36
West Columbia, SC
for cheap clear plastic to vacuform canopies try the sides from a 2 liter soda bottle.

I tried plastic bottles, however they're not quite malleable for the scale I use them in. Everytime I heat up the bottles they cool too fast by the time I get the mold ready.

When you mentioned "clear plastic bags". What kind of clear plastic bags are you referring to? Can you post a photo of one of the bags that you use?

I too have been experimenting with using the thin (but stiff) clear plastic packaging that is used for most gift boxes for such. I have not done too many, as I do not have much plastic to spare.

I like to know where to get that plastic packaging so I can experiment with it.

What I'm using you can find in any dollar store or in a hobby store.
http://www.dollartree.com/catalog/a...=25449&entityType=product&isAlt=false&index=0

That's the exact product I got because it was cheap and you get a lot in a single packet. So far the results have been moderately successful.
 

Rhaven Blaack

!!!THE MAN BEHIND THE CURTAIN!!!
Staff member
Administrator
Moderator
Jun 12, 2009
12,492
9,853
228
Oregon
www.deviantart.com
I like to know where to get that plastic packaging so I can experiment with it.

What I'm using you can find in any dollar store or in a hobby store.
http://www.dollartree.com/catalog/a...=25449&entityType=product&isAlt=false&index=0

That's the exact product I got because it was cheap and you get a lot in a single packet. So far the results have been moderately successful.

Anytime I get something at the store that is wrapped in the stiff plastic packaging, like small electronice, housewears (that you would get from IKEA), or anything else that is packaged in the stiff (clear) plastic box or vaccu-formed packaging.
You might also want to try "MICHAELS" craft store or "HOBBY LOBBY" to see if they might carry clear sheets of plastic that is about .02mm thick (which is the thickness of the plastic that I have).


good luck with it.
 

vbsargent

Member
Apr 16, 2008
175
3
16
MD, USA
In the past I tried using clear plastic bottles and had the same problem- the plastic distorted and cooled too fast. But I ofund a tutorial that showed how to do it successfully. The other week I found and downloaded a 32 page booklet on how to build a modeling vac former from either here at Zealot or at papermodelers (now I can't seem to find it). At the back it spelled out exactly how to successfully do it with a soda bottle and a heat source.

You will need:
A) A bottle with a smooth shoulder and neck. Some brands with a small ridge, like Pepsi bottles might work- the ridge sometimes disappears when heated.
B) Your positive mold- make it fairly sturdy- wood, foam,plaster (I used 1mm board coated with CA then sanded).
C)A heat source- I used a paint stripper heat gun. VERY effective.
D)Small pieces of wood to act as a base and wedges.

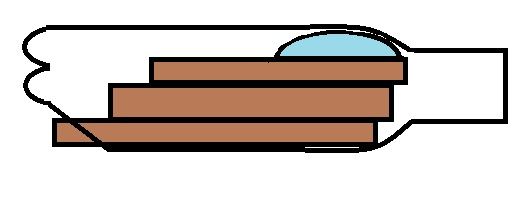
1)Cut a hole in the bottom of the bottle just large enough to fit your mold. Place it against the inside shoulder of the bottle as clase to the neck as possible. Insert the base and wedges in the bottle underneath the mold wedging it firmly against the inside of the bottle. Viewed form the side(with the bottle laying on its side) the bottom of the mold should be above the neck of the bottle.
2)Apply heat slowly and evely to the bottle around the canopy. The bottle will shrink conforming to the mold. Be careful to make sure the base and wedges won't inhibit the plastic from shrinking to conform to the mold.
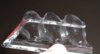
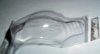
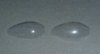
3) Let cool, cut out, and admire your newly acquired skill.

Vacform_zps0f2418de.jpg


My first go at this wasn't completely successful, but it was light years better than my previous attempts.

vbsargent
 

Experimental Designs

Papercraft Visionary
Sep 4, 2011
133
0
16
36
West Columbia, SC
I dabbled with the bottle last week and I was very impressed the results following your method with the exception of using a heat gun. I popped mine in the oven for a few minutes at 240-270 degrees Farenheit. (I'm in the US so you do your own conversion for Celsuis you Euros!)

I'll admit it was a bit of trial and error although fortunately I have healthy thirst for coke so I had several bottles left out of the recycling bin.

However despite the results I'm looking for something a little easier to handle on smaller scales. 1:72, 1:87 and 1:100 scales are what I'm working with.

By the way the bottles made great shield bubbles for my starship models. I need some tips how to paint clear surfaces to give it shimmering (watery) effects of energy shields.
 

BobH

New Member
Oct 4, 2006
12
0
1
Douglas, Massachusetts
It depends on what size you are trying to make but I have made canopies from light bulb packaging.

This was a package of night light bulbs.
 

Attachments

  • Canopy_1.jpg
    Canopy_1.jpg
    120.7 KB · Views: 12
  • canopy_2.jpg
    canopy_2.jpg
    90.7 KB · Views: 17
  • Canopy_3.jpg
    Canopy_3.jpg
    166.7 KB · Views: 12

Experimental Designs

Papercraft Visionary
Sep 4, 2011
133
0
16
36
West Columbia, SC
I apologize, the temperature for the bottle was wrong. That was for the plastic bags, the temperature I used to shape the plastic bottle was closer to 310-345 degrees. I experimented with the other half of the same bottle last night to make a "tear drop" shape canopy like ones similar on most modern aircraft. I still have a ways to go with the technique.

I did not need to melt it just enough to soften the plastic up to form around the mold. Although I like to mention I burnt the s*** out of my fingers... Et Tu Heat Gloves?!