building my own snowspeeder

mcusanelli

Well-Known Member
Feb 26, 2008
374
121
58
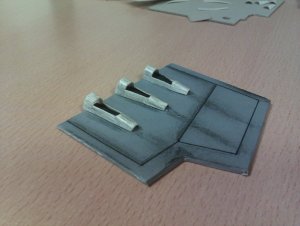
Wow! This looks like the construction of a studio filming miniature, you're doing a beautiful job!
Mike
 

dnalor

Well-Known Member
Oct 28, 2011
917
186
58
Belgium Europe
:) thanks..

Today i completed the downside of the 2 brake pads
Now i have to construct the upside..and that's harder :)

6157
 

Attachments

  • brake flap1.jpg
    brake flap1.jpg
    133.7 KB · Views: 15

Revell-Fan

Co-Administrator
Staff member
Administrator
Moderator
Aug 1, 2009
11,609
12,349
228
Vreden
BSG is also great...i love that old viper..
But first my star wars ships...and when there is any space left, the viper :)
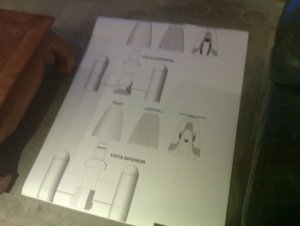
A TOS Viper is on top of my todo list. I'll tackle her as soon as the hangar bay is ready.

And: I am totally thrilled by your build!:thumb:
 

leofirebrand

New Member
Jul 24, 2012
97
0
6
What type of cardboard do you use. Looking at some of your recent parts its impressive how clean the edges look espicially considering how thick the card must be. Aslo is it really hard to cut?
 

dnalor

Well-Known Member
Oct 28, 2011
917
186
58
Belgium Europe
:) That depends..
How larger the part how thicker the cardboard..
I collected many types cardboard with all different thicknesses.
Very large parts are normal box cardboard..
But with the braking pad, the pad itself is very thick massive cardboard, and the 3grey/white parts on top are very thin (that are inlays from a tea box) cardboard.
they become rigid because of the bend and the connection to the pad.
(i glued a little strip of thick cardboard first to the pad and placed the thin cardboard over it).

And so i collect all the cardboard i can find and is large enough i can use.
 

dnalor

Well-Known Member
Oct 28, 2011
917
186
58
Belgium Europe
A little thing i'm trying..:)
no snowspeeder...but an y wing :)

Maybe my new project when my snowspeeder is done.


6473
 

Attachments

  • 2012-11-19 17.50.25.jpg
    2012-11-19 17.50.25.jpg
    121.8 KB · Views: 14
  • 2012-11-19 19.37.07.jpg
    2012-11-19 19.37.07.jpg
    135.4 KB · Views: 10
  • 2012-11-19 20.33.17.jpg
    2012-11-19 20.33.17.jpg
    135.2 KB · Views: 10

leofirebrand

New Member
Jul 24, 2012
97
0
6
I'm glad to see you found some good drawings you could use for blueprints and I hope you do decide to do the Y-Wing next as I would love to see one built as big as your models are. If you have any questions or get stuck just let me know as I probably had similar probelms when I built mine.
 

dnalor

Well-Known Member
Oct 28, 2011
917
186
58
Belgium Europe
Ok first flap almost ready..
i've started with the attachment part to the speeder..
i don't find anywhere a clear picture of the mechanics, so this is what i created.
let's see if i can do that...or else it going to be something else :)

6576
 

Attachments

  • IMAG0061.jpg
    IMAG0061.jpg
    130.9 KB · Views: 12

dnalor

Well-Known Member
Oct 28, 2011
917
186
58
Belgium Europe
first ready.
now i have to complete the other pad.
and i need to build the other arm..that's a small one.


6695
 

Attachments

  • breaking flap 5.jpg
    breaking flap 5.jpg
    116.5 KB · Views: 10

leofirebrand

New Member
Jul 24, 2012
97
0
6
Very nice, the part looks like it belongs perfectly on the model. Are you hand drawning the graphics on these or doing them on the computer?
 

dnalor

Well-Known Member
Oct 28, 2011
917
186
58
Belgium Europe
Number 2 almost ready,
I only have to build the small cilinder part at the other side of the flap

6859
 

Attachments

  • breaking flap 6.jpg
    breaking flap 6.jpg
    136.6 KB · Views: 11

dnalor

Well-Known Member
Oct 28, 2011
917
186
58
Belgium Europe
Finally they are attached to the main body.


6929
 

Attachments

  • breaking flap 7.jpg
    breaking flap 7.jpg
    151.2 KB · Views: 14
  • breaking flap 8.jpg
    breaking flap 8.jpg
    119 KB · Views: 14