Warhammer Armor and things.

silveroxide

Senior Member
Aug 22, 2007
2,036
525
113
Fayetteville NC
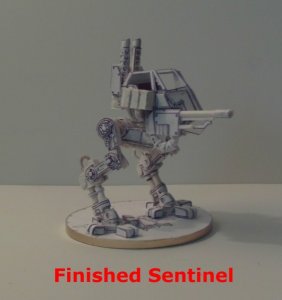
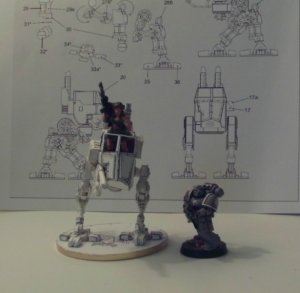
As mentioned in Flarebaffle's thread, I will start a Warhammer section with some of those fabulous models uploaded by Armorman. Eli Patoroch has done a remarkable job in the designing and constructing of those armor vehicles. My first attempt is the Sentinel and by no means will it end there. This Sentinel is about the correct size of the original and it is very well detailed. There where some modifications done like in the foot pads but over all, the model went together rather well. Here are a few pictures of the model and soon I will start a build thread with the color version.

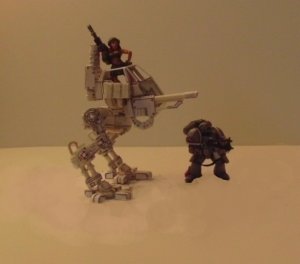
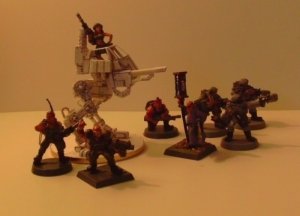
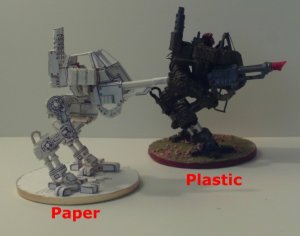
I have placed some of the Warhammer Imperial troops next to the model so you can compare the size and also a Plastic Sentinel so you can compare and see how close to the size and detail is the paper model.
 

Attachments

  • 001.jpg
    001.jpg
    66.2 KB · Views: 97
  • 011.jpg
    011.jpg
    82.6 KB · Views: 48
  • 010.jpg
    010.jpg
    68.6 KB · Views: 44
  • 004.jpg
    004.jpg
    61.7 KB · Views: 58
  • 008.jpg
    008.jpg
    95.6 KB · Views: 42
  • 007.jpg
    007.jpg
    98.7 KB · Views: 49

silveroxide

Senior Member
Aug 22, 2007
2,036
525
113
Fayetteville NC
the start

To start this session, I begin with the Exhaust module. With a small punch, I made the ventilating holes for the exhaust stack.

Next I took the exhaust stack and wrapped it around a round toothpick. After the stack is set, I placed and glued the toothpick half way in. There is a little of the toothpick sticking out of the bottom. This is done different from the plans, in that it will be inserted into the Engine block and it will be more sturdy. The backs and edges are colored in.

There are about twenty pics for the the exhaust section. There are more sequences to come.:wave::wave::wave:
 

Attachments

  • 012.jpg
    012.jpg
    79.2 KB · Views: 38
  • 013.jpg
    013.jpg
    33.2 KB · Views: 29
  • 014.jpg
    014.jpg
    49.9 KB · Views: 81
  • 015.jpg
    015.jpg
    64.9 KB · Views: 29
  • 016.jpg
    016.jpg
    80.3 KB · Views: 48
  • 017.jpg
    017.jpg
    31.9 KB · Views: 87

silveroxide

Senior Member
Aug 22, 2007
2,036
525
113
Fayetteville NC
Sentinel.

Continuing with the build. Used part #9 and started to fold the parts. Parts #9a, the stack base are laminated and then placed in to their locations after coloring the edges.

Once the plates are set. Drill a hole big enough for the toothpicks extensions in the stacks to go in.:wave::wave::wave:
 

Attachments

  • 018.jpg
    018.jpg
    22.8 KB · Views: 78
  • 019.jpg
    019.jpg
    71 KB · Views: 24
  • 020.jpg
    020.jpg
    19.7 KB · Views: 80
  • 021.jpg
    021.jpg
    35 KB · Views: 21
  • 022.jpg
    022.jpg
    36 KB · Views: 37
  • 023.jpg
    023.jpg
    29.5 KB · Views: 83

silveroxide

Senior Member
Aug 22, 2007
2,036
525
113
Fayetteville NC
Sentinel.

More on the exhaust stack. The pictures are a little out of line but you can see that I made some modifications with the heat fins. Those side armor panels will come in the next installment. The white sections are the scratched built parts, But you can use the ones in the kit as well. The small strips are on the original plastic model but you can do without them as well.

The fins were done by gluing a smaller strip on top of another slightly wide strip. Measure the width of the fins and glue three stacks as shown. It will give the illusion of the fins.:wave::wave::wave:
 

Attachments

  • 024.jpg
    024.jpg
    26.9 KB · Views: 24
  • 025.jpg
    025.jpg
    16.6 KB · Views: 836
  • 026.jpg
    026.jpg
    16.6 KB · Views: 831
  • 027.jpg
    027.jpg
    18.5 KB · Views: 851
  • 028.jpg
    028.jpg
    17.9 KB · Views: 843
  • 029.jpg
    029.jpg
    30.1 KB · Views: 23

Chrispysurfer

New Member
Jun 13, 2009
25
0
6
SO-
I posted this question on the longer Warhammer armor post but thought it might be better here with some additional questions on your wonderful build.
I hate to post and sound like a noob, but could someone explain the process of laminating to me? I am currently working on a dreadnaught which is uncolored. I am using fine markers to color the paper and just wondered how that works with the laminating as well. I know some people paint these. Just curious...
Thanks a lot!!
So from this thread, you color and then laminate? What do you color with? I am currently trying fine tipped markers but I don't know if I am happy with the results.
Also, what did you use for your base on your unpainted version? Is that foam core?
This is a beautiful build and I am loving the detail you put into the explanation.
V/R

Chrispysurfer
Still learning......
 

silveroxide

Senior Member
Aug 22, 2007
2,036
525
113
Fayetteville NC
Chrispysurfer. There are different weights of paper and the most common weight in the USA is 60lbs. I prefer to use 120Lbs. For lamination or to make the pieces thicker, I use a cardstock about the same weight as that used for shoe box or pizza box. In my case, I am lucky enough to acquire the same box materials that are used for jewelry boxes.

Sometimes I use markers but I would rather use acrylic paints. In this build I will probably show some of the paints that I use. When the scratched built pieces are done, I paint them sometimes by themselves if they differ from the main color scheme, for example, the exhaust fins and the stacks. For the body, I found a color that is almost the same as the body "Teddy Bear Tan".

Now for the base, It is a heavily laminated round center pieces that were left over from my building a horse drawn buggy on the sister site "papermodelers.com". When I reached the desired thickness, I edged it with a gold colored cardstock.

Keep an eye out on this build and you will see some of my techniques and tricks that you can use on your own models. Enjoy and see you around in the forums.
 

silveroxide

Senior Member
Aug 22, 2007
2,036
525
113
Fayetteville NC
Sentinel.

Almost finished with the exhaust section. For some reason the pics are out of order again. The main cabin should be at the bottom. You can see the lamination of the side panels. They are thick enough for edge gluing and does away with the tabs.

As for the engine portion, I painted the fins a gun metal and colored the white side of the armor plate a darker brownish color. The side armor engine plates are also glued to a heavy cardstock for thickness. More to come and see you next installment.:wave::wave::wave:
 

Attachments

  • 029.jpg
    029.jpg
    30.1 KB · Views: 40
  • 030.jpg
    030.jpg
    21.2 KB · Views: 828
  • 032.jpg
    032.jpg
    19.4 KB · Views: 818
  • 033.jpg
    033.jpg
    10.3 KB · Views: 809
  • 034.jpg
    034.jpg
    38.4 KB · Views: 21
  • 035.jpg
    035.jpg
    28.4 KB · Views: 22

silveroxide

Senior Member
Aug 22, 2007
2,036
525
113
Fayetteville NC
Sentinel.

Some more work on the cabin. I guess the size of the pictures in pixels, determines the positioning of the photos. To make it more flowing, follow the numbers on the top right corner of the photos for the correct sequence.

36. The sides are laminated and only kept the front tabs in place. Folded them into position.

37. The sides are in place.

38. The indented part is folded with the top portion laminated.

39. The indented part is place into position

40. The front Glacis plate is ready for placement.


More to come, See you all next round.:wave::wave::wave:
 

Attachments

  • 036.jpg
    036.jpg
    19.4 KB · Views: 803
  • 037.jpg
    037.jpg
    22.6 KB · Views: 801
  • 038.jpg
    038.jpg
    22.2 KB · Views: 22
  • 039.jpg
    039.jpg
    15.8 KB · Views: 803
  • 040.jpg
    040.jpg
    14 KB · Views: 810
  • 041.jpg
    041.jpg
    24.6 KB · Views: 31

silveroxide

Senior Member
Aug 22, 2007
2,036
525
113
Fayetteville NC
Sentinel.

More on the cabin.

41. The front armor plates, laminated.

42. Side view of armor placements

43. Blackened the cabin area where the view slits are to be. Trimmed out the view slits on the view port armor. This is also laminated.

44. Armor view port are in place.

45. Side view of view ports

46. Side door added. Not laminated.

So much for now, more to come, enjoy. See you next posting.:wave::wave::wave:
 

Attachments

  • 041.jpg
    041.jpg
    24.6 KB · Views: 34
  • 042.jpg
    042.jpg
    17.3 KB · Views: 793
  • 043.jpg
    043.jpg
    30 KB · Views: 22
  • 044.jpg
    044.jpg
    18.2 KB · Views: 790
  • 045.jpg
    045.jpg
    19.1 KB · Views: 792
  • 046.jpg
    046.jpg
    12.3 KB · Views: 847

Chrispysurfer

New Member
Jun 13, 2009
25
0
6
SO-
I am learning so much from you build here. Great postings!! Let me see if I have this right, so in some places, specifically the indent in picture 38 and 39, you laminate the back side instead of tabs for a cleaner edge. The other case for lamination is for thickness as in the glacis. So far for my builds, I have only folded tabs and have been using a 110 weight paper. Looks like I need to find a good source for some thicker stuff. Any recommendations?
Do you prefold the laminated piece prior to gluing it to the front piece? I could see that for sharp bends the pieces might separate.
This is a really great post, thanks again!
Chrispysurfer
 

silveroxide

Senior Member
Aug 22, 2007
2,036
525
113
Fayetteville NC
Do you prefold the laminated piece prior to gluing it to the front piece? I could see that for sharp bends the pieces might separate.
This is a really great post, thanks again!
Chrispysurfer[/quote]


As for paper recommendation, 110lbs or 120lbs folded four times will give you the approximate thickness or shoe box material. Also posterboard is a good source, it comes in a thin and thick version. If it is the thin board then two ply is recommended. Also bristol board is also good but not the thick version used for matt board. For the bend in the laminated pieces. If I do a cirlcle or a wheel, I form the first sheet first and then I layer on top of that to the right thickness, if you do not do this, the circle will warp on you, it has to be done a layer at a time. For flat pieces, one on top of each other is fine, but if the laminate is say 2ply, then you need to do each bend on top of each other or you may have to cut a V cut on the reverse side to bend it to shape.:wave::wave::wave:
 

silveroxide

Senior Member
Aug 22, 2007
2,036
525
113
Fayetteville NC
Sentinel.

On with the show and more stuff.

47. Placed the side view port, laminated 1ply.

48. Attached the engine module on line bottom edge of the lower back of the cabin.

49. Rear view of the engine module.

50. The top hatch is made up of three pieces

51. Stack the hatch pieces as shown. All the pieces are laminated.

52. Attached the hinges straight from the sheet, non laminated.


Still more to come. Enjoy and see you all around the next posting.:wave::wave::wave:
 

Attachments

  • 047.jpg
    047.jpg
    13 KB · Views: 766
  • 048.jpg
    048.jpg
    20.9 KB · Views: 764
  • 049.jpg
    049.jpg
    26.5 KB · Views: 18
  • 050.jpg
    050.jpg
    24.6 KB · Views: 21
  • 051.jpg
    051.jpg
    16.4 KB · Views: 759
  • 052.jpg
    052.jpg
    18 KB · Views: 777

silveroxide

Senior Member
Aug 22, 2007
2,036
525
113
Fayetteville NC
Sentinel.

in continuum, more on the cabin. How about that.... This post came in out in sequential order.

53. Bottom Pivot plate laminated bent into position and glued on.

54. In place, you can see the lamination.

55. Laminated the round pivot point and placed on plate.

56. Drilled a hole for the shaft. I am not using the one in the kit. I will be using a paper stick. (Paper Q-Tip)

57. Paper stick from a Loli-pop, Q-tip.

58. Starting on the outside cabin boxes.

A few more details for the cabin, it is almost done at this stage before I go to the Legs and the base.:wave::wave::wave:
 

Attachments

  • 053.jpg
    053.jpg
    21 KB · Views: 747
  • 054.jpg
    054.jpg
    17.2 KB · Views: 754
  • 055.jpg
    055.jpg
    17.1 KB · Views: 756
  • 056.jpg
    056.jpg
    17.4 KB · Views: 754
  • 057.jpg
    057.jpg
    15.9 KB · Views: 805
  • 058.jpg
    058.jpg
    18.5 KB · Views: 748

silveroxide

Senior Member
Aug 22, 2007
2,036
525
113
Fayetteville NC
You never fail to amaze us with your skill:thumb::mrgreen::mrgreen::mrgreen::rolleyes:.

Adama


Thanks for the comment Husker. This little item caught my eye and I decided to build both versions. The regular Sentinel Catachan style and the Armageddon Armor cabin style. There are a few new techniques in this build and I will make them apparent as I go Along.

Glad to see your moniker again. Are you done or still out there?
 

silveroxide

Senior Member
Aug 22, 2007
2,036
525
113
Fayetteville NC
Sentinel.

Continuing with cabin.

59-60-61 Placement of the external boxes and things.

62-63 Views of cabin.

64. Scratched built front weapons auxiliary attachment point.

See you all next posting.:wave::wave::wave:
 

Attachments

  • 059.jpg
    059.jpg
    14.3 KB · Views: 278
  • 060.jpg
    060.jpg
    18 KB · Views: 37
  • 061.jpg
    061.jpg
    19.3 KB · Views: 79
  • 062.jpg
    062.jpg
    13.9 KB · Views: 276
  • 063.jpg
    063.jpg
    23.7 KB · Views: 19
  • 064.jpg
    064.jpg
    20.2 KB · Views: 296

silveroxide

Senior Member
Aug 22, 2007
2,036
525
113
Fayetteville NC
Sentinel.

More details.

65. More external boxes

66. 67. 68, 69 The making of the base. Place it to the side and have it ready when the model is finished.:wave::wave::wave:
 

Attachments

  • 065.jpg
    065.jpg
    19 KB · Views: 266
  • 066.jpg
    066.jpg
    68.5 KB · Views: 19
  • 067.jpg
    067.jpg
    16.5 KB · Views: 266
  • 068.jpg
    068.jpg
    25.3 KB · Views: 20
  • 069.jpg
    069.jpg
    15.5 KB · Views: 291

silveroxide

Senior Member
Aug 22, 2007
2,036
525
113
Fayetteville NC
Sentinel.

Getting there. The devil is in the details.

70. 71. The swivel base platform. I laminated the whole section by mistake. Should have laminated the front section and left the channel open for the Gear box.

72. The edges are rounded off.

73. Here is the channel carved out. Should have left this area open.

74. The gear, transmission box made by rolling the paper strip around a shaft. In this case a paper stick but a micro screw driver would work better.

75. Placed the trim around the swivel base and the pivot point panel on the base.

Stay tune for more.:wave::wave::wave:
 

Attachments

  • 070.jpg
    070.jpg
    17.9 KB · Views: 70
  • 071.jpg
    071.jpg
    18.8 KB · Views: 257
  • 072.jpg
    072.jpg
    27.1 KB · Views: 18
  • 073.jpg
    073.jpg
    22 KB · Views: 75
  • 074.jpg
    074.jpg
    16.8 KB · Views: 20
  • 075.jpg
    075.jpg
    14 KB · Views: 324