Mantua 2-6-6-2 rehabilitation

Bill Nelson

Well-Known Member
Dec 14, 2008
2,680
467
78
Clarksville Tn
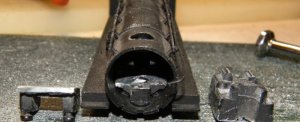
I purchased a mantua 2-6-6-2 for use at the club (Bill and Tom's excellent adventure). I put a MDC sound decoder in it, and took it to the club. It barely ran, and studying it carefully showed that it had a good mechanism (motor , gears and drive wheels) but had serious issues with electrical pick up, and suspension.


The Chinese ( I assume ) who assemble this thing attach wires to painted sections of the frame , so the black and red wire from the decoder plug in the tender do not have good contact with the frame of the front and rear portions of the articulated frame. also the tender trucks have pick ups on only one axle each, so that the tender has pick up on only two of eight wheels, which is stupidly inadequate.


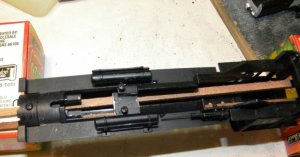
Also the springs on the leading and trailing trucks are too stiff, which tends to lift the first two drive axles off the rail, and the last two, as well, so that good electrical contact exists on only two drivers, and that contact has to go through a painted contact at the frame.

So the electrical pick up on this locomotive, new out of the box is practically useless. I have taken mine apart, and will attempt to build a good electrical pick up system.

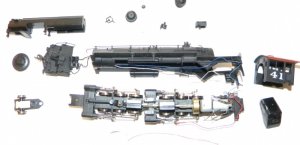
I am also not satisfied with the weight of this locomotive, it has a zamac boiler weight, which I have not been able to dislodge from the boiler yet, but I would like to remove it, and replace it with led, or tungsen (heavier than lead, and cheaper than gold or platinum, the only things that are heavier than tungsten or lead).

I will post some photos later, this locomotive has promise, it just ***** as delivered.

Bill Nelson
 

Doctor G

Well-Known Member
Sep 1, 2008
1,415
298
78
Clarksville, Tennessee
Hey Bill,

Glad you are going to take this Hoss on.It is a nice BIG locomotive that would do very well at the club. I know you been frustrated by the wiring job from the factory. I bet you could give a tutorial about electrons through paint to the guys who built this beast.

Speaking about Choo Choo club, I cannot make it this week again because of a Haiti team meeting. We go to Haiti in 2 weeks.
Dr Tom:cry::cry::cry::cry:
 

Bill Nelson

Well-Known Member
Dec 14, 2008
2,680
467
78
Clarksville Tn
Its big

Yes Tom it is big, but It is going to be a challenge to make it into as stout a locomotive as it should be. If I could ditch the zamac boiler weight, and replace it with lead or tungsten, that would go a long way toward making it a strong puller. Unfortunately the frame screws into the boiler weight, clamping the boiler in place. so if I want to make the locomotive heavier, I have to retain parts of the zamac boiler weight, perhaps epoxied into the plastic boiler to provide mounting locations for the frame, and then load up the rest of the boiler with lead.

from the factory the wires run up in the boiler to be out of sight. I'm going to rewire it with the wires running down the frame. the wires might be more visible, but it will make it a lot easier to disassemble the locomotive for maintenance and tweeking.
more electrical pick ups and some weight ought to make a big improvement. then I just need to get rid of this MDC decoder, that sounds like ****** and get something better.


Bill Nelson
 

Bill Nelson

Well-Known Member
Dec 14, 2008
2,680
467
78
Clarksville Tn
I got some work done on cutting down the boiler weight; using a hack saw (slow) and a dremil with a grinding disk (thicker, and less fragile than a cutting wheel- still slow, but not as slow as the hack saw.

The idea here is to cut out as much of the weight as possible, leaving only needed mounting positions, and enough material to determine the clearance needed to cleat the mechanism.

next I will glue the center mounting block to the plastic boiler, so the frame can be screwed on (after the needed electrical modifications are done). before it gets assembled I',m going to pack the boiler with as much tungsten and lead as I can fit in there.


The front view shows how much space was cleared out at the smoke box. Even more space is cleared elsewhere. whatever kind of white metal the boiler weight is made out of it is a lot lighter than lead, so I should be able to do some good here.

Bill Nelson
 

Attachments

  • SML boler& wghtpces.jpg
    SML boler& wghtpces.jpg
    97.5 KB · Views: 70
  • SML pieces of  weight.jpg
    SML pieces of weight.jpg
    86.8 KB · Views: 63
  • SML pieces.jpg
    SML pieces.jpg
    79.1 KB · Views: 78

Bill Nelson

Well-Known Member
Dec 14, 2008
2,680
467
78
Clarksville Tn
mounting block

Here is a photo of the little piece of the boiler weight that the screws screw into to mount the fame to the boiler.

right now I have some pieces of strip wood slid through the boiler opening to hold the little piece of the boiler weight up, while the white gorilla glue that will hold it to the boiler shell for now. Later wit will get some JB Weld (steel reinforced epoxy) reinforcement. when the tungsten and lead pieces get glued in there, it should have even more support.

note the trough that runs through that block, and the flat spot in front, will give me a reference to show how much clearance I need for the mechanism. the boiler weight stops at the firebox opening, but that opening is a little wider than needed for the motor, so I may be able to pack some lead in there too.

The next steps, are to go to work on the frame, building in enough electrical pick up into this monitor, and to reinstall the outside boiler detail, and them pack that boiler full of weight.

I'll have to go get a good flash light (the lighting isn't good in my garage where my tool box is. somewhere in my toolbox I have some tungsten rods (fancy welding rods). the welding supplier I bought them from thought I was nuts when I told him that I was wanting them for cheap weights. He said "Tungsten is expensive!" I told him "There are two metals heavier than tungsten, gold and platinum, and they make tungsten look cheap."


Bill Nelson
 

Attachments

  • SML mnting block.jpg
    SML mnting block.jpg
    112.1 KB · Views: 40

Doctor G

Well-Known Member
Sep 1, 2008
1,415
298
78
Clarksville, Tennessee
I'll have to go get a good flash light (the lighting isn't good in my garage where my tool box is. somewhere in my toolbox I have some tungsten rods (fancy welding rods). the welding supplier I bought them from thought I was nuts when I told him that I was wanting them for cheap weights. He said "Tungsten is expensive!" I told him "There are two metals heavier than tungsten, gold and platinum, and they make tungsten look cheap."


Bill Nelson
Bill,
Neat metallurgy course there.I did not know that tungsten was heavier than lead.

You are doing good work. It will be fun to see this monster locomotive do some pulling.

What sound system are you shooting for????

Dr Tom:thumb:
 

Bill Nelson

Well-Known Member
Dec 14, 2008
2,680
467
78
Clarksville Tn
I read about the tungsten on the Yahoo HON3 site before I abandoned it for the Yahoo HOn3 chat group, which mostly posts BS, but if you ask a question, you get an answer, where as on the first list a lot of useful info got posted ,but the group was kind of insular, and it wasn't past them to ignore a question three or four guys probably knew the answer to.

Bill Nelson.

ps I found the tungsten! so some progress can continue.
 

Bill Nelson

Well-Known Member
Dec 14, 2008
2,680
467
78
Clarksville Tn
I have done a little work on this critter after getting home from work this morning @ about 8:35 am.

I did some measuring, and found out that the tungsten welding rods , cut in half, where just the right length. This is a blessing, as you don't want to make any unnecessary cuts this stuff is as hard as it is heavy. the dremil grinding wheel was mostly there before I started cutting these rods. I didn't cut all the way through them either, I scored all the way around, and cut them about half way through, and then grabbed each end with a small vice grip, and snapped them in two.

I then glued the pieces into the boiler shell with white gorilla glue.
as you can see in the picture there is still a lot of room, but I have to proceed from here carefully. with locomotive weighting, more is not always better. What you want is as much weight a possible, perfectly balanced over the drive wheels. So far this boiler weighs at least twice as much as the stock boiler did. I can add a lot more weight, but I will need to be careful to keep it relatively well ballanced, in order to get maximum tractive effort.


For now I need to let the gorilla glue set up, and then Work on adding weight in the boiler area over the rear set of drivers and in the cab. You don't want a nose heavy articulated. when I rebuilt my first 2-4-4-2, it was nose heavy, and I had to build a completely different suspension to transfer that extra weight to the two sets of drivers , and that took a lot of trial and error work. It was worth it, as that locomotive could only pull a five car train on dead flat track before modifications. when I got done it could pull 21 cars up a 2% grade . but making the adjustments was a real pain.


In any case, I'm getting somewhere on this project, but it is about time for me to go and try to sleep, so I can be awake when my wife gets home from teaching clinicals for her nuring students.


Bill Nelson
 

Attachments

  • SML drmlgrndgwhlwrntnb.jpg
    SML drmlgrndgwhlwrntnb.jpg
    79.5 KB · Views: 33
  • sml wldgrdwghts#2.jpg
    sml wldgrdwghts#2.jpg
    111.4 KB · Views: 33
  • SML wldgrdwgts#1.jpg
    SML wldgrdwgts#1.jpg
    91.6 KB · Views: 37

S class

Member
Jun 9, 2009
88
0
16
the best part about using the tungsten rods for weights is that if she ever drops a shaft or pops a leak in a pipe up on the mountain the LPB's can pull a rod out a spot weld a repair :mrgreen::thumb::mrgreen:
 

Bill Nelson

Well-Known Member
Dec 14, 2008
2,680
467
78
Clarksville Tn
As I had thought it is nose heavy so far. Next I have to replace that worn out grinding wheel on the dremil, and start to work trying to load up the bake end of the locomotive. I'll start with a row under the cab roof. and then add a row to either side of the cab side walls under the window sill. there is also a space between the flywheel and the rear gear tower. I might work on that some today, If I don't sleep all day (I got done with my work week at 8am this morning.

I have a lot of projects I can work on though if I can stay awake a while. I got a delivery this week, and I now have enough Micro Engineering Hon3 #6 switches to complete the narrow gauge staging yard @ Gegokayoosa, and an extension with a return loop, so that whole trains could be turned, avoiding the inevitable awkwardness of having to do real switching on a shelf hanging from the ceiling not only above eye level, but above head level.

I also got some Rio Grande Model's roundhouse stoves, I can add to the engine house in Crooked Creek. (some day I have to go back to work on it and scratch build the brass hinges for 12 locomotive stall doors (two per each opening, with two openings on each of the three tracks); but I have some city classics factory windows on backorder, that will be needed to make the skylights, so I can't start work on the roof until those show up.

I got a Grant Line Kit, that will allow me to turn one of my Bachman 0n30 rod locomotives into a true and proper On3 locomotive (I have a Climax with DCC and sound, but they don't need a kit to convert). I have a Bachman 2-6-0 that I inherited from my Dad, and a non operational brass O scale model of a Porter Mogul in Japanese narrow gauge (42inch) I may try to hack up both locomotives to see if I can come up with a one of a kind On3 semi brass Porter Mogul. I got the Porter mogul at a local antique store (to tender ) for $25, so with the inherited frame, this is an almost free project. If you are an old time type guy , and I are, few locomotives look as good a a porter mogul!

I also have about 19 partly finished HOn3 car kits or kitbashes, which are partly done, a foam board Hon3 layout that I have started which has a hole in the middle cut out to fit my artificial Christmas tree's stand, I will make a foam scenery plug, so that when it isn't under the Christmass tree I can fill in the hole. This, once I have built it, will give me the first continuous running capability that I have had in eighteen years or so, as my HO railroad's insane design is strictly point to point.


I have also acquired a Jordan miniatures Mack rail bus kit. Like all Jordan Miniatures kits it is exquisitely cast in plastic, with extraordinary detail. I have on back order a NWSL flea drive, and an auxiliary gear box forit, and some HOn3 geared axles for it. I have a Con-Coor Goose modifies=d and painted for for the State line Railroad, and I'll try to kitbash the Mack unit into something similar for the Marietta and North Georgia railroad , the other Narrow gauge outfit in my universe.

There are other projects as well, too many to document. Will I go to work on trains?, or will I go to sleep in my leather recliner front of the roaring fire in the Hampton stove in the fireplace in my dinning room .....inquiring minds want to know


Bill Nelson
 

reklein

New Member
Jun 11, 2008
32
0
6
Lewiston ID
Hey Bill, nice work,good project. I got three of those things. A tank type I've had for 15 years runs pretty good but the two other relatively new ones aren't so hot. I was wondering what your thoughts on the drive tube between drivers is and how would you improve that. Also I found that the lead truck picks the notch on the stock rails of my Atlas turnouts. I wish Atlas didn't notch those so deep. I sorta cured that by filing the edge of the notch to a more sloped contour much as you would a point that gets picked. I've also found that for all those wheels on the track they don't pick up the juice very well. I'll have to take a look. I think 3 of these things will be enough for me. Now for an MTH "little Joe". Looking forward to the rest of your rebuild. BILL Kleinert.
 

Bill Nelson

Well-Known Member
Dec 14, 2008
2,680
467
78
Clarksville Tn
Hey Bill, nice work,good project. I got three of those things. A tank type I've had for 15 years runs pretty good but the two other relatively new ones aren't so hot. I was wondering what your thoughts on the drive tube between drivers is and how would you improve that. Also I found that the lead truck picks the notch on the stock rails of my Atlas turnouts. I wish Atlas didn't notch those so deep. I sorta cured that by filing the edge of the notch to a more sloped contour much as you would a point that gets picked. I've also found that for all those wheels on the track they don't pick up the juice very well. I'll have to take a look. I think 3 of these things will be enough for me. Now for an MTH "little Joe". Looking forward to the rest of your rebuild. BILL Kleinert.


A little Joe should be a real Hoss, we will need a review. MTH's entry into the HO world could be an interesting development, and I'm looking forward to seeing what their quality is like.

I don't think there will be a problem with the drive tube If you wanted to, they could be replaced with universals from NWSL or the old hobbytown universals, which I believe are available from Micro Mark.

The difference between the old one and the new ones may be the painted frame issue showing up.

I'm looking forward to the Olympic gold medal hockey game this afternoon between the USA and Canada. My NHL team has a defenceman on each team, so one will get the gold and the other the silver. unlike football or baseball. I won't be able to build much during the game except for when they are resurfacing the ice between periods.


Bill Nelson