Van Hobbies brass CNR N-5-d 2-8-0 rebuild

doctorwayne

Active Member
Sep 6, 2005
3,516
0
36
Canada, eh?
Wayne, here's a LINK to a method that I use for plugs between the loco and tender. I make the leads from the tender long enough so that, when the tender and loco are disconnected at the drawbar, the two can be separated so that it's easy to grasp the plugs to separate them. In service, the connected plugs and excess wire are stuffed into the front of the tender (I use a cut-off disk to make a suitable opening in the front wall of the tender), and the wires are barely noticeable. Good reliable connections, and a manageable size, and cheap, too! ;):-D

Wayne
 

WReid

New Member
Jan 26, 2008
69
0
6
Kirkland Lake, Ontario
Like I said before this is my first brass locomotive rebuild. Before this I had worked on some plastic steam locomotives and plastic diesels. My other model building experience was for the most part remote controlled airplanes, helicopters and some static plastic models.

Even though I started out with what seemed to be a basket case it has not been as hard as I was expecting but the whole thing has been a new learning experience. Things have went well so far. Of course when I get to locomotive #2 things maybe different.

I found working on a brass steam locomotive not to be much different than a plastic one. Is some areas I found it to be easier. They are not a delicate as their plastic cousins when it comes to handling them. The only real difference between a plastic steam locomotive and a brass one is the metal construction, gearing system and the sprung axles if the brass locomotive has them. The driver quartering, side rods and valve gear requires the same attention on both to get a smooth running locomotive.

The one big thing I found is really needed for brass locomotive work is good soldering skills and good soldering tools. This is the one area a person can get into trouble fast and end up with a bunch of loose parts if not careful.
After that the rest is the same modeling skills used for plastic locomotives but instead of plastic you are using brass. Added detail parts can be plastic or brass and can also be glued on if needed. The painting and decaling are the same for both.

I will admit there were times during the restoration when I was ready to pull my hair out.
The main one was after I had the new drivers in place with the side rods. I added the valve gear and suddenly the chassis no longer rolled smoothly. There was an small bind that only happened once an awhile. I figured seeing as the valve gear was the last parts added the problem was there as it had never happened before I added the valve gear
. After two days of careful checking I was no further ahead with solving the problem. I took a break for a few days and during that time I was reading some old model train magazines. One had an article about play in the axle bearings on brass locomotives and how to remove it with brass shim stock. Of course right after reading it I ran down to my work shop and checked my frame bearing fit. There was some play so I followed the article and removed the play using some thin brass strips. As before the chassis rolled nice without the valve gear. I remounted the valve gear planning on finding the bind once and for all and was very surprised to find it now rolled very well with the valve gear in place. On a hunch I removed the shims I added between the bearings and frame and the bind came back. It may have been some time before I would have thought to look at axle bearing play as the cause.


Wayne R
 

WReid

New Member
Jan 26, 2008
69
0
6
Kirkland Lake, Ontario
Wayne, here's a LINK to a method that I use for plugs between the loco and tender. I make the leads from the tender long enough so that, when the tender and loco are disconnected at the drawbar, the two can be separated so that it's easy to grasp the plugs to separate them. In service, the connected plugs and excess wire are stuffed into the front of the tender (I use a cut-off disk to make a suitable opening in the front wall of the tender), and the wires are barely noticeable. Good reliable connections, and a manageable size, and cheap, too! :wink::grin:

Wayne

Wayne thanks for the link. I had actually found that thread awhile back. I was actually hoping to do as you had posted there. Unfortunatly the way my tender shell mounts to the tender floor made making a hole in the front of the tender a no go idea. Right behind the bottom of the front wall of my tender on the inside is a brass bar for the screw that holds the tender shell on. I was also trying to avoid cutting a hole in the tender front as it would be visiable due to the design of the tender front. But I will admit I am still thinking about doing it.:mrgreen:

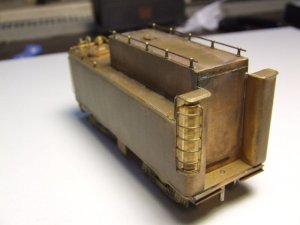
repaired tender  front view.jpg
This picture of the front of the repaired tender shows what the front of the tender looks like. There is a black line at the bottom of the front inset wall. That is where I had thought about making an opening just slightly bigger than one of my micro plugs. This way they could be shoved in or pulled out one at a time with enough room to get past the wires from the other micro plug. The only thing that stopped me from going this route was making a hole in the nicely detailed tender front.:eek: :(


Wayne R
 

doctorwayne

Active Member
Sep 6, 2005
3,516
0
36
Canada, eh?
Unless you're using a really l-o-n-g drawbar (also known as a drawn out bar), ;):p that area is very difficult to see once it's been painted. Of course, there's nothing wrong with your solution, either - this is simply another option.

Wayne
 

WReid

New Member
Jan 26, 2008
69
0
6
Kirkland Lake, Ontario
Unless you're using a really l-o-n-g drawbar (also known as a drawn out bar), :wink::p that area is very difficult to see once it's been painted. Of course, there's nothing wrong with your solution, either - this is simply another option.

Wayne

Wayne you make a good point about it being a difficult spot to see once painted and with the engine coupled to the tender with a proper spacing. I guess my biggest hurdle to over come is not wanting to make a hole in the tender. Most of all since having a nice running accurate model of a CNR 2-8-0 with sound is more important to me than the collector value of the locomotive. :mrgreen: I had originally planned on making a hole there as the inset front wall on the tender is actually not correct for the N-5-d tender. Van Hobbies messed up when they made the tenders. :eek: There should be no inset at the front as the real ones were flat there with the vestibule between the cab and tender there.

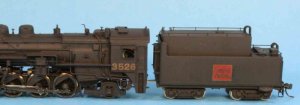
vh-536_c1-1%20copy2.jpg
This photo shows how the front of the tender should have been modelled. The N-5-d class got their tenders from the S-2 mikados. Van Hobbies got the mikados correct when they did them. Seeing as I have a couple of days before I will have time to paint I am going to give the idea of a hole in the tender front some rethinking. In the end the less handling I have to do of the locomotive and tender to seperate them if ever needed the better it will be for the paint.


Wayne R
 

doctorwayne

Active Member
Sep 6, 2005
3,516
0
36
Canada, eh?
Seeing as I have a couple of days before I will have time to paint I am going to give the idea of a hole in the tender front some rethinking. In the end the less handling I have to do of the locomotive and tender to seperate them if ever needed the better it will be for the paint.

Wayne R

Ease of dis-assembly is an important consideration and is one of the reasons that I eliminate working lights from all of my steam locos. I also try to make notes on special procedures required for dis-assembly of modified locos, as I often forget some of the things that I've altered which can also affect that. wall1:pwall1:p
A cursory comparison of prototype photos with the Bachmann Consolidation leads me to believe that my N-2-as and -bs may have some major alterations in the assembly/dis-assembly procedures. :eek::rolleyes:
For me, in order of importance, a loco must operate well, be easy to service, and look "good enough" for my own standards. Often, the more important considerations on anyone's personal list may compromise some of those of lesser importance.

Wayne
 

WReid

New Member
Jan 26, 2008
69
0
6
Kirkland Lake, Ontario
I thought I had better give a little update on my N-5-d rebuild.

Thanks to ending up with a bad case of the flu for just about two weeks I have not had much of a chance to work on it.:cry: Also seeing as winter will be here soon in the north I had a few things to take care of before it gets too cold.:eek:
The good news is I did manage to get a coat of black paint on all the parts except for the tender trucks and the side rods/valve gear parts. I ended up having to paint the boiler two times thanks to some water staying trapped under the sand dome. It decided to make an appearance when I was spraying the second coat.wall1 This meant stripping the boiler and starting over again.:curse: The second time around things went fine.
I plan to paint the cab windows red this weekend as well as some hand valves and give the raised cab numbers some CN yellow #11 paint. I will also be putting the drive back together so I can paint the side rod and valve gear in place with the wheels turning slowly.
I was hoping to do the decaling this weekend but have found out Black Cat Publishing has come out with a new set of CNR steam decals that are more correct than the Microscale ones. The good news is Black Cat is located here in Canada so the new decals should be here in a week.:mrgreen:
Once I have the decals I will be able to shot the clear coat. I am thinking of using flat clear for the smokebox and firebox. A satin/flat mix for the boiler and straight satin for the cab and tender. This should give the black a different look on different parts of the locomotive. Weathering will do the rest.
Once my camera batteries are charged I will take a few pictures of the painted parts as they are now and post them.


Wayne R
 

WReid

New Member
Jan 26, 2008
69
0
6
Kirkland Lake, Ontario
Well my plans to paint the cab numbers and windows got put on hold when my brother who I do not see to often dropped in for a visit on the weekend. The good news is yesterday and today the final painting ( except for side rods and valve gear ) was done.

Today I painted the side cab windows red and the raised cab numbers CN yellow #11. Painting the windows was the easy job. I have shaky hands and the raised cab numbers proved to be a bit of a scary job as I was worried my hand would shake at the wrong time and the cab would get yellow where it was not needed.:eek: But with some patience and taking my time it came out okay.:mrgreen:

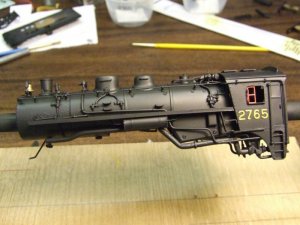
boiler painted.jpg
The boiler with the raised cab numbers and windows painted. The boiler is mounted on a brass tube that sits on a wooden holder I made for painting. This way the boiler could be rotated so all the nooks and crannies could be painted.


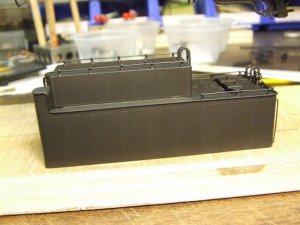
tender shell painted.jpg
Tender shell painted. The rest of the parts look the same so no need to post pictures of them.

For paint I used Polly Scale steam power black. It is not a real dark black but is also not to gray. It is a water based acrylic. I had thought of using either Floquil or Scale Coat but decided seeing as I have always used either Modelflex or Polly Scale I would stick with what I am used to. The paint was thinned ( 15% ) using bottled water and sprayed with my Badger 175 dual action airbrush using a medium tip and needle. Most everything got two light coats followed by one final coat once I was sure I had not missed any hard to get spots.

Before any of the parts were painted they were sandblasted with baking soda using a Badger mini sandblaster. This helps the paint get a better hold on the brass and cleans the parts up real nice. Then it was a wash in warm soapy water and a rinse. Next a quick dip ( no more than 10 minutes ) in white vineager to remove any stubborn tarnish followed by a warm water rinse. Next a dip in lacquer thinner then a dip in 99% denatured alcohol. Between each cleaning step the parts were blown off with compressed air and dried with a hairdryer. Seeing as the parts had been handled a lot during the rebuild I wanted to make sure everything was real clean so the paint stuck real well.


Wayne R
 

GN.2-6-8-0

Member
May 25, 2006
150
0
16
80
Glendale AZ.
Wayne

Am myself thinking of switching to Acrylic paint instead of Floquil or scalecoat but never having used Acrylics have a question.do either Modelflex or Pollyscale make a paint with hi gloss or failing that what clearcoat would would you recommend before applying decals or is it not required! I cut my teeth on a Badger 150 single action air brush but switched to a Paasche double action recently and and really like the added control it gives.
 

WReid

New Member
Jan 26, 2008
69
0
6
Kirkland Lake, Ontario
Modelflex has a few colors that dry to a shiny finish. Engine black is one I know of. I am not sure which other ones do but I do know CN red #11 does not. As for Polly Scale so far the ATSF red I used and the steam power black dry to a semi gloss finish ( satin ). I have been told water type decals can be applied over the Polly Scale without a gloss clear coat being added first. When sprayed properly it actually dries to a real smooth finish. It actually behaves more like a solvent based paint than an acrylic.


For gloss coats I have used Testors gloss coat and dull coat most of the time ( lacquer based ) but recently I have used acrylic clear coats. They seem to work fine but can be a little tricky at times if not thinned properly but for the most part I have had no problems with them.

Actually up until now I have only used CDS dry transfer decals for 99% of what I have painted and decaled.To be honest though seeing as dry transfer decals do not require a gloss coat when they are put on most of my experience with acrylic clear coats have been with flat or satin ones.

I have a spare brass USRA tender I painted with the steam power black which will be used to do a test with water type decals to see how they go on without the gloos coat. I will post my results in a few days.

One trick I have tried is to add some acrylic gloss to the color you are spraying and it will dry shiny. It does work and it makes for a coat or two less in the painting process.

I used to have a web link that talked about adding gloss to the paint to get it to dry shiny. I will have to see if it is still on the old computer and if so post it here.

Model Railroader also did a number of articles about using acrylic paints. I will post the months and years they were in later.


Wayne R
 

steamhead

Active Member
Apr 16, 2005
2,360
0
36
75
Brownsville, TX
That's a sweet looking paint job...!!! Wish my hands were as shaky as yours....:mrgreen:
Can't wait to see the drive train painted, and the finished loco looking brand, spankin' new..!!!:thumb:
 

WReid

New Member
Jan 26, 2008
69
0
6
Kirkland Lake, Ontario
Trust me there are times when I wish I was not cursed by my shaky hands. Simple jobs can sometimes become hard ones.:curse:

I actually have all the drive train parts painted. Well except for the side rods and valve gear. They will get paint with the wheels slowly turning once the drive is together. I was hoping to be putting the drive train together by now but some how I forgot :confused: to paint the the frame bottom plate.wall1 It got painted Monday afternoon along with the tender trucks. I am going to give the paint a few days drying time before I start assembling the drive train. After all the painting I do not want to jump the gun and chip any paint.:mrgreen:

I am actually looking forward to seeing the finished product myself. It will spur me on for the second one I still have left to tackle.


Wayne R
 

WReid

New Member
Jan 26, 2008
69
0
6
Kirkland Lake, Ontario
Well I hope to be assembling the drive train tonight but it will now be this weekend before I can get to it.
I read about a neat trick to help keep the paint on the side rods and valve gear from wearing off when the locomotive is handled. I do not plan to handle it a lot but decided to try it. It involved cleaning the side rods and valve gear in lacquer thinner to remove all traces of oil and dirt. Next they got a little scuffing with some 800 grit wet/dry sandpaper. Just enough to dull the plating a little but not enough to break through the plating. Next was a bath in 99% alcohol then they got sprayed with some dullcote. This is supposed to help the paint grab better. Once the drive is reassembled they will get sprayed with the same black used on the locomotive with the wheels turning slowly.

Seeing as I could not assemble the drive tonight I decided to mount the steam chest, pilot, and boiler back on the frame to see how things were going to look. I have been dying to see how it will look now compared to when I got it. In short curiosity killed the cat finally.:p:p:mrgreen:

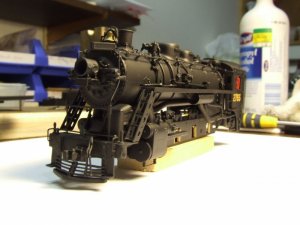
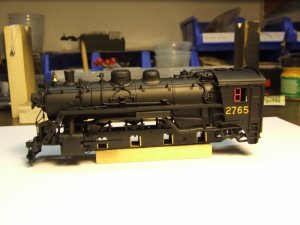
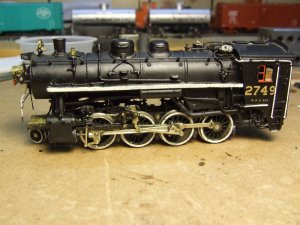
I took a couple of pictures so here they are.

#2765-aa.jpg

#2765-bb.jpg

locomotive, left side.jpg
This is how it looked when I received it so many months back.

I am actually very happy with the color of the Polly Scale steam power black paint I used. I person it looks a little more blacker than the photos I took. Also depending on the lighting it looks anywhere from black to a gray color and seems to photograph nicely. The lighting I took the pictures with is just about the exact lighting I will be using on my new layout. I used a lamp for extra lighting for the pictures and the yellow light from it gave the paint a warm black look with a slight brown tint. More so in the picture than in person.


Wayne R
 

steamhead

Active Member
Apr 16, 2005
2,360
0
36
75
Brownsville, TX
We're all salivating here....!!! The wait is getting on our nerves....
Please...pretty please, finish it....:rolleyes:

BTW...is it going to get some weathering...?
 

WReid

New Member
Jan 26, 2008
69
0
6
Kirkland Lake, Ontario
That is one of the reasons I decided to do a test fit. I would like to change the color of the smokebox and firebox a bit so I have decided I will give them a spray of some very diluted weathered black and a touch of tarnished black. Just enough to change the color ever so slightly and give them the look of heat baked parts. Any parts I do not want it on like handrails and pipes will get touched up with a brush and some of the base black thinned out.

As for weathering it will be getting some. I do not want it to look to freshly shopped but just how dirty I am not sure yet. By the later 1950s most CNR steam looked very hard worked. Most of all since diesels were taking over and steam was on its way out.

I prefer to use very diluted weathering colors as this way it takes a number of passes to get the look I want and it cuts down the risk of going to far to quick.

The next time I post it will be back together, decaled and should be fully weathered.:mrgreen:


Wayne R
 

WReid

New Member
Jan 26, 2008
69
0
6
Kirkland Lake, Ontario
I thought I had better give an update on my N-5-d rebuild for all those awaiting the pictures of the finished locomotive.

I hope to have some pictures to post soon. The drive has been reassembled and tested. I just need to do the final clear coats on the boiler and tender shell then weather it a little once the boiler is back on the drive and the tender shell on the tender frame.

Unfortunatly I am being held up by an unexpected glitch. I was unhappy with the Microscale CN steam decals I had planned to use. The yellow was incorrect and looked more like gold as well as a few other problems. As luck would have it Black Cat Publishing came out with a new set of HO scale CNR steam locomotive decals. I was able to get a few sets a few days after their release. They look much better than the Microscale ones and have the proper yellow. The bad news is when they were printed the " FUEL OIL " lettering was accidently left off. :eek: Not good for my project as my tender is an oil tender. There is to be an auxiliary sheet printed with the " FUEL OIL " lettering and I am just waiting for it to be released. Last word I had was it would be avaliable by the end of November. I am hoping so as I really want to get it finished.


Wayne R