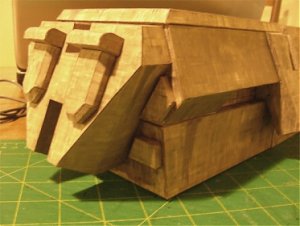
Here's another image of the end piece completed and attached. You can see a few of the preliminary greeblies I've attached around it (trust me there are more). The side leg assembly is also attached on one side. This starts to give a sense of the main body's shape.
Outland Shuttle Build
- Thread starter Hot4Darmat
- Start date
You are using an out of date browser. It may not display this or other websites correctly.
You should upgrade or use an alternative browser.
You should upgrade or use an alternative browser.

I had to go back to the drawing board for the side pods and the landing gear, but the new versions are looking very nice, and going together MUCH better.
I've been assembling little greeble boxes like crazy, but that's all I've been able to do these past few days due to an insanely full recent work schedule, three busy little lads I'm dad to, and a bout of surgery for one of them (all is well now). The more I get done on this model, the more excited I get as it starts to really look more like I want it to. More soon.
I've been assembling little greeble boxes like crazy, but that's all I've been able to do these past few days due to an insanely full recent work schedule, three busy little lads I'm dad to, and a bout of surgery for one of them (all is well now). The more I get done on this model, the more excited I get as it starts to really look more like I want it to. More soon.
S
Soaring
You know what, I enjoy looking at your model entries. Why? The taste of your models are amazing, I love little greeble pieces that make the model look darkening, yet so real like. I can't wait for more man, you're doing an excellent job, unmatchable skill ")
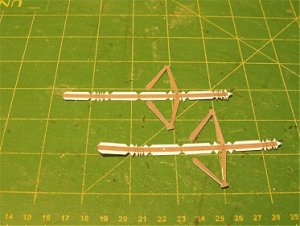
Anyone who has had a close look at this ship will likely agree that one of the coolest features is the landing gear. The studio model featured brass tubing, working springs and shocks, and metal supports all around so that the landing gear were pretty much real working landing gear. I can't do this in paper, and gave up trying to capture all the incredible detail from the studio model, so I went for the general look and feel in cardstock. Now for a picture of what the landing gear leg parts look like freshly cut out (one part is missing from this picture). The second image is a closer look at the shock spring parts. Make sure you have a fresh replaced blade when you tackle these suckers. There is some finicky cutting here, and life is too short to make paper models with a dull blade.
Attachments
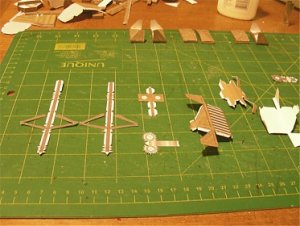
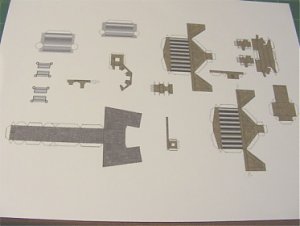
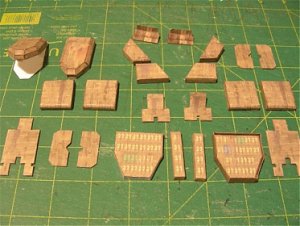
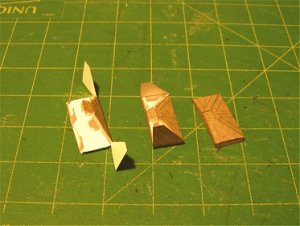
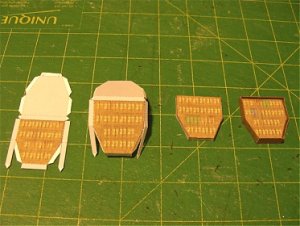
These next two photos show how each of the landing foot pads get folded up and assembled (a total of 8 of these are needed), and how the side container holds get built up (a total of 8 of these are needed too).
Attachments
WooHoo.. betterer and betterer ! From the pics It looks like the Hue or colour correction is a little whacked out, but i kind of like the extra rusty tones it gives the textures. Will the model be predominantly shades of grey ?
What! your not going to Dev paper springs and suspension ! ~ Whooozie lol
btb. I really like outlandshuttletestbuild12.jpg ~ great shot!, its feels like your standing next to something really BIG! Please, the same angle for the finished goodies..
Most excellent Duncan ~ keep foldin' ....foldin' ..............foldin' ..... all....most....there....
:thumb::thumb:
Thanks again. The colours you see are pretty close to being right. It is a browney-greeney colour, and not grey. More dirty rust than anything. So far I like it overall, but may change it yet. I'm going to wait and see how I like the completed model before I make final texture tweaks.
This shuttle is supposed to make planetfall in a variety of nasty atmospheres, so I imagine its outer skin would look pretty battered, streaked and stained. Either way...I'm just going for a look I like that I think captures the original relatively well.
Believe it or not, I spent a number of hours trying to design a paper spring, sliding tube-within a tube sleeve arrangement that would allow it to have that cushioned "settling-down-onto-its-legs" look when set down.
I gave up.
The model is complex enough as it is....I'm guessing that after all this work, maybe a handful of people will actually build it.
At a re-use crafts store in St. Paul a few weeks back, I found a bag of paper sticks -- they appear to be the same as the sticks that Tootsie Pops come on -- and at the time, it struck me that they would be perfect for something like landing gear legs, and it would be easy enough to fashion a tube around them for them to fit in.
It was a good find. I'd eaten plenty of Tootsie Pops, but I never could find a way to fully clean the part that the candy is on without damaging the paper.
If you live in a decent-sized city, you should look around for shops of these kinds; they can be a goldmine of great parts, and I would think they could be greeblie heaven for a build like the shuttle from Outland.
Here's the website for the shop I was talking about:
ArtStart
And here's a partial directory of similar shops in other states:
The Scrap Box
At a re-use crafts store in St. Paul a few weeks back, I found a bag of paper sticks -- they appear to be the same as the sticks that Tootsie Pops come on -- and at the time, it struck me that they would be perfect for something like landing gear legs, and it would be easy enough to fashion a tube around them for them to fit in.
It was a good find. I'd eaten plenty of Tootsie Pops, but I never could find a way to fully clean the part that the candy is on without damaging the paper.
If you live in a decent-sized city, you should look around for shops of these kinds; they can be a goldmine of great parts, and I would think they could be greeblie heaven for a build like the shuttle from Outland.
Here's the website for the shop I was talking about:
ArtStart
And here's a partial directory of similar shops in other states:
The Scrap Box
We have craft stores here in the People's Republic of Massachusetts. Michaels and A.C. Moore. Apparently one hobby here in N.E. is making your own candy. You'll find these sticks in the candy making section.
These craft stores are a bounty of useful objects. Stuffed animal eyes, especially the very smallest ones can serve as little domes, bubbles on Daleks, or giant rivets. The craft stores are also my best source of water-free PVA (aka white glue).
Thanks for the suggestion. Paper sticks...perfect. How well will they make a bend? I guess I'll pick some up and see.
S
Soaring
I don't know how well they'd make a bend. I suppose I could experiment with wetting them, or wetting just a portion of them, or cutting them apart, mitre-ing the edges, gluing them together and then sanding the joint smooth.
In the past, I've made angled tubes by first rolling the paper around a form (a small dowel or knitting needle or brass tube, for example) and then cutting some slits on the side of the tube where I want to make the bend. (The slits are on the inside of the bend.) Then I insert a pipe cleaner, carefully bend the paper and glue the bend. the pipe cleaner adds rigidity and helps it keep its shape while the glue is drying. You then cut the pipe cleaner to length (it'll stay inside the tube) and you're done.
In the past, I've made angled tubes by first rolling the paper around a form (a small dowel or knitting needle or brass tube, for example) and then cutting some slits on the side of the tube where I want to make the bend. (The slits are on the inside of the bend.) Then I insert a pipe cleaner, carefully bend the paper and glue the bend. the pipe cleaner adds rigidity and helps it keep its shape while the glue is drying. You then cut the pipe cleaner to length (it'll stay inside the tube) and you're done.
Soaring: no I haven't given up. Not by a long shot. I'm into this thing up to my neck. I just gave up trying to make the landing gear have some shock absorption or cushion effect. That's all.
More photos soon
More photos soon
S
Soaring
Ohh! I reread your post earlier, sorry, I was abit confused. So you gave up only on the landing stuff.....
Well, I'll be waiting for more photos! I'm excited to see this ^.^
Well, I'll be waiting for more photos! I'm excited to see this ^.^
A
ARMORMAN
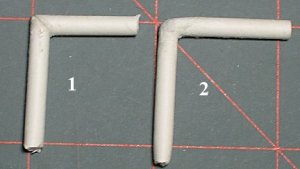
Here is a picture of a paper stick with an angles applied in two different ways.
#1 was cut at a 45 degree angle and glued together.
#2 was wet in the middle then pressure applied until it bent.
I dipped my finger in some water and applied the drop of water to the area where I wanted the bend to be. It soaked in after a few seconds, then more drops where applied. It is a judgement call on how many times you apply the water. The outside of the elbow split a little so some tissue with some water and PVA glue was applied to fill the gap, like papiermaché. The angled stick was then taped around the right angle corner of a piece if wood until it dried. Some sanding was used to give it a smoother look. Some more tweaking will make it look even better. Maybe some CA appied to stiffen it and more sanding.
The paper sticks might bend without splitting if you soaked it more and took some extra time. I first tried bending it around a 16d nail, but it found that just using your hands worked better.