time to get started on a new layout

N

nachoman

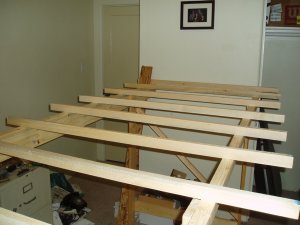
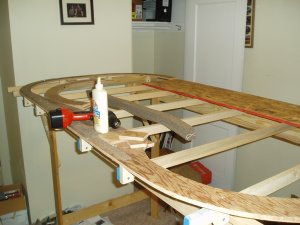
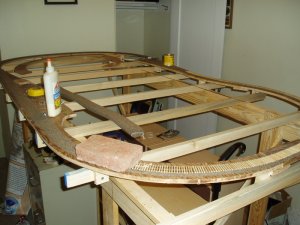
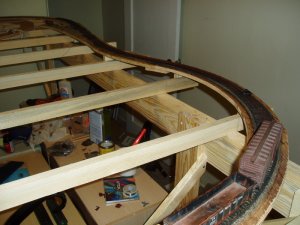
Well, here are the begginings of my brand new layout. The old one has been taken down and awaiting it's place in the closet. As you can see, I'm just barely getting the benchwork started. Today, I have continued working on the benchwork, but hopefully tomorrow I will get some of the subroadbed in place and will start laying track!

I plan on periodic updates to this thread, but I am also going to write a construction journal for the e-mag.

Kevin
 

Attachments

  • newlayout.jpg
    newlayout.jpg
    100.1 KB · Views: 12

TrainNut

Ditat Deus
Sep 15, 2004
1,731
0
36
54
AZ
Cool so far. I know you have already posted the track plan in another thread but for reference sake, you may want to include it here as well. I can see my mudhen growling around those curves already!
 
N

nachoman

Here is my most recent progress. It doesn't look like much, but I put more bracing underneath and have started with the subroadbed. I used the L-girder construction method and it is remarkably sturdy. The next step will be to finish the subroadbed on the first level, and then lay the ties and rails. I need to get the rails layed on the lower level first, because once I start adding the upper levels, access to the lower level becomes more difficult.

Kevin
 

Attachments

  • layout2.jpg
    layout2.jpg
    114.7 KB · Views: 16

toptrain1

Well-Known Member
Jan 2, 2007
940
576
93
New Jersey
Your not alone!

Well Natchoman I to am presently breaking down my layout and building anew. I still have some table work to break up before starting. My main move is to go from the basement to the attic. In the area where I am breaking down the old layout I'll set up my table saw and start building tables, of a portable type, to put up in the attic. Here is a old photo of Stevenville yard.
frank------toptrain1
 

Attachments

  • CNJ mike and decapod 14 2007 026.jpg
    CNJ mike and decapod 14 2007 026.jpg
    328.8 KB · Views: 18
N

nachoman

Here is a homemade tie allignment jig with a strip of ties alligned and held with a thin strip of masking tape.

Kevin
 

Attachments

  • tie jig.jpg
    tie jig.jpg
    224.5 KB · Views: 7
N

nachoman

Well, I didn't get as much done as I hoped this weekend. Too many other things to occupy my time (football!). But, I slowly started laying ties, 25 at a time. I've got the subroadbed for the lower dual-gauge lower level cut out and secure. Once I get the rails layed around most of the lower level, I can begin the climb up the mountain :mrgreen:. I've also started building a turnout where the narrow gauge branches away from the dual gauge. I've also realized that building a full dual-gauge turnout may be formidable, and I am considering buying the other three that I need (at 35-40 bucks a piece!)

Kevin
 

Attachments

  • newlayout2.jpg
    newlayout2.jpg
    215.7 KB · Views: 11
  • newlayout3.jpg
    newlayout3.jpg
    294.8 KB · Views: 6
N

nachoman

Here is this week's update: I got about 1/2 of the ties on the lower level glued down, sanded, and stained. I also mounted a custom turnout where the narrrow gauge can diverge from the dual gauge trackage. I painted the rails with rustoleum rusty metal primer before I spiked them down, and it looks really red in the photograph, so I am not sure i am happy with the color that much. I also started spiking the dual guae trackage. That's very tedious, and I will probably run out of spikes really fast. I am spiking every 4th tie.

Kevin
 

Attachments

  • newlayout4.jpg
    newlayout4.jpg
    217.7 KB · Views: 7
  • newlayout5.jpg
    newlayout5.jpg
    233.4 KB · Views: 11

TrainNut

Ditat Deus
Sep 15, 2004
1,731
0
36
54
AZ
It's kinda fun to start on something new isn't it? Kinda gives a new excitement to the whole project.
 
N

nachoman

I will do my best. My camera is only point and shoot, so it may not focus on the spikes that well.

Kevin
 
N

nachoman

first trains!!

Since this was my first attempt at handlaying, I thought it best to test the short section I have completed before I go too far. So, I pulled out old #6 from storage (a MDC 0-6-0), blew the dust off her, put her on the track, and let her roll. With a few squeaks and wobbles the wheels turned and off she went, for about two feet and then derailed wall1 So, I put the loco back on the track, and tried again. Another derailment, at the same spot wall1 So, out came the NMRA gauge. Seems my rails were a little tight in gauge in a few places on the curve. Lesson learned - when using those three point gauges, the single prong end has to face towards the inside of the curve! If you do it the other way on a sharp curve, the gauge will be too tight (especially on 18" radius curves).

After unspiking and re-spiking about 3' of track for both the narrow and standard gauge rails, I tried again with success :mrgreen: Next I tried a short narrow gauge train - and once again success.

Hopefully over the next few evenings I can extend the track to the other side of the turnout so I can test the turnout.

Kevin
 

Attachments

  • firsttrain.jpg
    firsttrain.jpg
    238.2 KB · Views: 9
  • firstngtrain.jpg
    firstngtrain.jpg
    206.2 KB · Views: 13
N

nachoman

I've got enough rail laid and wiring done so I can run through my first homemade switch. Things run through there quite smooth. Unfortunately, the diverging narrow gauge track doesn't go anywhere yet, so I can't test that direction yet.

One thing I learned, is my handlaid switch is more critical of wheels out of gauge. If things are in gauge - it works perfectly. If wheels are just slightly narrow, they bump on the guard rails. This is a good thing, though. If everything is in gauge - things run much, much better. Ti just means I made my turnout to closer tolerances than the prefabs.

I also made a short video of my work train running through the switch. I don't normally like to patronize local media fads, but youtube does let me share the video with you all for free. The quality is poor and there is no sound because I just took the video with my digital camera. Hope the link works.

http://www.youtube.com/watch?v=aMKGJ54K-rQ

Kevin
 

TrainNut

Ditat Deus
Sep 15, 2004
1,731
0
36
54
AZ
The quality is poor and there is no sound because I just took the video with my digital camera.
Looks like the switch is working great! Off the wall Q: In your experiences of uploading videos from digital sources to you tube, do you think it would work uploading a video from my cell phone? It's a 3g2 format. I've always wanted to upload videos but have never taken the time to figure out how.
 
N

nachoman

I know nothing about uploading videos from a cell phone. In fact, this is the first time I have uploaded a video of any kind :)

Kevin
 

tetters

Rail Spiking Fool!
Jan 21, 2005
879
0
16
50
Toronto, Ontario, Canada
One thing I learned, is my handlaid switch is more critical of wheels out of gauge. If things are in gauge - it works perfectly. If wheels are just slightly narrow, they bump on the guard rails. This is a good thing, though. If everything is in gauge - things run much, much better. Ti just means I made my turnout to closer tolerances than the prefabs.

Yep...that's my excuse whenever my trackwork operates less then stellar! Its the rolling stock...not my track! sign1

All kidding aside. I agree with you on that point. 9 x's out of 10 if I do encounter a problem it has more to do with the wheels being out of gauge then the trackwork itself.