1880's paycar

nkp174

Active Member
Oct 10, 2006
1,455
0
36
41
Cincinnati, O.
I've resumed work on my DSP&P paycar 051. My boxcars and waycar are awaiting super glue...so I've picked up where I left off a few months ago.

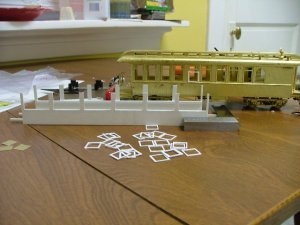
051 was built around 1879. I was paired with the office car 050 and commonly pulled by the roads only 4-4-0. The C&S rebuilt the 051 into a business car and she was renumbered 911 in 1911. The car survives along with the last South Park mogul at the Georgetown Loop. A brass model was imported a number of years ago by Hallmark...but it has many errors and is of the current business car setup...the worst error is that it is way too tall...but my dad picked up one of those for $20 a while back...so it is a nice reference point for my paycar.

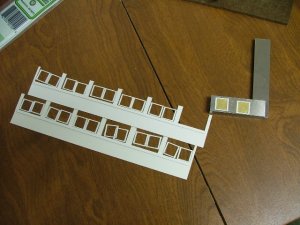
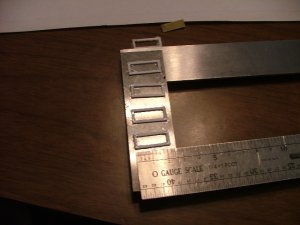
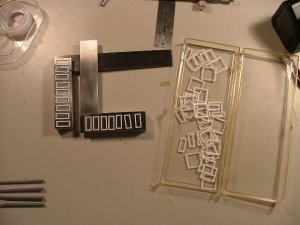
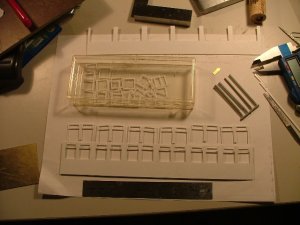
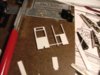
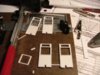
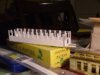
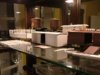
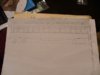
I've cleaned up the edges of the car sides...in preparation for the window assemblies. The car body is 36'2" long...my sides are currently 36'...but I'll will be shortening them to accommodate 4" corner moldings. I then spent 6-8 hours since Sunday afternoon building all 48 window panes...it's take over 500 pieces of styrene which I cut...and will actually be over 700 pieces once I've added the frames. The window panes just need a little filing. Here are some pics...
 

Attachments

  • Copy of DSCF5374.JPG
    Copy of DSCF5374.JPG
    125.1 KB · Views: 24
  • Copy of DSCF5375.JPG
    Copy of DSCF5375.JPG
    118.2 KB · Views: 16
  • Copy of DSCF5376.JPG
    Copy of DSCF5376.JPG
    119.4 KB · Views: 12
  • Copy of DSCF5377.JPG
    Copy of DSCF5377.JPG
    130.4 KB · Views: 14
  • Copy of DSCF5378.JPG
    Copy of DSCF5378.JPG
    121.8 KB · Views: 15
  • Copy of DSCF5379.JPG
    Copy of DSCF5379.JPG
    123 KB · Views: 18
N

nachoman

That's a lot of work to make all those windows, but you are doing a fine job so far. How do you plan on making the roof?

Kevin
 

nkp174

Active Member
Oct 10, 2006
1,455
0
36
41
Cincinnati, O.
I'm planning to build a a skeleton of styrene...using a layout tool to cut any curves...and then to add a layer of 0.010 styrene over that...the styrene will be several smaller pieces. I'm probably going to develop a trick or two for the end of the roof (the toughest part)...and then I'll add an additional layer on top of the roof to make it thicker/non-translucent/more durable.

After I finish this car...I'll need to start the office car which is 6' longer and has an extra set of paired windows on each side.
 

nkp174

Active Member
Oct 10, 2006
1,455
0
36
41
Cincinnati, O.
Here's an update...

I've mounted the upper panes in the frames...and glued them together in pairs with a 4" board in between per the prototype.

I've glued half of these assemblies into one of the car sides...but won't have much of a chance for the next few days to do much.

Here's everything completed so far aside from the frame which is somewhere else.

Michael
 

Attachments

  • Copy of DSCF5380.JPG
    Copy of DSCF5380.JPG
    124.7 KB · Views: 21
Michael,

this looks great again. When I think that I have a model with 700 parts - You have built the window frames and details from 700 parts alone! What for an extensive work!
It's really nice to see your fine work and I'm waiting for next steps already. Congratulation for this very fine modeling jib again!!!!
:thumb: :thumb: :thumb: :thumb:

Bernhard
 

nkp174

Active Member
Oct 10, 2006
1,455
0
36
41
Cincinnati, O.
With my first truck sideframe master encased in drying RTV...and the rest of the boxcar resting in my china cabinet...I've begun working on the ends to the pay car.

I narrowly diverted a small disaster in that the plans I was using...plans for the car after she was rebuilt into a business car...did not show windows at the vestibule end of the car. Upon looking at pictures in some of my books...I've noticed that most of the South Park passenger cars of the 1880's had windows on the ends. So I'm now attempting to find a decent picture to work off of. The office car...a near sister to the paycar...was more commonly photographed...so I'm looking for pictures of her.

After I have the first end completed...or at least taking shape...I'll post it.
 
N

nachoman

There used to be a website devoted to DSP&P/C&S passenger cars - but I think it is offline now. You may ask over at the narrow gauge discussion forum (W E ' R E B A C K !) and see if someone could come up with a good photo, or check the denver public library's photo collection (Photoswest.org)

Kevin
 

nkp174

Active Member
Oct 10, 2006
1,455
0
36
41
Cincinnati, O.
Those are good links, Nachoman. I guess I haven't been to that narrow gauge forum for over a year...since they had videos of the freshly restored #9

I've actually spent some time chasing down the webpage on the passenger cars...Hayes Hendricks is the person whom runs that site. He said he hops to have it up within the month.

I dropped a question on one of the DSP&P yahoo groups...so we'll see if anything comes from it...they're usually helpful.
 

nkp174

Active Member
Oct 10, 2006
1,455
0
36
41
Cincinnati, O.
Hayes doesn't have his website back up yet...but the shop supervisor isn't too pleased with the hold up. Here he's checkin' over the work.

Afterwards...Here's the ends under construction.

Suddenly the four sides have been glued together and are resting on the frame. I had to add 4 additional windows...2 per end...after coming to the conclusion that it probably had them.

Then there is my first operational door...24" wide and 6' tall. I've decided not to install it yet as I'm not pleased with it. I've decided that since this car was built in the railroad shops...it would have a rectangular door. My future pullman coach will have a rounded top door. I'll probably use this door in a building or something...It's going in the scrap bin (not crisp enough for my taste)
 

Attachments

  • DSCF5598.JPG
    DSCF5598.JPG
    114.6 KB · Views: 11
  • DSCF5599.JPG
    DSCF5599.JPG
    113 KB · Views: 9
  • DSCF5610.JPG
    DSCF5610.JPG
    119.9 KB · Views: 9
  • DSCF5612.JPG
    DSCF5612.JPG
    126.1 KB · Views: 12
  • DSCF5613.JPG
    DSCF5613.JPG
    116.7 KB · Views: 15
  • DSCF5620.JPG
    DSCF5620.JPG
    112.4 KB · Views: 14

nkp174

Active Member
Oct 10, 2006
1,455
0
36
41
Cincinnati, O.
And here she is on trucks next to the new 27' UP built boxcar...the inside has been airbrushed and the roof glued on...to the right of that is the B&S boxcar...also freshly airbrushed (the doors and door tracks are removable). Behind them is the waycar...with pedestals installed and one axle currently in them. The two platform cars are also in the case. I'm considering whether or not to scratch build trucks for the paycar...it's sitting on a set of PSC trucks.

Next is what will probably be my next passenger project once I complete the paycar...a pair of B&S built 40'6" coaches which were part of the same order as the B&S box and flat cars. There was also a third coach which was 6" shorter and 2" wider...it may have been an express-coach without baggage doors. I've completed my drawing through a careful cataloging of every passenger car pictured in the South Park Pictorial Supplement...and references made to John Maxwell's F&CC coach drawings, Pruitt's C&S 911 drawings, Dan Abbot's (badly inaccurate) drawings of this car, floor plans of the Carson & Colorado's 40'6" 1880 B&S coaches, and pictures of the Grizzly Flats passenger coach which was C&C coach #5. The DSP&P coaches were #3 & #5 (#4 was the other B&S car). #3 was renumbered #63 in 1885...became #1XX in 1898 (when the C&S formed), and finally C&S #56

I might do a head end car first.
 

Attachments

  • DSCF5623.JPG
    DSCF5623.JPG
    119.6 KB · Views: 16
  • DSCF5624.JPG
    DSCF5624.JPG
    115.3 KB · Views: 11
N

nachoman

I'm glad to see someone who has more unfinished rolling stock scratchbuilding projects than me. At least I hope so :)

Kevin
 

tetters

Rail Spiking Fool!
Jan 21, 2005
879
0
16
50
Toronto, Ontario, Canada
The expression on the your cat's face is priceless! That typical feline, "We are not amused." look.

Awesome job too! I'm impressed by the level of skill and attention to detail some of you guys put into your projects. Outstanding!
 

nkp174

Active Member
Oct 10, 2006
1,455
0
36
41
Cincinnati, O.
Thanks. Chester's expression is primarily due to the light in his face. I took a picture with the light off and he looks quite happy.

The most un-fun part of scratch building is definitely acquiring the material. Yesterday I went to the LHS and they were out of 1/32" thick lead sheets. I need some to stuff into my platform cars and my passenger car. I picked up enough of the sticky weights for two more cars. I'm going to look into shotgun reloading supplies...to see if I can get lead cheaper than $2.25 per car.

The biggest hurdle for me to overcome right now is that I have a bunch of cars that need brake gear. I'm going to start on that soon. I also need several sets of NWSL wheels and Coronado couplers for Christmas.

EDIT: Hayes is Hayes Hendricks...he had a beautiful webpage about the DSP&P passenger car fleet...but it's been down for 9 months or so as he moves it to a new server. I was hoping to check my work against his research.
 

Russ Bellinis

Active Member
Feb 13, 2003
4,501
0
36
78
Lakewood, Ca.
Visit site
A few years ago I bought a bag of shot from a local sporting goods/gun store. If I remember correctly, the price I paid was about $14-$15; and I gave 1/2 of the shot to a friend and fellow modeler. I still have a 3# coffee can filled almost to the brim with lead shot. The bag of shot filled 2 3# coffee cans, but needless to say it weighed much more than 6#!
 

nkp174

Active Member
Oct 10, 2006
1,455
0
36
41
Cincinnati, O.
I've got to take out the trash...and then I'll advance it forward...hopefully updating this tonight.

I saw $3 per pound for #11 which is 3" scale (in o-scale) in diameter. I hope I don't have to purchase 5 pounds worth. Still, lead weights run around $3-$4 per car for me...and I'd love to drop that down to under a $1. Dr. Wayne has also given me some ideas on casting my own thin sheets for a fraction of A-line's price and to avoid being at the mercy of the LHS having it in stock. :rolleyes:
 
N

nachoman

Or just keep your eyes to the ground when you walk down the street. I find tire weights all the time. For awhile I would collect them, then melt them in a soup can with a propane torch, and let them cool into little round ingots for storage. If I ever need lead for something, I can reheat it and pour it into a mold of whatever shape I want.

Kevin