

The Building of the Galactic Fleet
- Thread starter Chadepotts1273
- Start date
You are using an out of date browser. It may not display this or other websites correctly.
You should upgrade or use an alternative browser.
You should upgrade or use an alternative browser.
Well, I very much enjoy building your models. I really appreciate the hard work you put into them, & the incredible detail. I also find them to be at a very good level of challenging. I hope I can do you proud with this build, as well as with other ships ( yours & other designers) as this thread progresses. Feel free to offer any constructive criticism or advice.rinks:
Did I mention that I like it when other people build my models?
On the port side, parts 20 & 25 & their approximate positions.
The parts for the "cockpit, bridge?" section laid out & partially assembled. From left to right, parts 15, 16, 17, & 18. For part 19 I substituted a small section of toothpick & painted it gray. It attaches underneath the cockpit bubble. For the cockpit bubble, I substituted a plastic pea-sized bead & painted it black (sorry, paper purists).My arthritis was just too flared up this evening to attempt the very small part 19, or the cockpit bubble. 
 I also did make a failed attempt to assemble the optional=original part 17. Again arthritis frustrated my efforts, but I may try again & replace the part at a later date. It just looks better IMHO. But for now, I'll just stick with the simplified version.
I also did make a failed attempt to assemble the optional=original part 17. Again arthritis frustrated my efforts, but I may try again & replace the part at a later date. It just looks better IMHO. But for now, I'll just stick with the simplified version.The cockpit section, with all parts glued together & attached to the port side wing (part 14). I hope I got the angle positioning right with the bigger section. That's how I interpreted it from the instruction pics. The bottom pic shows the approximate position in glueing to the wing.


 I've begun a little bit of greebling with these panels on the bottom side of the main hull.
Oops! The cockpit section (the piece with the black window) must be attached at an angle:

Sorry!
(BTW, I have moved the thread into the SciFi section; it should be easier to find now. )
Sorry!
(BTW, I have moved the thread into the SciFi section; it should be easier to find now.
)- Apr 5, 2013
- 13,498
- 9,549
- 228
When I took a look at my original project folder I noticed that there was another ColMov model out there. It was buried deep inside one of our zillion threads. I have put it in the Resources to keep everything together. Have fun and enjoy!
http://www.zealot.com/resources/patrick-yorks-colonial-movers-repaint-by-nothing.1710/
This might be the very first paper model of the CM, so it is of historic value.
http://www.zealot.com/resources/patrick-yorks-colonial-movers-repaint-by-nothing.1710/
This might be the very first paper model of the CM, so it is of historic value.
Last edited:
Thank you Revell-Fan for noticing my screw up before I got much farther , & also for that front view pic of the ship. It helps to have a different perspective. I had to lightly score the glue joints on the top of the wing where it meets the main hull, & on the bottom of the cockpit tube where it glues to the wing. Fortunately I had not applied very much glue yet, so the adjustment wasn't too big of a deal. Here are some before & after pics first of my blunder, & then the adjusted angle for the cockpit section. Hope that's a bit more acceptable.
, & also for that front view pic of the ship. It helps to have a different perspective. I had to lightly score the glue joints on the top of the wing where it meets the main hull, & on the bottom of the cockpit tube where it glues to the wing. Fortunately I had not applied very much glue yet, so the adjustment wasn't too big of a deal. Here are some before & after pics first of my blunder, & then the adjusted angle for the cockpit section. Hope that's a bit more acceptable.
Last edited:
Added a few more greebles on the topside of the main hull. Hope I'm not overdoing it. Once I get in greeble-mode, it's hard to stop!

- Apr 5, 2013
- 13,498
- 9,549
- 228
It's space, if the cockpit bent over a bit, with the gravimetric plating, you'd never notice it. (I didn't!!)
Not at all!Hope I'm not overdoing it.
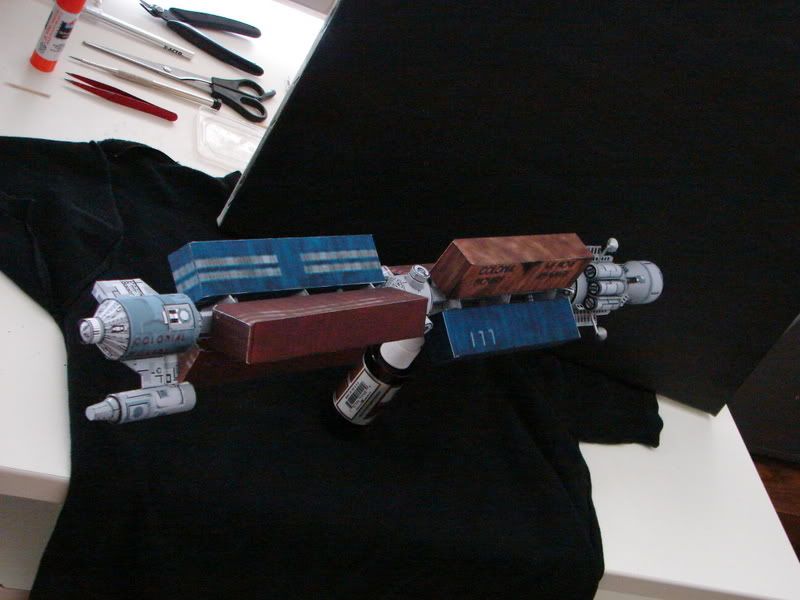
I made just a few additions this evening. Starting with some greebling with the yellow & red conduits on the starboard side & the housing they feed into. My craftsy & artistic daughter suggested I use colored paper clips , so I did & I'm very happy with the results. I also assembled the rear cone assembly with parts 11(the cone), part 26(the end cap), & parts 12(for the 4 add-ons ).Note: the cone assemblies are the same front & back for the forward(head) & mid- section, & for the front of the engine section.

 I have just a few more greebles I'd like to add for the cockpit tube & wing, then I'll move on to the mid-section of the ship.
I have just a few more greebles I'd like to add for the cockpit tube & wing, then I'll move on to the mid-section of the ship.Thank you Zathros, I appreciate that!No, you're "doing it', and damned well too!!
I made just a few additions this evening. Starting with some greebling with the yellow & red conduits on the starboard side & the housing they feed into. My craftsy & artistic daughter suggested I use colored paper clips , so I did & I'm very happy with the results. I also assembled the rear cone assembly with parts 11(the cone), part 26(the end cap), & parts 12(for the 4 add-ons ).Note: the cone assemblies are the same front & back for the forward(head) & mid- section, & for the front of the engine section.View attachment 153317View attachment 153318 View attachment 153319 I have just a few more greebles I'd like to add for the cockpit tube & wing, then I'll move on to the mid-section of the ship.
Chad,
Nice work with the Colonial mover! Great job greebling too!
Sky Seeker
Thanks Skyseeker, btw, you're earlier comment about my build of this particular ship coinciding with my moving I had to chuckle at. I really could have used a full size version of this ship to help me in my move. It's amazing how much crap can accumulate around the place in just a few short years. Now I really could use the ship to just haul some stuff off.Chad,
Nice work with the Colonial mover! Great job greebling too!
Sky Seeker

I haven't been able to do much on the CM these past few evenings. I did start putting the mid-section together ( part 28, & parts 11 for the cones). I found a wooden dowel measuring 3/8" in diameter (sorry, I'm not sure what that translates to in mm) that I'm hoping to use to reinforce the spine parts. I haven't glued it yet though, just in case it doesn't fit through the paper parts of the spine.
