Mecha Tricks: Compound Curves and Sturdy Feet

Kjev

Active Member
Dec 15, 2006
344
52
31
South Eastern Idaho
20160218_204914_zpsc1rtnv8y.jpg

I'm not real sure if this is the best forum, but since the model I'm working with is Sci-Fi, it seemed to fit.

I came up with this idea a couple of weeks ago, and experimented with it to see how well it would work. While the method seems to work well, my implementation needs more practice (you'll see.)

Curves in general are tough for me to do, and compound curves are a bugger with any paper model. I never seem to get them to come out smooth, line the edges up nicely, or not have glue boogers all over when I'm done.

So I came up with the idea of using twist-ties inside the curves to help smooth them out.

First step, choosing a victim...er...test subject. I went with the Mad Cat/Timberwolf from nebulastation.net, designed by Jan "Walter" Sluka. I chose this one because it's a fairly simple build, and I remembered from his design thread that one of his main beefs with many models was low-poly curves.

His final design has a very nicely designed bullet-nosed cockpit, just what I needed. He's also got great instructions and reference pics in the PDF.

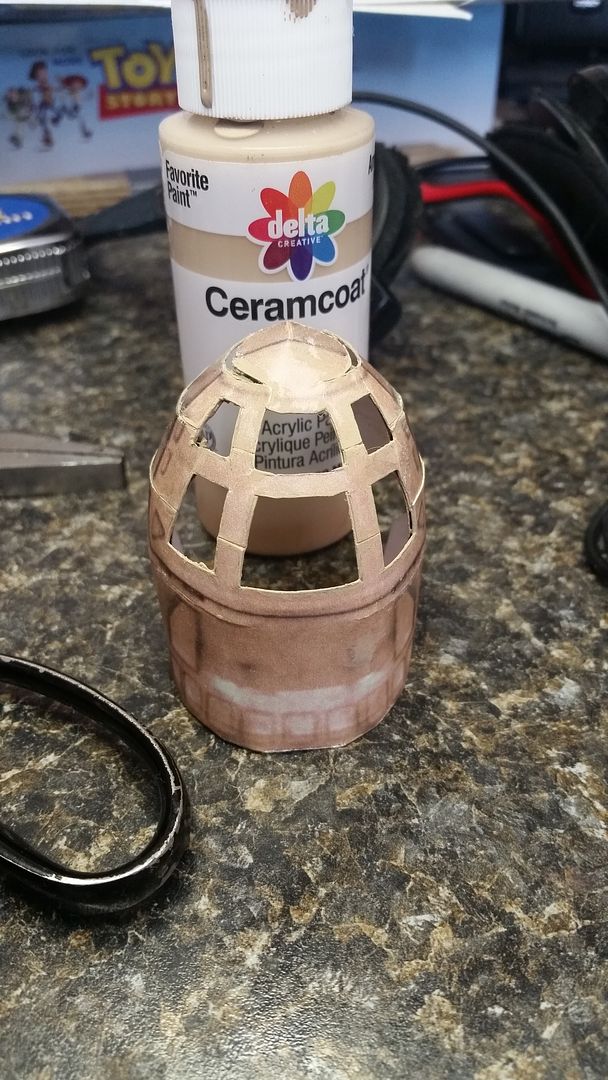
The first thing I did was open the PDF in Photoshop and change the color scheme from gray to tan. Then it was off to Kinko's to print it out.

My first mistake was not using the same guy who usually does my printing. He's a sci-fi buff and a modeling enthusiast, so he makes sure everything is printed right.

Nope, this time I got little Suzy Coed, who was in a hurry because there was, like, this totally hunky guy that came in behind me, y'know, and she just had to go talk to him, because she'd like, just die if she didn't.

She assured me that she had printed everything at the right scale, and promptly dismissed me so they could get back to discussing the latest frat party or somesuch. Silly me didn't think to actually check the printouts first, even though each page has a handy measuring scale on it. Yup. one inch on the scale was actually about 7/8 of an inch in reality.
mad.gif


All drama aside, my first step was to cut out the cockpit parts.

20160204_162731_zpsx7yisjsi.jpg


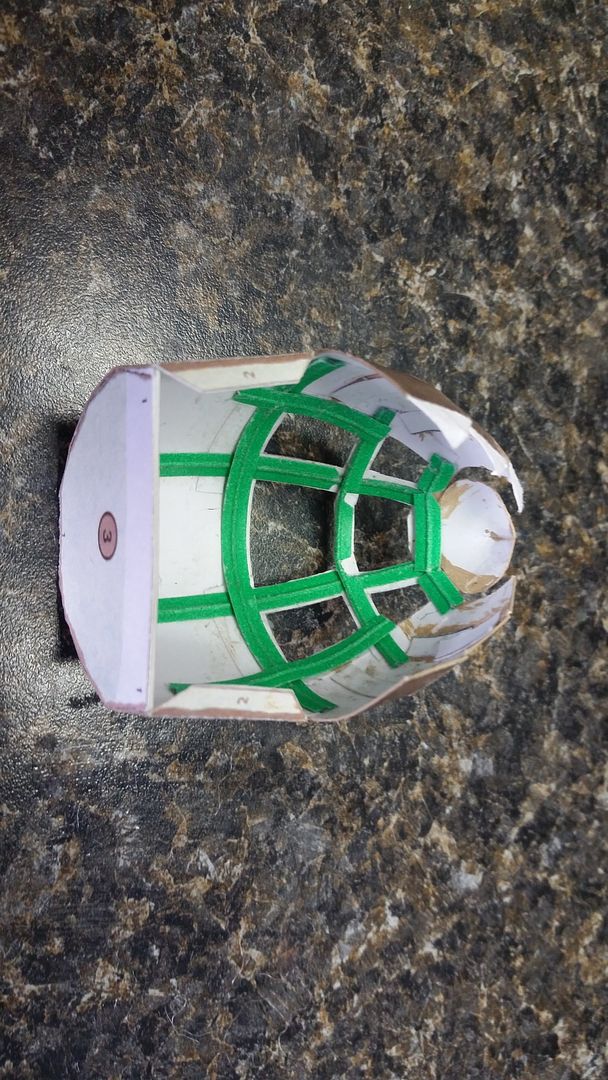
To be fair, if you haven't seen this model before, the cockpit is really one piece, but I wanted to inset the windows. When I cut them out, I got a few separate pieces. I also cut off the tabs.

The next step was to get a stack of twist-ties. My sweet wife kindly picked up a handful while she was grocery shopping. I like the kind from the produce department because the wires are covered with paper, so they glue down better. The ones that sometimes come with garbage bags are usually coated in plastic.

(Side note, these things also work great to twist into armatures for miniature trees. I used to get a handful and make trees while I "helped" my wife shop)

The wires are thin, and you can cut them with scissors. After that, glue them into place on the inside of the model.

20160206_093734_zpsfrklsg30.jpg


Wait until the glue is dry, and then you can bend the curves into the shape you want.

20160206_093759_zpsncdxmbc7.jpg


20160206_133737_zpsxyo2tsiu.jpg


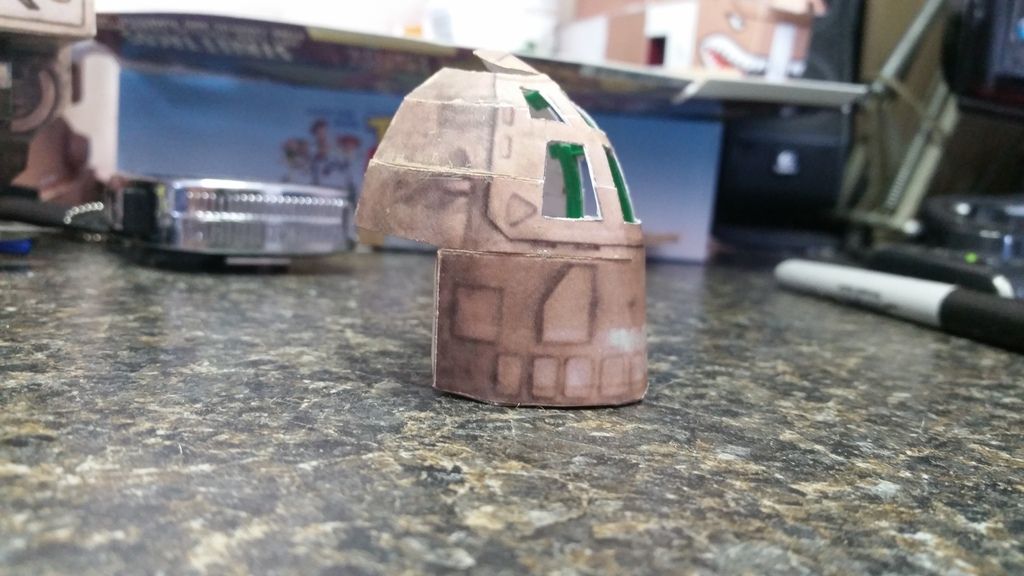
After that, I painted the edges to match, and went to work on the windows. The easiest way was to cut a basic shape, and then trim it until it fit.

Now, where I screwed up can easily be seen. Where the wires overlap, the layers ended up too thick, and some of my windows look crappy as a result.

20160206_181630_zpsvnjvvqe5.jpg


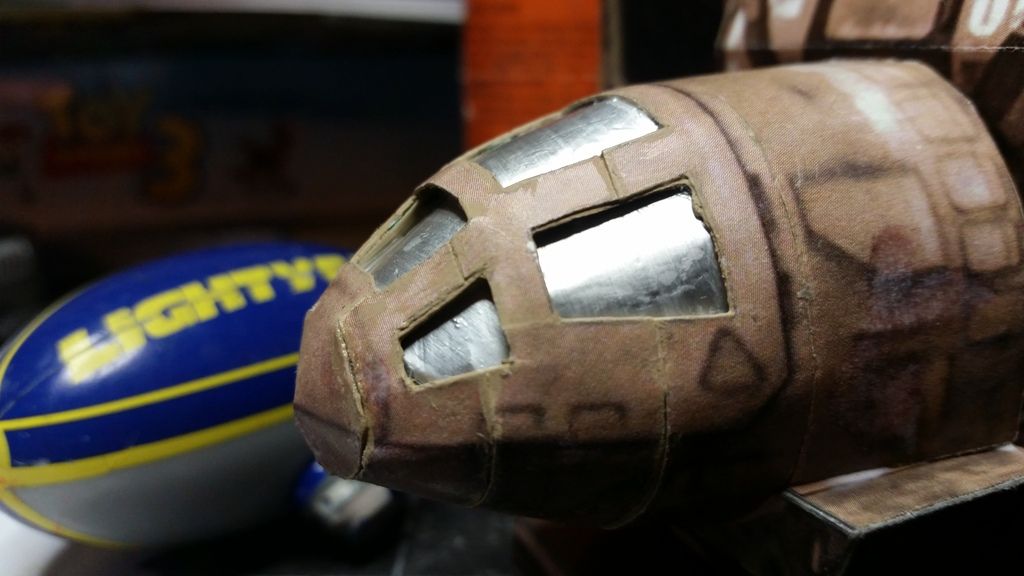
But the curves came out nice!
smile.gif


I used two layers of aluminum foil glued to some cardstock for the windows.

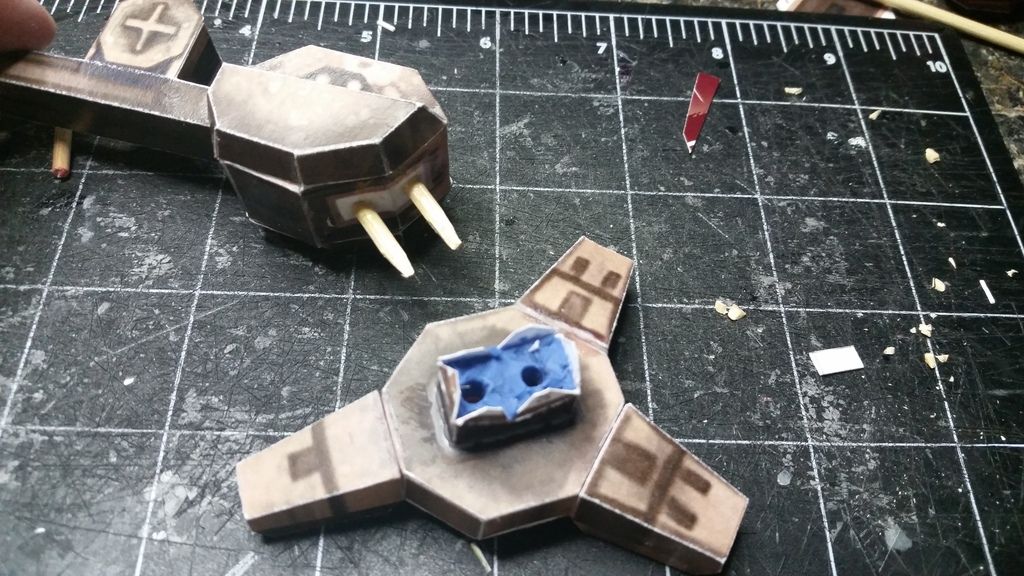
Moving on, I decided to inset the missile racks on the shoulders, and make the torso twist with my usual magnet-and-washer setup.

20160204_162850_zpssrnjhdms.jpg


20160204_162829_zpsmbv4b99f.jpg


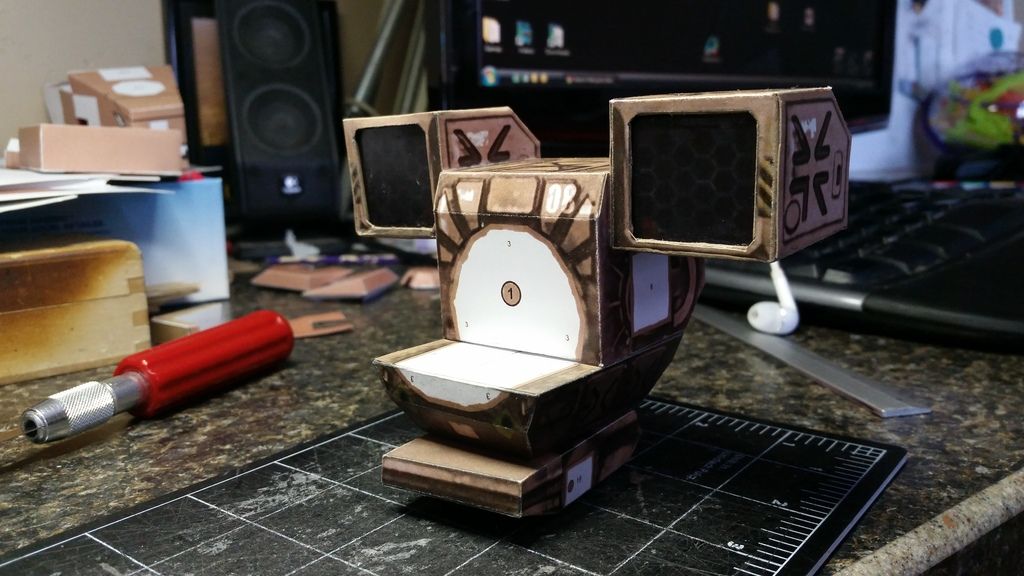
I really like how the missile racks came out.

Moving on...

Every 'mech I've ever built or designed has one weakness: the hips and legs. These get a lot of strain, especially when I beef up the torso, add magnets, washers, and so forth.

The other issue is that most mechs are top heavy, no matter how big the feet are, because there are usually more parts in the torso, head and arms. Ankles on most models seem to be fairly skinny, and consequently, seem to weaken over time.

To combat this, I started with the feet. I wanted two things out of them: Level, and solid. First, I did my best to keep everything lined up and square while I was assembling the feet.

Second, I loaded the main part of the foot with modeling clay.

20160213_123942_zpsmjw1sxcw.jpg


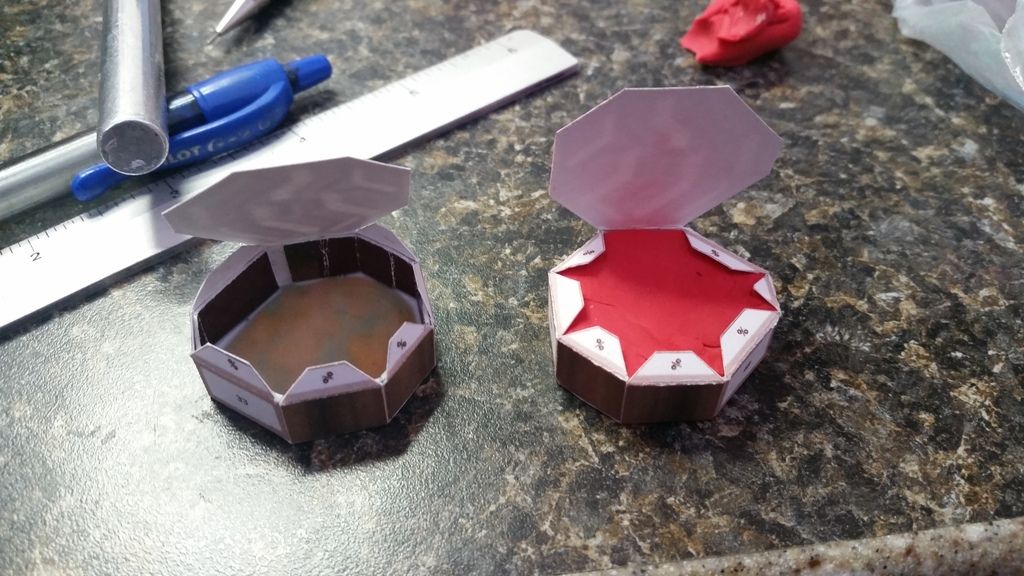
You can see how I lined the inside with cereal box cardboard to keep the clay from bulging the foot out of shape when I packed it in. When the foot was full, I just glued the top down.

20160213_124227_zpsesebj4c7.jpg


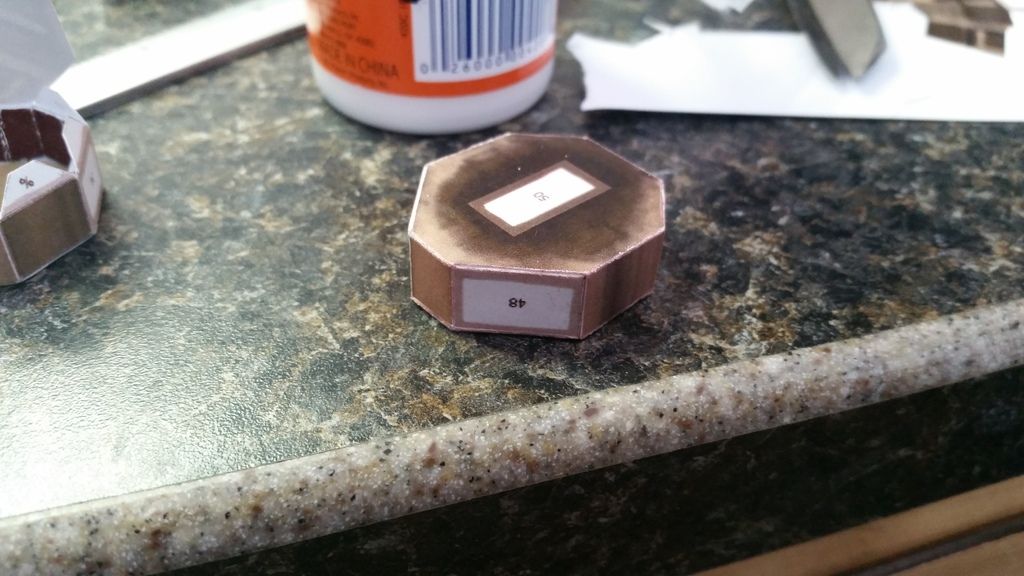
Then I did the same thing with the ankle.

20160214_185254_zpsfrg0nrlv.jpg


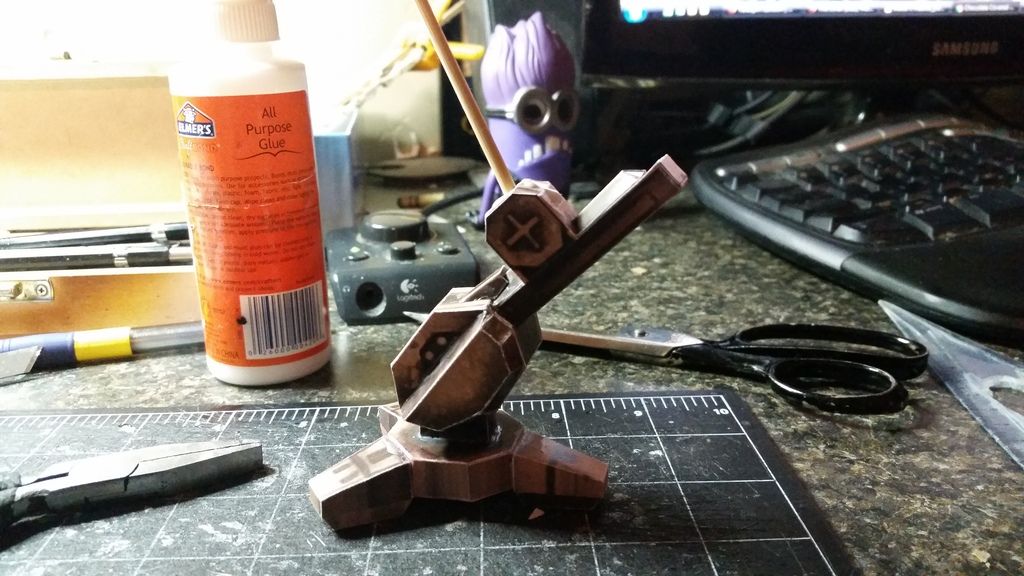
You can also see where I made two pins from bamboo skewers. These go clear into the foot. It took some careful drilling with a pin vise to make the holes, and then I widened them with the skewers.

There are also skewers that go up the inside of the leg to help stiffen it, and and another skewer that goes where the femur would go on a human.

20160215_182723_zpsx5ztcutv.jpg


When I got each section of the legs done, I filled them up with white glue. I didn't line the insides with cardboard, because I was feeling lazy.

For a couple of days, the legs were kind of squishy until the glue dried. Now they're rock solid, and pretty heavy.

I also ran a skewer horizontally from one side of the hips to the other, and glued them to the pelvis as strongly as I could. First with white glue, and then with super glue.

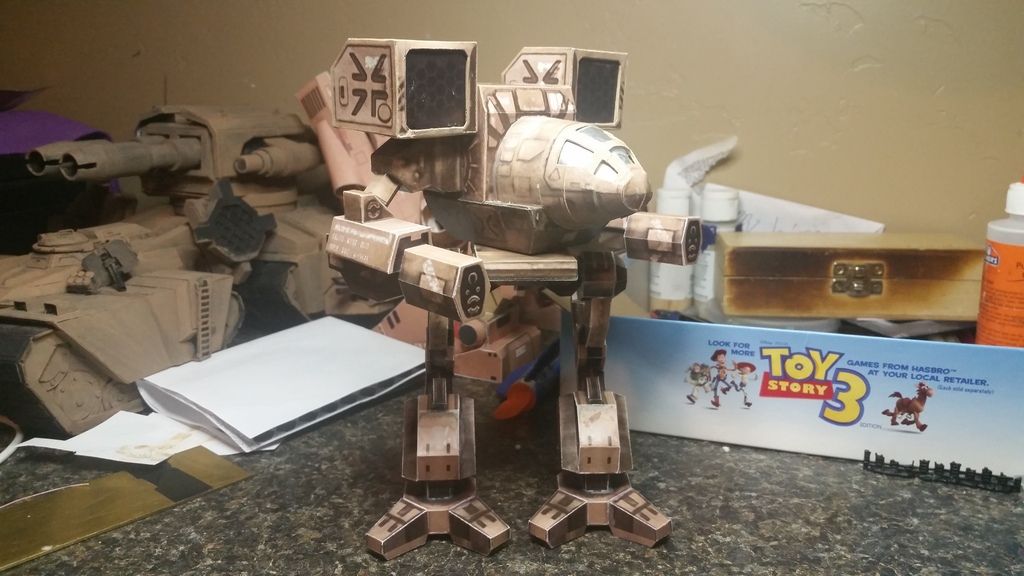
That's pretty much it. For a model, other than the windows, it turned out pretty well. The only thing I really dislike is the size.

20160218_204320_zpsk9xtl9dl.jpg


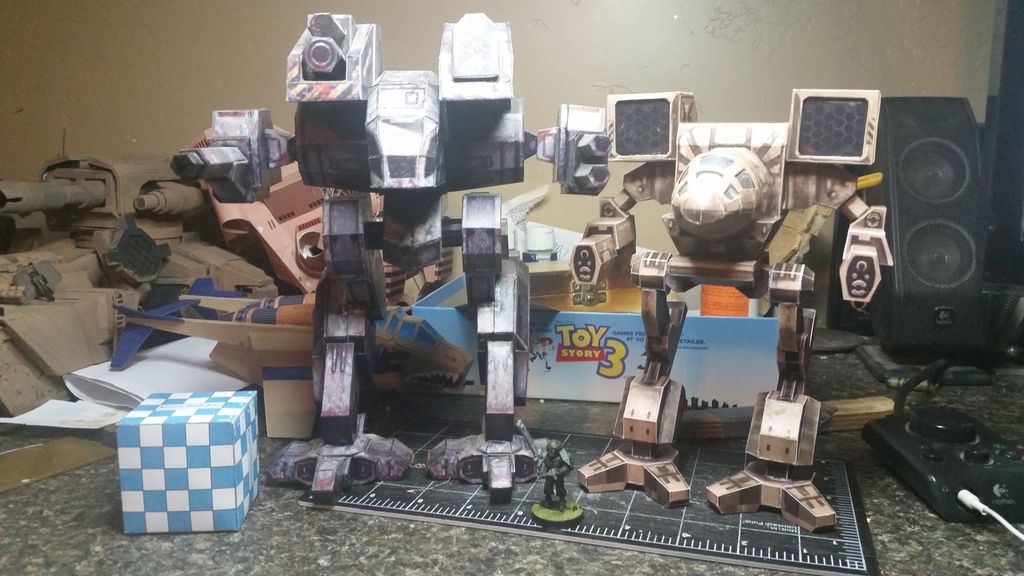
See, in Battletech (the game this comes from), the Mad Cat is a 30-40 meter tall, Heavy-class, 75-ton walking death machine. In this picture, it's next to a Hellhound, which is supposed to be a mere (!) 50 tons. The Hellhound is 1:40 scale, and the famous G'Nea Pyg down there by there feet is 28mm or about 1:40 or 1:60. At any rate, it irks me that the 75-ton mech looks about half the size of the 50-tonner. (Apologies for the lousy lighting. It was late and the rest of the house was asleep)

Maybe I'll correct the size in the future. And I'll be more picky who does my printing next time. And take a ruler to verify the size before I leave.

There's more photos in my photobucket album, here.
 

zathros

*****SENIOR ADMINISTRATOR*****
Staff member
Administrator
Moderator
Apr 5, 2013
13,499
9,551
228
Many members have been experimenting with "Waterforming". I used to use very big spoons, soak paper till wet, and then fit to spoon, and let dry. When the paper dried, it would dry with a compound curve, and I would use these to make fenders for cars from the 1930's. If you do it on a printed part, make sure you printer uses Pigment Ink, as Dye based ink runs and leeches when in contact with water..

Fellow member Dan B, King used this technique, to masterful effect, on the round end of his ship the "ASO USSC Discovery 1", from "2001: A Space Odyssey", and it looks fantastic!! :)

general_646-jpg.146532


That's a rubber ball, pushing a moise sponge from the back into the plastic bow. That he found the right size bowl still confounds me!! :)
dsc_0102-jpg.143009
 

Kjev

Active Member
Dec 15, 2006
344
52
31
South Eastern Idaho
Never thought of those techniques. Kinko's uses dye-based inks, and super glue will smear them. As a side note, I have stuffed parts with glue-soaked toilet paper to stiffen them, and it seems to help reinforce curved parts.

But these are both great ideas (and a lot less time-consuming than fiddling with pieces of wire)

Thanks, Zathros!
 

zathros

*****SENIOR ADMINISTRATOR*****
Staff member
Administrator
Moderator
Apr 5, 2013
13,499
9,551
228
Virtually all Epson printers use Pigment Ink. I believe Kinko's or Staples, will use Pigment or "Archival" ink, but you have to ask for it. Dye based ink fades due to U.V. rays where as pigment ink, if it does fade, fades very little. www.inkproducts.com can get you pigment ink for your printer at a better price than O.E.M., and anyone else for that matter. I have used this company for 7 years.!! ;)
 
  • Like
Reactions: Sky Seeker

Revell-Fan

Co-Administrator
Staff member
Administrator
Moderator
Aug 1, 2009
11,595
12,338
228
Vreden
  • Like
Reactions: Sky Seeker

Kjev

Active Member
Dec 15, 2006
344
52
31
South Eastern Idaho
I'll ask next time at Kinky's and see what they charge. Knowing them, probably something comparable to the gross domestic product of a small country. I'll let you know what they say.

Thanks for the link, RF, I'll look it up!
 

zathros

*****SENIOR ADMINISTRATOR*****
Staff member
Administrator
Moderator
Apr 5, 2013
13,499
9,551
228
Kjev, do you not have a printer/ I only ask because people give them to me, and usually it's just clogged heads. If you have one and it is not printing right, I can probably help you get it going. I am a state licensed Electronic Technician (whooey!). :)
 

t.l.williamsjr

New Member
Feb 8, 2004
59
10
8
Zathros

Could you please write up how to unclog printheads. I have an old Canon inkjet with the removable/replaceable heads that is clogged solid after several years of sitting and not being used. Got it for my mother when I got her a Toshiba laptop about 12 years ago, the laptop still works, and the printer would except for the clogged head. I would like to unclog the printhead and order a second one, but tight finances make buying a replacement impossible.
TIA
TomW
 

lizzienewell

Well-Known Member
Jun 24, 2005
289
158
56
59
Anchorage, Alaska
lizzienewell.com
That appears to be a plastic Christmas ball. You can buy them in several sizes in craft stores. They are generally available in the autumn and you've got to snap them up when you see them since they usually sell out before the holidays. It's likely that he designed the model to match the size of the ball.


That's a rubber ball, pushing a moise sponge from the back into the plastic bow. That he found the right size bowl still confounds me!! :)
dsc_0102-jpg.143009
[/QUOTE]
 

spaceagent-9

Right Hand Man and Confidant
Moderator
Jul 10, 2013
3,104
3,473
143
62
pheonix
those are great!!! especially using the bag ties!! you guys display your genius all the time i am glad to see it. also floral foam sanded into shapes and glued onto works good .
 
  • Like
Reactions: bigpetr

Kjev

Active Member
Dec 15, 2006
344
52
31
South Eastern Idaho
I haven't messed with floral foam much. I tried it back when I used to make wargames terrain, and gave up on it. Too many crumblies, and not tough enough for my standards. But inside a model...hmmmm.
 

Kjev

Active Member
Dec 15, 2006
344
52
31
South Eastern Idaho
Kjev, do you not have a printer/ I only ask because people give them to me, and usually it's just clogged heads. If you have one and it is not printing right, I can probably help you get it going. I am a state licensed Electronic Technician (whooey!). :)

I do have a printer, but we mostly use it to print off stuff for our kids (we home school them). And I'd rather go blow through Kinko's ink than my own. Theirs seems to do a better job...when the right person does it.

But I'll keep your occupation in mind, should mine ever act up! Thanks!
 

zathros

*****SENIOR ADMINISTRATOR*****
Staff member
Administrator
Moderator
Apr 5, 2013
13,499
9,551
228
What you should try is assembly foam. We used to fill very thing small (Basketball size) radar domes that were almost completely covered. The openings had to be machined. We filled them with the expanding assembly foam, which becomes very hard. The allowed us to hold the spherical domes, mount them in CNC machines, and have all the openings needed cut. I used a a four axis milling, the fourth axis being a rotary table perpendicular to the table, allowing access to any part of the dome. When finished, we dipped the foam in a special solution that dissolved it. It actually was all non-toxic, though I wouldn't drink it, it could be the worse case of constipation you ever had, maybe the last!! For a model, you would just leave the foam in and cut out what you need to with an Ex-acto blade, as it cut excellently with any sharp object and leaves to dust or the like behind, when cured. You could use "Great Stuff" but you must leave a hole for the extra foam to ooze out of. :)
 

zathros

*****SENIOR ADMINISTRATOR*****
Staff member
Administrator
Moderator
Apr 5, 2013
13,499
9,551
228
Zathros

Could you please write up how to unclog printheads. I have an old Canon inkjet with the removable/replaceable heads that is clogged solid after several years of sitting and not being used. Got it for my mother when I got her a Toshiba laptop about 12 years ago, the laptop still works, and the printer would except for the clogged head. I would like to unclog the printhead and order a second one, but tight finances make buying a replacement impossible.
TIA
TomW


Sent you a P.M. :)
 

zathros

*****SENIOR ADMINISTRATOR*****
Staff member
Administrator
Moderator
Apr 5, 2013
13,499
9,551
228
No, usually it is mixed, then poured, and starts to expand as the chemical reaction takes place. If it has no place to let the excess escape to, it will blow whatever it's in apart.
 

Kjev

Active Member
Dec 15, 2006
344
52
31
South Eastern Idaho
Interesting. I know a guy who used to spray foam insulation into houses. He'd fill up a box with a "test spray" to make sure he had the consistency right. He said they made great exploding rifle targets. I've just used the gooey crap that comes in rattle cans. It fills gaps, but always seems to end up everywhere.
 

zathros

*****SENIOR ADMINISTRATOR*****
Staff member
Administrator
Moderator
Apr 5, 2013
13,499
9,551
228
Zathros

Could you please write up how to unclog printheads. I have an old Canon inkjet with the removable/replaceable heads that is clogged solid after several years of sitting and not being used. Got it for my mother when I got her a Toshiba laptop about 12 years ago, the laptop still works, and the printer would except for the clogged head. I would like to unclog the printhead and order a second one, but tight finances make buying a replacement impossible.
TIA
TomW

In reply to your printer head cleaning question:

First, get a syringe, the they sell over the counter at most pharmacy, for giving kids medicine, at like CVS, etc. You have to find a rubber hose that fits very snug onto the tips that puncture the ink cartridges when you install them. The Syringes are tapered, so they usually work on any hose.

1) Place, by going into "change cartridge" command, the ink heads into position

2)Remove ink cartridges, shake them with your fingers, covering the openings, so the ink does not fly out. If you can hear ink, the ink is still good, if not, it's empty, or dried up, and you will need ink.

3) Take a bow of water, around a quart, place one drop of dishwashing detergent in this bowl, and fill with HOT water, making sure that the detergent has completely been absorbed.

4) Take the syringe, connect the hose, fill with water/soap solution (make sure you use a bright flashlight to see the injector holes) and make sure the hose is no less that 4 inches long. Press the hose onto the injector in, pick a side to start from, it doesn't matter. Make sure you fingers are as close as possible to the pins, using fine needle nose pliers is great for this. You do not want to damage the injector tips, but those must make a water tight connection.

5) With the holes firmly attached, star pressing on the syringe, hard, the Hot water should dissolve the ink, don't worry about run off, the water will go to the bottom of the printer and evaporate.

6) You will definitely feel when the syringe has broken through the heads, sometimes, it's a very small piece of hard ink that is now allowing the head to spray properly, in either case, do this process multiple times, on each syringe, till you have cleared them all out.

7) I usually make a text message in Black only to gets sheets of paper to go through and absorb any unwanted water. You will have to print a full color image to pass ink through all the heads. Use the image below. It will tell you much about your printers capability.

8) That should be it. Reinstall your cartridges, and let the printer go the charging ink cartridge process. Epson printers do not measure the ink, they go by the number of times you have printed, and people throw away perfectly fine cartridges, when all you really have to do is shake them violently, to spread the ink and cover the internal contacts, which signal there is ink in the cartridge.

9) That's about all you can do. The more you use your printer, the better it will run. I do this process to my Epson Workforce 1100, 13" by 19" (up to six feet really) printer, and it works like a charm. While your in there, take a very strong paper towel, with the same solution and make sure the rollers and other parts of the printer are clean. :)

If there is anything else, send me a P.M. so I answer you more quickly, I have Pneumonia, and have been slacking. I sent this in a P.M. and realized it might make good sense to post for reference. :)
 

zathros

*****SENIOR ADMINISTRATOR*****
Staff member
Administrator
Moderator
Apr 5, 2013
13,499
9,551
228
That appears to be a plastic Christmas ball. You can buy them in several sizes in craft stores. They are generally available in the autumn and you've got to snap them up when you see them since they usually sell out before the holidays. It's likely that he designed the model to match the size of the ball.


That's a rubber ball, pushing a moise sponge from the back into the plastic bow. That he found the right size bowl still confounds me!! :)
dsc_0102-jpg.143009
[/QUOTE]


Me too!!
 

spaceagent-9

Right Hand Man and Confidant
Moderator
Jul 10, 2013
3,104
3,473
143
62
pheonix
all I have is a comment about foam. florists foam at the dollar tree, that green stiff stuff, works very good and is easily shaped. some make it with fiberglass like a surfboard over it. maybe tissue paper and a wet glue could be molded this way in layers to make shapes. im sure others have said something like this before.